Setting the Windows Virtual Memory
Note
You need to set virtual memory only for Windows Server 2012 R2 and Windows Server 2016.
BMS memory is large. Therefore, the automatically allocated virtual memory will take up a lot of system disk space. You are advised to disable the virtual memory or set an upper limit for it.
Log in to the Windows VM.
Click
 in the lower left corner, right-click This PC, and choose Properties from the shortcut menu.
The System page is displayed.
In the navigation pane on the left, choose Advanced system settings.
The System Properties dialog box is displayed. By default, the Advanced tab is active.
In the Performance area, click Settings.
The Performance Options dialog box is displayed.
Click the Advanced tab, and click Change in the Virtual memory area.
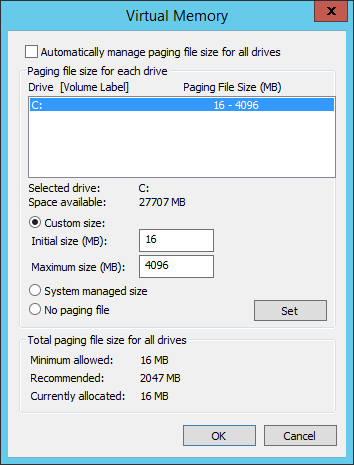
The Virtual Memory dialog box is displayed.

Figure 1 Virtual Memory dialog box
Deselect Automatically manage paging file size for all drives.
To disable the virtual memory, select No paging file. To set an upper limit for the virtual memory, select Custom size. You are advised to set the maximum virtual memory to less than 2 GB.
Click Set, In the displayed dialog box, select Yes.
Click OK.
Restart the VM to complete the virtual memory settings.