Configuring the VM Environment
After the Windows OS is installed on the VM, disable the firewall and configure remote desktop.
Windows Server 2012 R2/Windows Server 2016
Click
 in the lower left corner to start Server Manager.
In the navigation pane on the left, choose Local Server. In the right pane, click the link following Windows Firewall.
In the Windows Firewall dialog box, choose Turn Windows Firewall on or off in the navigation pane on the left.
In the Customize Settings dialog box, turn off the Windows firewall for the private and public networks.
Go back to the Local Server page and click the link following Remote Desktop.
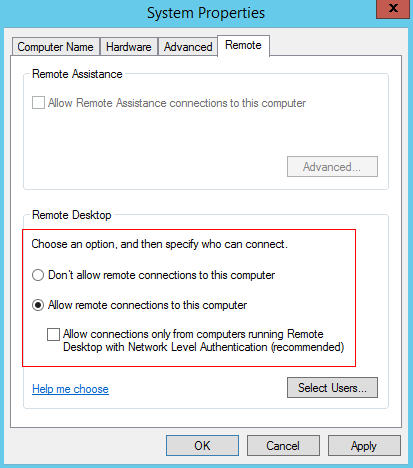
In the System Properties window, select the options shown in the red box in the following figure.
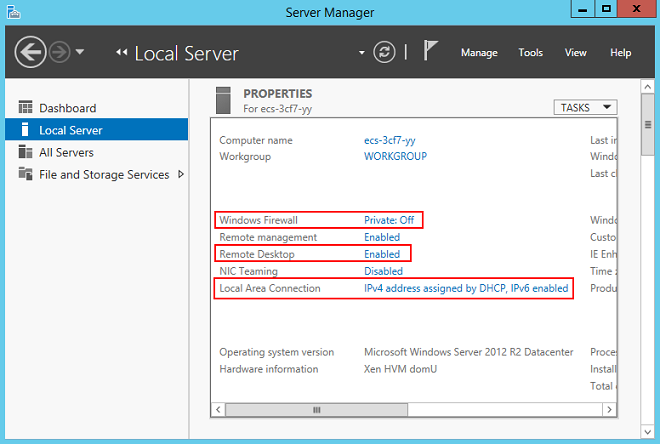
Go back to the Local Server page and verify that statuses of the properties are those shown in the red box in the following figure.
Windows Server 1709
In the CLI, enter regedit to open the registry.
Disable the firewall.
In the Registry Editor window, choose HKEY_LOCAL_MACHINE > SYSTEM > CurrentControlSet > Services > SharedAccess > Parameters > FirewallPolicy > StandardProfile and set EnableFirewall to 0.
Choose HKEY_LOCAL_MACHINE > SYSTEM > CurrentControlSet > Services > SharedAccess > Parameters > FirewallPolicy > DomainProfile and set EnableFirewall to 0.
Choose HKEY_LOCAL_MACHINE > SYSTEM > CurrentControlSet > Services > SharedAccess > Parameters > FirewallPolicy > PublicProfile and set EnableFirewall to 0.
Enable remote connections.
In the Registry Editor window, choose HKEY_LOCAL_MACHINE > SYSTEM > CurrentControlSet > Control > Terminal Server and set fDenyTSConnections to 0.