Enabling Web Tamper Protection
Before enabling WTP, you need to allocate a quota to a specified server. If the service is disabled or the server is deleted, the quota can be allocated to other servers.
The premium edition will be enabled when you enable WTP.
How WTP Prevents Web Page Tampering
Protection Type | Mechanism |
|---|---|
Static web page protection |
|
Dynamic web page protection | The proprietary RASP can detect application program behaviors, prevent attackers from tampering with web pages through application programs, and provide self-protection in Tomcat application runtime. |
Prerequisites
Choose Prevention > Web Tamper Protection and click the Servers tab. The Protection Status of the server is Unprotected.
Choose Asset Management > Servers & Quota. The Agent Status of a server is Online, and the Protection Status of the server is Unprotected.
Setting Protected Directories
You can set:
You can add a maximum of 50 protected directories to a host. For details, see "Adding a Protected Directory".
To record the running status of the server in real time, exclude the log files in the protected directory. You can grant high read and write permissions for log files to prevent attackers from viewing or tampering with the log files.
Enabling WTP
Log in to the management console.
Click
 in the upper left corner of the page, select a region, and choose Security > Host Security Service. The HSS page is displayed.
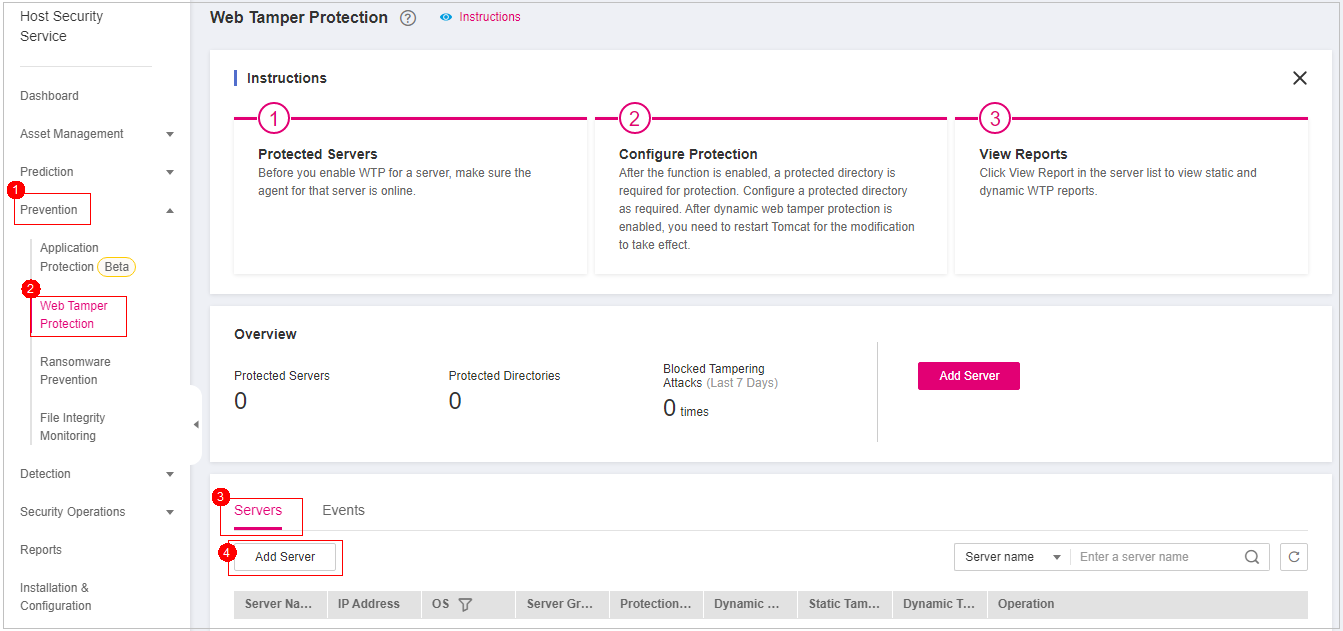
In the navigation pane, choose Prevention > Web Tamper Protection. On the Web Tamper Protection page, click Add Server.

Figure 1 Adding protected servers
On the Add Server page, click the Available servers tab. Select the target server, select a quota from the drop-down list or retain the default value, and click Add and Enable Protection.
View the server status on the Web Tamper Protection page.
Choose Prevention > Web Tamper Protection. If the Protection Status of the server is Protected, WTP has been enabled.
Important
A quota can be bound to a server to protect it, on condition that the agent on the server is online.
Disable WTP before updating a website and enable it after the update is complete. Otherwise, the website will fail to be updated.
Your website is not protected while WTP is disabled. Enable it immediately after updating your website.