Configuring Remote Backup
After a remote backup server is configured, if a file in a protected directory is changed, HSS will back up the updated file. By default, HSS backs up files in the protected directory to the local backup path configured in the Add Protected Directory dialog box. (Excluded subdirectories and file types will not be backed up). Enable remote backup to prevent local backup files from being damaged by attackers.
If the file and backup directory on the local server become invalid, you can log in to the remote backup server, obtain backup files, and manually restore the tampered websites. You can view backup paths on the Manage Remote Backup Server page. For details, see Changing a Remote Backup Server.
Constraints and Limitations
Only Linux servers support remote backup.
The server used for remote backup must meet the following requirements:
Cloud platform Linux servers
The server status is Running.
The HSS agent has been installed on the server and its Agent Status is Online.
Important
The remote backup function can be used when the Linux backup server is connected to the protected cloud server. To ensure proper backup, you are advised to select a backup server on the same intranet as your cloud server.
You are advised to use intranet servers least exposed to attacks as the remote backup servers.
Adding a Remote Backup Server
Log in to the management console.
Click
 in the upper left corner of the page, select a region, and choose Security > Host Security Service. The HSS page is displayed.
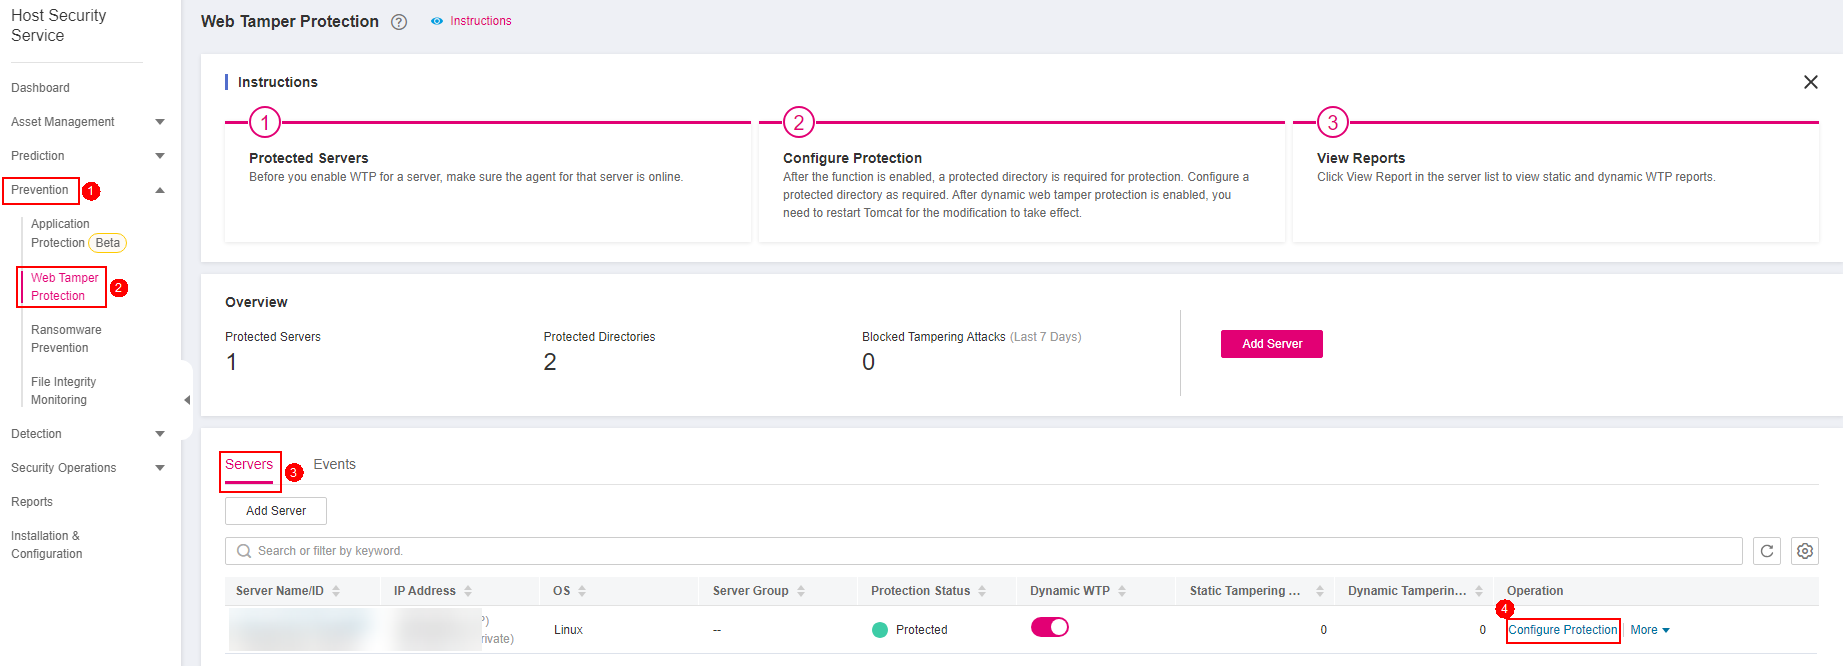
Choose Prevention > Web Tamper Protection. Click Configure Protection in the Operation column.
Note
If your servers are managed by enterprise projects, you can select an enterprise project to view or operate the asset and scan information.

Figure 1 Entering the page of protection settings
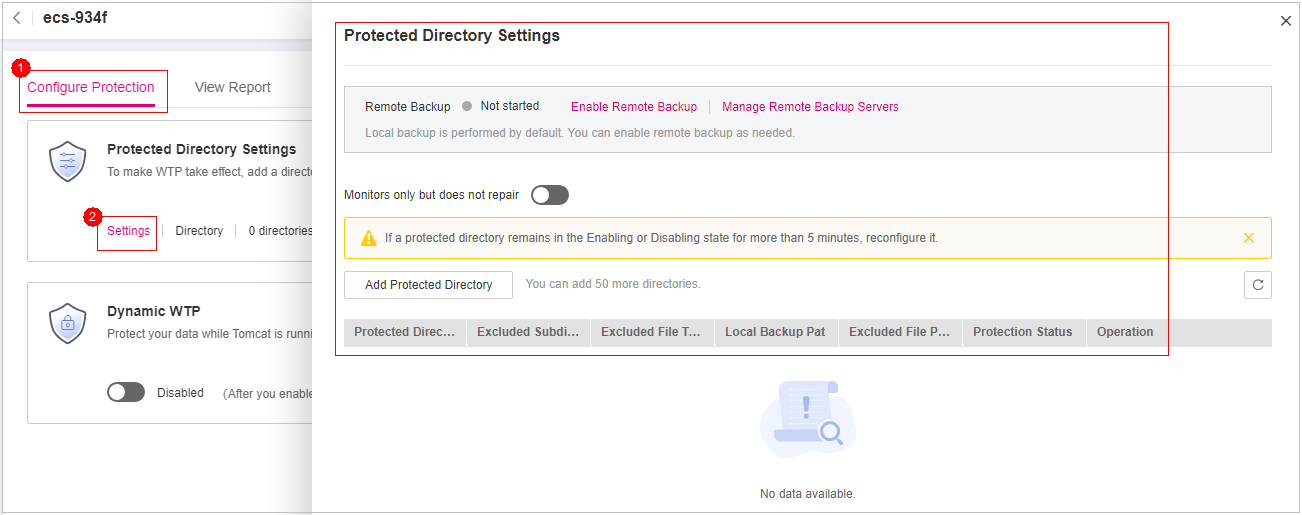
Click Settings under Protected Directory Settings.

Figure 2 Protected directory settings
Click Manage Remote Backup. In the dialog box that is displayed, click Add Backup Server.

Figure 3 Adding a Remote Backup Server
Table 1 Backup server parameters¶ Parameter
Description
Example Value
Address
This address is the private network address of the server.
192.168.0.249
Port
Ensure that the port is not blocked by any security group or firewall or occupied.
8080
Backup Path
Path of remote backup files.
If the protected directories of multiple servers are backed up to the same remote backup server, the data will be stored in separate folders named after agent IDs.
Assume the protected directories of the two servers are /hss01 and hss02, and the agent IDs of the two servers are f1fdbabc-6cdc-43af-acab-e4e6f086625f and f2ddbabc-6cdc-43af-abcd-e4e6f086626f, and the remote backup path is /hss01.
The corresponding backup paths are /hss01/f1fdbabc-6cdc-43af-acab-e4e6f086625f and /hss01/f2ddbabc-6cdc-43af-abcd-e4e6f086626f.
If WTP is enabled for the remote backup server, do not set the remote backup path to any directories protected by WTP. Otherwise, remote backup will fail.
/hss01
Click OK.
Setting remote backup
Log in to the management console.
Choose Prevention > Web Tamper Protection. Click Configure Protection in the Operation column.
Note
If your servers are managed by enterprise projects, you can select an enterprise project to view or operate the asset and scan information.

Figure 4 Entering the page of protection settings
Click Settings under Protected Directory Settings.

Figure 5 Protected directory settings
Click Enable Remote Backup and select a remote backup server.
Click OK to start remote backup.
Changing a Remote Backup Server
Log in to the management console.
Choose Prevention > Web Tamper Protection. Click Configure Protection in the Operation column.
Note
If your servers are managed by enterprise projects, you can select an enterprise project to view or operate the asset and scan information.

Figure 6 Entering the page of protection settings
Click Settings under Protected Directory Settings.

Figure 7 Protected directory settings
Click Manage Remote Backup Servers. The Manage Remote Backup Servers page is displayed. Click Edit in the Operation column to modify the information about the remote backup server.
Click OK.