Creating a VPC Attachment
Scenarios
This section describes how to attach a VPC to an enterprise router so that the VPCs attached to the enterprise router can communicate with each other.
Notes and Constraints
If you use the propagated routes of a VPC attachment, the route table of the enterprise router automatically learns the VPC CIDR block as the destination of routes. The CIDR block cannot be changed. To ensure that routes in the route table do not conflict, the CIDR blocks of all VPCs attached to the enterprise router cannot overlap. Otherwise, communication fails.
If your existing VPCs have overlapping CIDR blocks, do not use propagated routes. Instead, manually add static routes to the route table of the enterprise router. The destination of the routes can be VPC subnet CIDR blocks or smaller ones.
Procedure
Log in to the management console.
Click
 in the upper left corner and select the desired region and project.
Click Service List and choose Networking > Enterprise Router.
The Enterprise Router page is displayed.
Search for the target enterprise router by name.

Figure 1 Searching for an enterprise router
Go to the Attachments tab using either of the following methods:
In the upper right corner of the enterprise router, click Manage Attachment.
Click the enterprise router name and click Attachments.
On the Attachments tab, click Create Attachment.
The Create Attachment page is displayed.
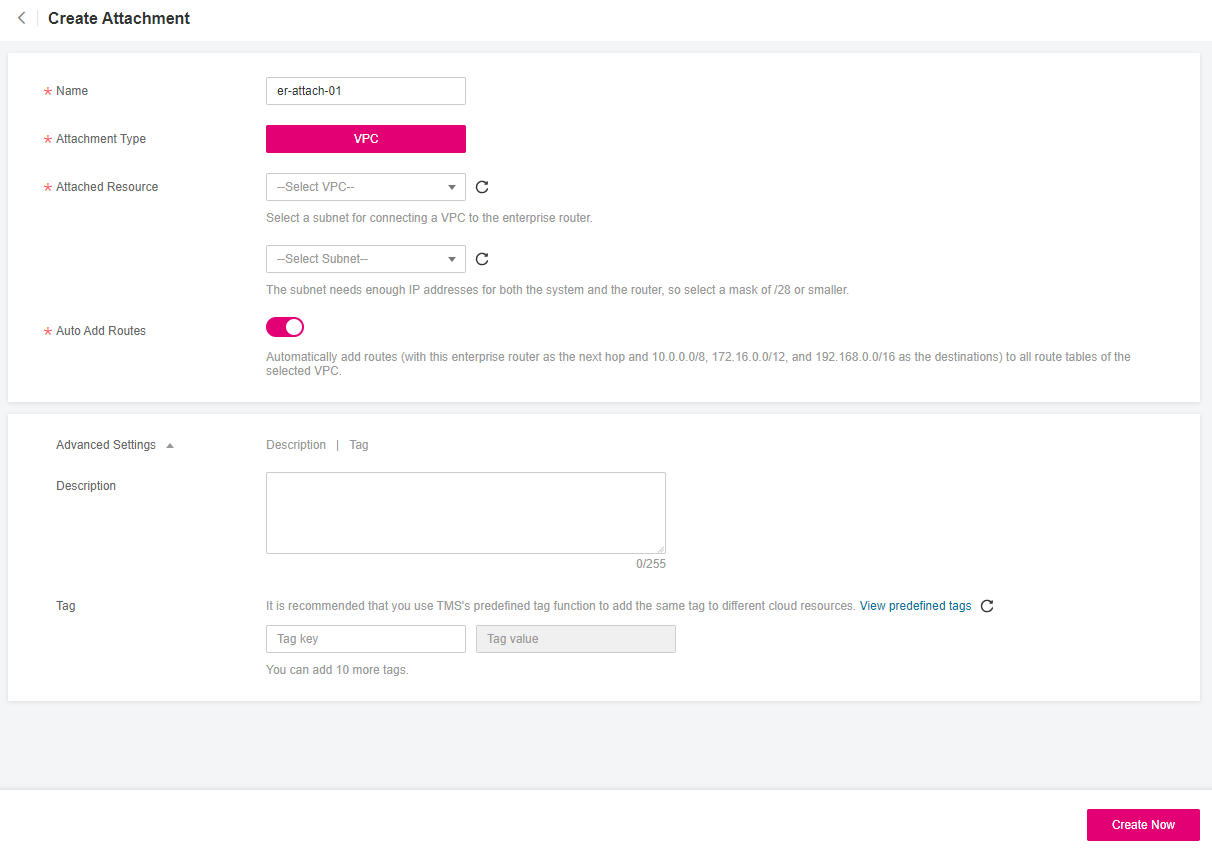
Figure 2 Create Attachment
Configure the parameters based on Table 1.
Table 1 Parameters for adding a VPC attachment¶ Parameter
Setting
Example Value
Name
Mandatory
Enter an attachment name. The name:
Must contain 1 to 64 characters.
Can contain letters, digits, underscores (_), hyphens (-), and periods (.).
er-attach-01
Attachment Type
Mandatory
Select VPC, indicating that a VPC is to be attached to the enterprise router.
The methods for creating attachments vary depending on the attachment type. For details, see Attachment Overview.
VPC
Attached Resource
Mandatory
Select the VPC to be attached to the enterprise router. You can enter a VPC name to quickly find the target VPC.
Select a subnet in the selected VPC. You can enter a subnet name to quickly find the target subnet.
You can select any subnet in the VPC. All subnets in the same VPC can communicate with each other by default and the enterprise router can connect to the entire VPC.
You are advised to select a subnet that is dedicated for connecting to the enterprise router. To ensure that the subnet has enough IP addresses for the system and the enterprise router, make the subnet mask /28 or smaller.
VPC: vpc-A
Subnet: subnet-A01
Auto Add Routes
Optional
Enable this option if you want to automatically add routes (with this enterprise router as the next hop and 10.0.0.0/8, 172.16.0.0/12, and 192.168.0.0/16 as the destinations) to all route tables of the selected VPC.
Do not enable this option if an existing route in the VPC route tables has a destination set to 10.0.0.0/8, 172.16.0.0/12, or 192.168.0.0/16 because the routes will fail to be added. After the attachment is created, manually add routes to the VPC route tables. For details, see Step 5: (Optional) Add Routes to VPC Route Tables.
Note
This parameter is only displayed when a VPC attachment is created. It cannot be enabled after the VPC attachment is created.
Enable
Description
Optional
Describe the attachment for easy identification.
-Tag
Optional
Add tags to help you quickly find your attachment.
For details, see Overview.
Tag key: test
Tag value: 01
Click Create Now.
The attachment list is displayed.
Check the attachment status.
If the status changes from Creating to Normal, the attachment is successfully created.
Follow-up Procedure
If Default Route Table Association and Default Route Table Propagation are not enabled for an enterprise router, you need to:
Create a custom route table for the enterprise router. For details, see Creating a Route Table.
Create associations for the attachments of the enterprise router. For details, see Creating an Association for an Attachment in a Route Table.
Use either of the following methods to add routes for the attachment to the route table:
Create a propagation in the route table. For details, see Creating a Propagation for an Attachment in the Route Table.
After the propagation is created, routes of the attachments to the enterprise router will be automatically propagated to the route table of the enterprise router.
Add static routes to the route table. For details, see Creating a Static Route.