How to create an Object Storage
1. About
Use this component to deploy an Object Storage (OBS) on Open Telekom Cloud.
To create an OBS, an access key is required. Users can either create an access key manually or use the property auto_create_access_key of the component.
2. Requirements
Users who deploy an application with OBS, they must have the permission OBS Administrator set in IAM. Alternatively, they must have the permissions with following bucket policies:
obs:bucket:Get*,obs:bucket:CreateBucket,obs:bucket:DeleteBucket*(permissions to get, create, and delete buckets).obs:object:Get*,obs:object:PutObject,obs:object:DeleteObject.(permissions to get, create, and delete objects in the bucket).obs:bucket:ListBucket(permissions to list all objects in the bucket).obs:bucket:ListBucketVersions(permissions to list object versions in a bucket).
3. How to use
3.1 How to create an OBS bucket?
Drop the ObjectStorage component.
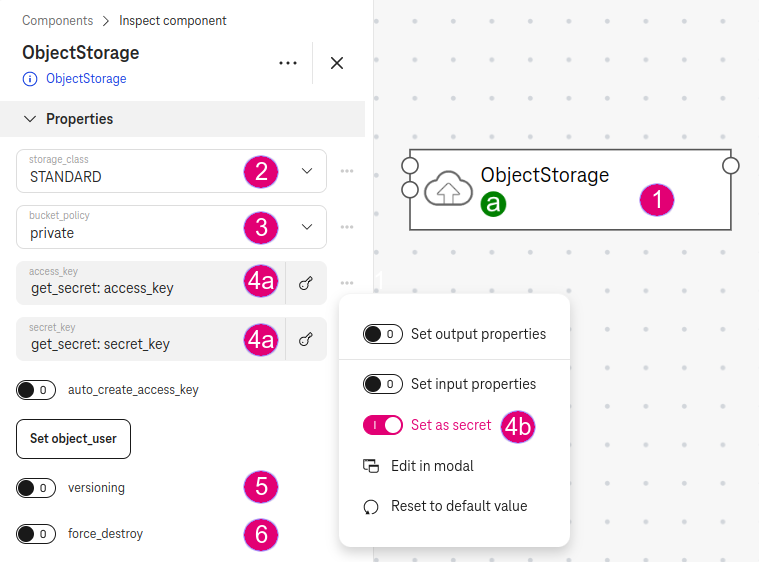
Specify the storage_class (e.g.,
STANDARD).
Choose
STANDARDfor frequently-accessed,WARMfor infrequently-accessed less than 12 times a year with quick response, andCOLDfor rarely-accessed averagely once a year, data archiving and long-term data backups.
Specify the bucket_policy (e.g.,
private).
Choose
public-readto allow anyone to read objects in the bucket,public-read-writeto allow anyone to read, write, or delete objects in the bucket, andprivateto allow only users with an access key can access the bucket.
Specify the access_key and secret_key (Step 4). If you do not want to expose the keys in plaintext, set it as a secret (Step 4b).
Tip
The access key is required for a user to create an Object Storage. You can create your access key in the Open Telekom Cloud Console in the My Credentials section.

Figure 1. ObjectStorage
(Optional) Enable versioning to enable versioning in the bucket. Defaults to
Disabled.(Optional) Enable force_destroy to auto-delete all objects in the bucket during the undeployment. If it is
disabled, the undeployment stops with error, when there are objects in the bucket and users have to delete the objects manually.
3.2 How to auto create an access key?
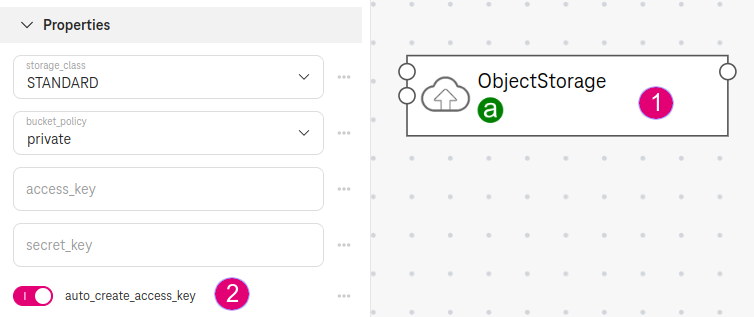
Enable auto_create_access_key if you do not wish to specify an access key manually (as in Step 4).

Figure 2. Set auto create an access key
Expected result:
Before the deployment, an access key is auto-created for the user (who deploys the application):

Figure 3. An access key is auto-created before the deployment starts
In the My Credentials Section of the Open Telekom Cloud console, you can see the new access key is created:

Figure 4. View access key on the Open Telekom Cloud console
In the topology, you can reference to the access key by using the intrinsic function get_secret: access_key and get_secret: secret_key.
Important
If you enable auto_create_access_key, the auto-created access key is auto-deleted when you delete the application.
3.3 How grant another user to upload objects to the bucket?
When a user deploys the application, he or she is the bucket owner of the bucket and has full control over the bucket. You can also specify another user to upload and delete objects in the bucket for you:
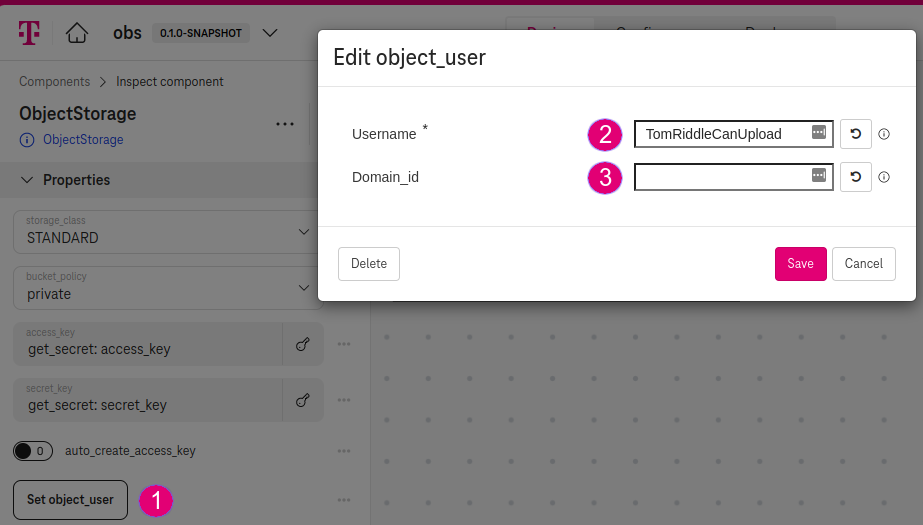
Click Set object_user
Specify username of the user (e.g.,
TomRiddleCanUpload).(Optional) Specify domain_id if the user is in another domain. Left empty, if the user is in the same domain as the bucket owner.

Figure 5. Set object_user
Expected result:
After the deployment completes, the bucket is configured with the following policy to allow the given user TomRiddleCanUpload to upload and delete objects:
{
  "Statement":[
    {
      "Sid":"SpReadWrite1660841709718",
      "Effect":"Allow",
      "Principal":{
        "ID": [ "domain/<DOMAIN_ID>:user/TomRiddleCanUpload" ]
      },
      "Action":[
        "GetObject",
        "PutObject",
        "GetObjectVersion",
        "DeleteObjectVersion",
        "DeleteObject"
      ],
      "Resource":[ "<BUCKET_NAME>/*" ]
    }
  ]
}
3.4 How to get the bucket address?
Go to attributes.
Set the attribute bucket_id and bucket_domain_name as output properties.

Figure 6. Set bucket_id and bucket_domain_name attributes as output properties
Expected result:
The deployment will output bucket_id (e.g., obs-objectstorage-68aca548) and bucket_domain_name (e.g., obs-objectstorage-68aca548.obs.eu-de.otc.t-systems.com):

Figure 7. Deployment outputs bucket_id and bucket_domain_name