Ansible Galaxy
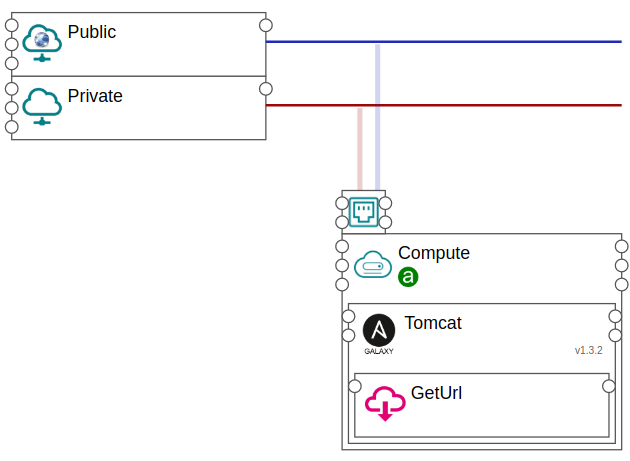
The following example shows how to deploy a web application on Tomcat using the AnsibleGalaxy component. We will use the galaxy zaxos.tomcat-ansible-role to deploy Tomcat.

Figure 1. Ansible Galaxy example
Tip
You can find this example under New Application / Topology Template / Ansible-Galaxy.
Step 1. Create compute
Design a compute with access to public network.
Set distribution to
centOS.

Figure 2. Create a compute with public access
The ansible galaxy in this example only works on CentOS/RHEL 7 so we have to set the distribution for the compute node.
Step 2. Create AnsibleGalaxy Tomcat
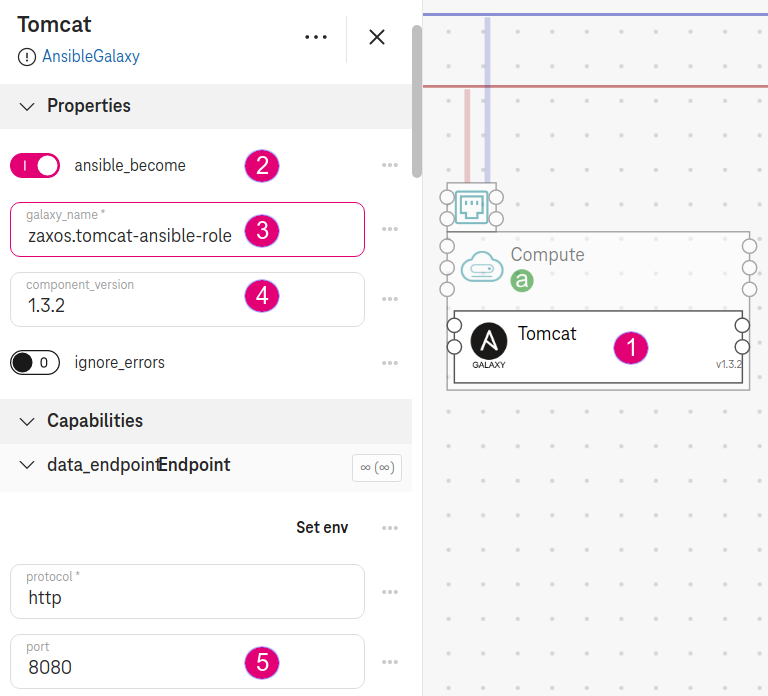
Drop the AnsibleGalaxy on the compute. Name it
Tomcat.Set galaxy_name to
zaxos.tomcat-ansible-role. This is the name of the galaxy to install.Set component_version to
1.3.2. This is the tag of the GIT repository zaxos.tomcat-ansible-role. By default, it is set tomaster.Set port to
8080. The orchestrator will create a security group to allow incoming traffic on port 8080 automatically.

Figure 3. Ansible Galaxy properties
Step 3. Define ansible variables
Write a yml file (e.g.,
tomcat_vars.yml):
# In this example, we configure the ansible galaxy to deploy Tomcat at :code:`/opt`
# and listen on port :code:`8080`.
tomcat_version: 8.5.23
tomcat_install_path: /opt
tomcat_port_connector: 8080
tomcat_permissions_production: True

tomcat_users:
  - username: "tomcat"
    password: "t3mpp@ssw0rd"
    roles: "tomcat,admin,manager,manager-gui"
See also
The ansible variables above are from the galaxy zaxos.tomcat-ansible-role. Take a look at the given galaxy to see which variables are available and customize them according to your needs.
Upload
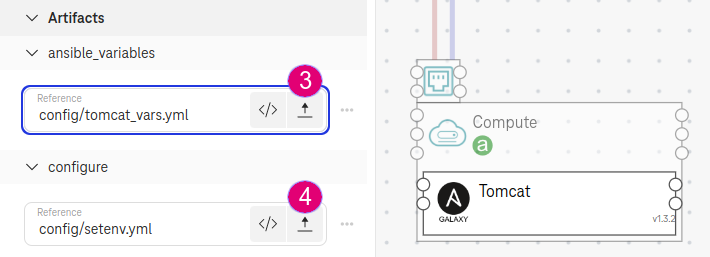
tomcat_vars.ymland select it as the artifact ansible_variables.

Figure 4. Ansible Galaxy variables
Step 4. Configure AnsibleGalaxy
By default, Tomcat uses Ipv6, so we write an ansible task (e.g.,
setenv.yml) to configure Tomcat to listen on IPv4:
- name: "Tell tomcat to listen for ipv4 instead of ipv6"
  copy:
    dest: "/opt/tomcat/bin/setenv.sh"
    content: |
      JAVA_OPTS="$JAVA_OPTS -Djava.net.preferIPv4Stack=true -Djava.net.preferIPv4Addresses=true"
    owner: tomcat
    group: tomcat
- name: Restart tomcat to enable ipv4
  systemd:
    state: restarted
    daemon_reload: yes
    name: tomcat
- name: "Flush firewall (optional)"
  shell: iptables -F INPUT
  args:
    executable: /bin/bash
Upload
setenv.ymland select it as the artifact configure.
Note
This example shows how to execute additional tasks after the ansible galaxy is applied.
Step 5. Deploy the .war file
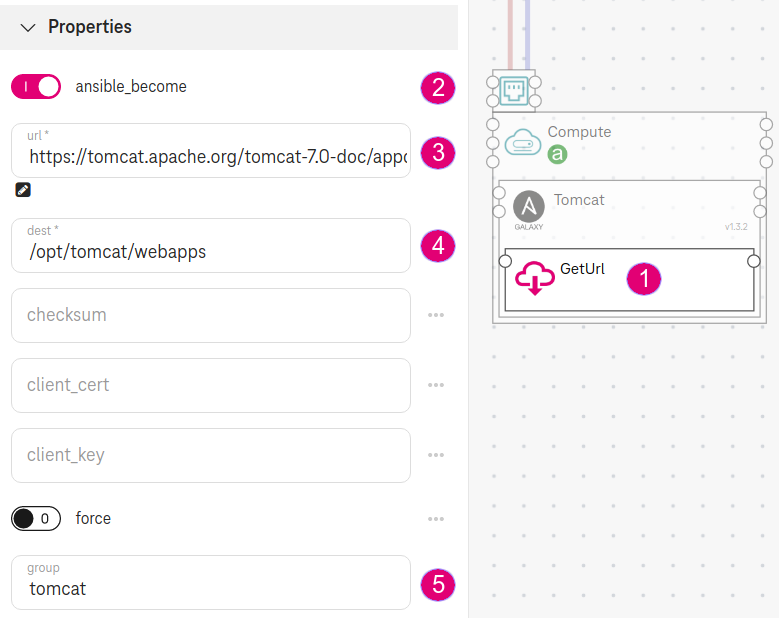
Drop GetUrl on the AnsibleGalaxy component. This component downloads a file on the Compute node after the Ansible Galaxy has completed.
Check the box ansible_become. This makes sure the file is created on the Compute node with no permission issues.
Set url to
https://tomcat.apache.org/tomcat-7.0-doc/appdev/sample/sample.war. This will download thesample.warfile from the given url. Here we use thesample.warfile from the Tomcat sample web application.Set dest to
/opt/tomcat/webapps. This is thewebappslocation inside theCATALINA_HOMEof Tomcat. Thesample.warfile will be created in this directory.Set group to
tomcat. This will set the permission of thesample.warfile to the group tomcat. The ansible galaxy zaxos.tomcat-ansible-role will create this group for you beforehand.

Figure 5. Using geturl
Step 6. Define the deployment output (optional)
Select app_url as outputs properties. The deployment will output the web application URL for you.

Figure 5. Ansible Galaxy output
Expected result
Access the app_url
http://<public_ip>:8080/sample/

Figure 6. Sample web application