Uploading an Image Through the Client
Scenario
This section walks you through the steps of uploading an image to SWR through the client by taking the nginx:v1 image built in Basics of the Container Engine as an example. Uploading an image through the client is to run Docker commands on the client where Docker is installed to push the image to an image repository of SWR.
Note
Each image layer uploaded through the client cannot exceed 10 GB.
Notes and Constraints
Each image layer uploaded through the client cannot exceed 10 GB.
The Docker client version must be 1.11.2 or later.
Prerequisites
You have created an organization in SWR. For details, see Creating an Organization.
If you use an ECS that is not a CCE node to connect to SWR using a private network address, configure insecure-registries as follows:
Modify the /etc/docker/daemon.json file. If the file does not exist, manually create it. Add the following content to the file:
{
    "insecure-registries": [
        "{Intranet address}"
    ]
}
To obtain the value of {Intranet address}, log in to the SWR console. On the Dashboard page, click Generate Login Command and obtain the private network address (IP:20202) in the private network command.
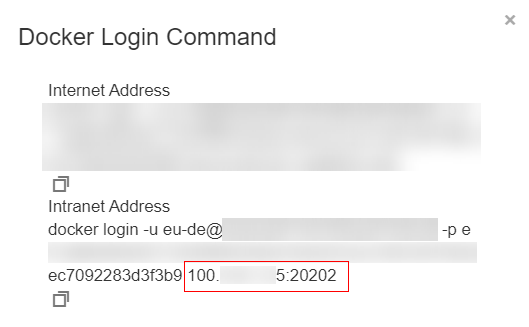
Figure 1 Obtaining the private network address
Note
If insecure-registry has been configured in the DOCKER_OPTS configuration item in the /etc/default/docker file, you do not need to modify the /etc/docker/daemon.json file.
Run the following command to add the private network IP address to the end of the DOCKER_OPTS configuration item:
vi /etc/default/docker
Example:
# Use DOCKER_OPTS to modify the daemon startup options. DOCKER_OPTS="--insecure-registry={existing configurations} --insecure-registry={Intranet address}"Restart Docker for the configuration to take effect.
sudo systemctl daemon-reload
sudo systemctl restart docker
Procedure
Access SWR.
Log in to the SWR console and the VM running the container engine as the root user.
In the navigation pane on the left, choose My Images and then click Upload Through Client. On the page displayed, click Generate a temporary docker login command and click
 to copy the command.
Figure 2 Obtaining a docker login command
Note
A temporary login command is valid for 24 hours. For details about how to obtain a login command that will remain valid for a long term, see Obtaining a Long-Term Valid Login Command. After you obtain a long-term valid login command, your temporary login commands will still be valid as long as they are in their validity periods.
The domain name at the end of the login command is the image repository address. Record the address for later use.
Run the docker login command on your Docker client (a device that has Docker installed).
The message "Login Succeeded" will be displayed upon a successful login.
Run the following command on the device where Docker is installed to label the nginx image:
docker tag [Image name 1:tag 1] [Image repository address]/[Organization name]/[Image name 2:tag 2]
In the preceding command:
[Image name 1:tag 1]: Replace it with the actual name and tag of the image to upload.
[Image repository address]: You can query the address on the SWR console, that is, the domain name at the end of the login command in 1.b.
[Organization name]: Replace it with the name of the organization created.
[Image name 2: tag 2]: Replace it with the desired image name and tag.
Example:
docker tag nginx:v1 swr.eu-de.otc.t-systems.com/group/nginx:v1
Push the image to the image repository by running the following command:
docker push [Image repository address]/[Organization name]/[Image name 2:tag 2]
Example:
docker push swr.eu-de.otc.t-systems.com/group/nginx:v1
The following information will be returned upon a successful push:
6d6b9812c8ae: Pushed
695da0025de6: Pushed
fe4c16cbf7a4: Pushed
v1: digest: sha256:eb7e3bbd8e3040efa71d9c2cacfa12a8e39c6b2ccd15eac12bdc49e0b66cee63 size: 948
To view the pushed image, refresh the My Images page.