Building a SpringBoot 2.x REST FunctionGraph
Overview
This guide shows how to use SpringBoot to develop applications and deploy services to FunctionGraph.
This section takes a slightly modified version of the https://spring.io/guides/gs/rest-service/ project of Spring.io as an example and deploys it to FunctionGraph using HTTP functions.
Note
Full sample can be found in GitHub repository: doc-sample-springboot-2.x-rest
Provided example here uses Java 11 with SpringBoot v2.7.17.
Operation process
To deploy an existing project to FunctionGraph, you usually only need to change: - the project listening port number to 8000, - create a bootstrap file in the same directory as the jar package, and - write the command to execute the jar package.
Step 1: Configure SprintBoot web port
The HTTP function currently supports only port 8000. You need to configure
the project web port to 8000 in SpringBoot application.yaml.
spring:
  application:
    name: doc-sample-springboot-2.x-rest

server:
  port: 8000

logging:
  pattern:
    console: "%clr(%d{yyyy-MM-dd'T'HH:mm:ss.SSS'Z', UTC}) '%X{x-cff-request-id}' %p %F:%L %t - %m%n"
Step 2: Create bootstrap file
Create a bootstrap file in the same directory as the jar package
and enter the startup parameters.
Check line 1 of bootstrap file for correct java runtime version, for availabe Runtimes paths,
see Table 1 Paths for different runtimes.
/opt/function/runtime/java11/rtsp/jre/bin/java \
  -Dfile.encoding=utf-8 \
  -cp $RUNTIME_CODE_ROOT/functiongraph-samples-doc-springboot-2x.jar:$RUNTIME_CODE_ROOT/lib/* \
  com.opentelekomcloud.samples.springboot.RestServiceApplication
Note
The Java runtime environment can be called directly in the FunctionGraph bootstrap without the need for additional installation.
Step 3: Create deployment zip file
The structure of the deployment zip file is:
 /
 ├─ lib
 |  ├─ dependancy1.jar
 |  ├─ dependancy2.jar
 |  └─ ...
 |
 ├─ doc-sample-springboot.jar
 └─ bootstrap
To create the deployment zip file run in project root:
doc-sample-springboot-2.x-rest$ mvn package
This will create the deployment zip file in folder target using the Apache Maven Assembly Plugin .
For details see:
Step 4: Create FunctionGraph HTTP Function
Create an HTTP function and upload the packaged zip package. For details, see Creating an HTTP Function.
Step 5: Verify the results
On the function details page, select the function version and click
Configure Test Events. The Configure Test Events page pops up.
Select the event template “API Gateway (Dedicated gateway), modify the
path (see line 13 in sample) and
pathParameters (see line 15 in sample) parameters in the test event,
and build a simple Get request.
 1{
 2    "body": "",
 3    "requestContext": {
 4        "apiId": "bc1dcffd-aa35-474d-897c-d53425a4c08e",
 5        "requestId": "11cdcdcf33949dc6d722640a13091c77",
 6        "stage": "RELEASE"
 7    },
 8    "queryStringParameters": {
 9        "responseType": "html"
10    },
11    "httpMethod": "GET",
12    "pathParameters": {
13        "name": "John Doe"
14    },
15    "path": "/greeting",
16    "headers": {
17        "accept-language": "q=0.5,en-US;q=0.3,en;q=0.2",
18        "accept-encoding": "gzip, deflate, br",
19        "x-forwarded-port": "443",
20        "x-forwarded-for": "103.218.216.98",
21        "accept": "text/html,application/xhtml+xml,application/xml;q=0.9,*/*;q=0.8",
22        "upgrade-insecure-requests": "1",
23        "host": "host",
24        "x-forwarded-proto": "https",
25        "pragma": "no-cache",
26        "cache-control": "no-cache",
27        "x-real-ip": "103.218.216.98",
28        "user-agent": "Mozilla/5.0 (Windows NT 6.1; Win64; x64; rv:57.0) Gecko/20100101 Firefox/57.0"
29    },
30    "isBase64Encoded": true
31}
Note
It is recommended that you increase the function memory specification and timeout period during testing, such as 512MB and 5s.
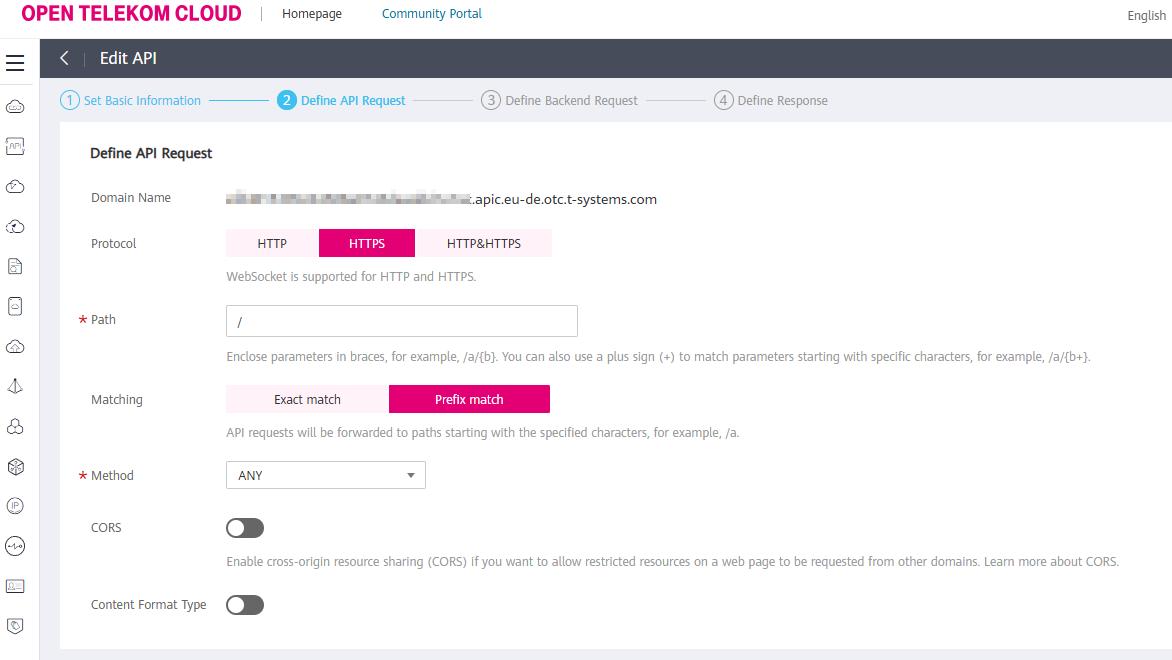
Step 6: Configure APIG Trigger
Please refer to User manual “Creating an HTTP Function” and Create a Trigger to create an APIG exclusive version trigger
It is recommended to select None for Security Authentication to facilitate debugging.
When defining the API request, set values according to:
Note
Generated URL can be found in FunctionGraph console -> Tab Configuation -> Triggers
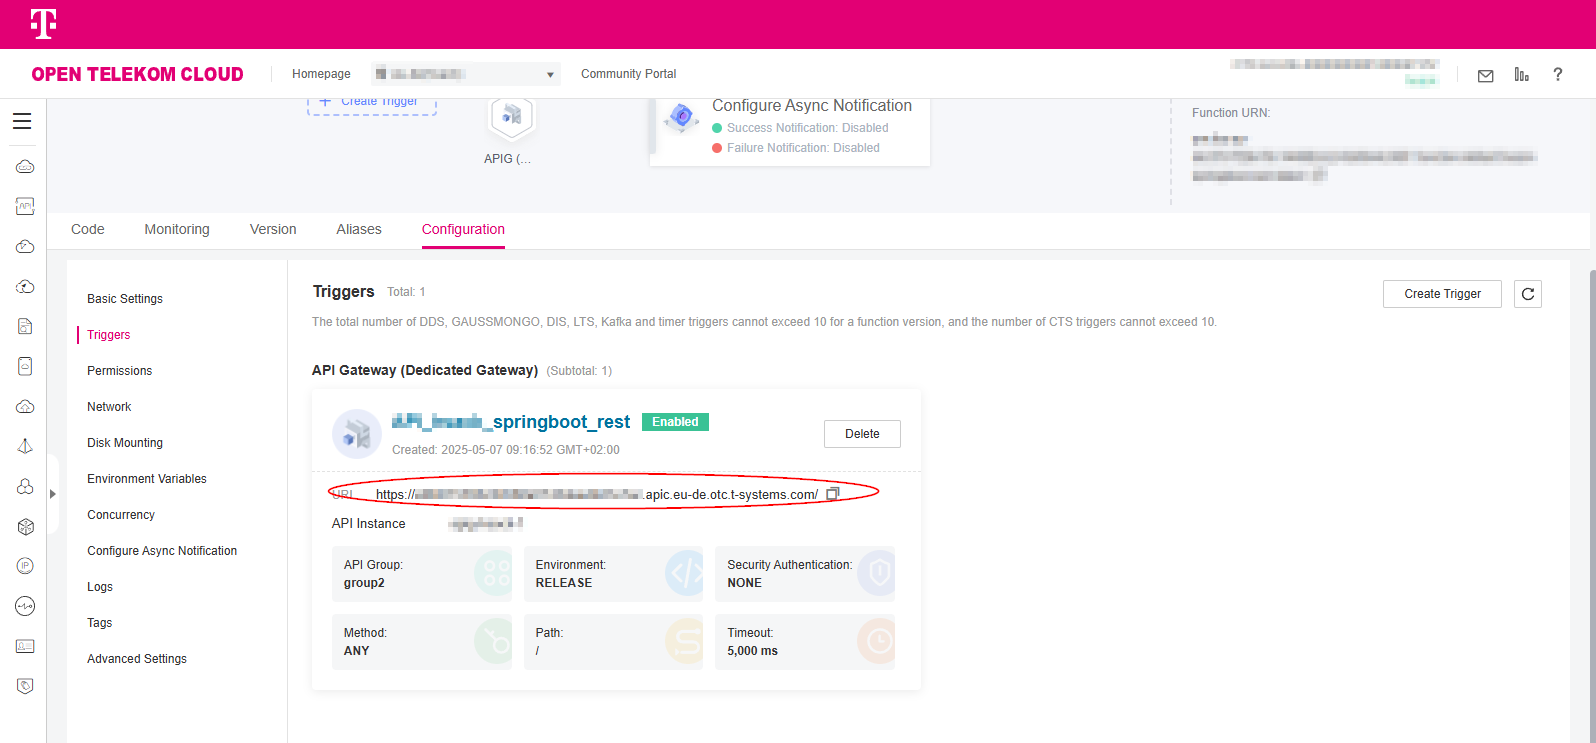
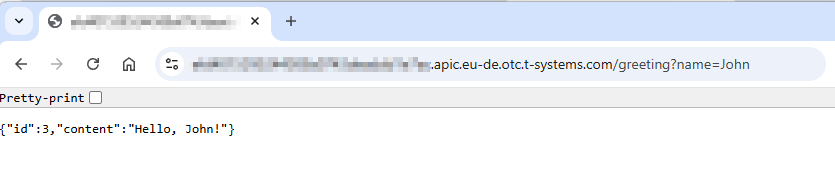
Copy the generated call URL and curl it:
Test event sample data¶$ curl https://XXXXXXXXXX.apic.eu-de.otc.t-systems.com/greeting?name=John {"id":2,"content":"Hello, John!"}
Or use copied URL in web browser:
Frequently asked questions
How to test local?
To test local use following command in root of project:
doc-sample-springboot-2.x-rest$ ./mvnw spring-boot:run
Why ClassNotFoundException after deployment?
Check bootstrap file for correct:
jarfile name in classpathcorrect main class name
What directories can my code access?
According to the commands in the bootstrap file above, it can be seen that the
uploaded code package is finally stored in the function instance (referring to
the environment/computing resources where the function runs,
which can be understood as a container) /opt/function/code/ path. However,
this directory can only be read, not written.
If you want to write some data to the instance during code execution, write
to the /tmp directory.
How are my logs collected and how should I output them?
If there is no request for a period of time, the function instance will be destroyed, and the data written to the local log will be destroyed at the same time. The current user cannot view the local log of the function while the function is running, so it is recommended not to write the log only to the local.
It is recommended to output the generated log to the console, such as
configuring the log4j output target to System.out, or directly
using the print function to print the log.
The logs output to the console will be collected by the function system. If the user activates the LTS service, the logs will be put into LTS for more real-time log analysis.
It is recommended to enable LTS logs during commissioning and click Go to LTS for log analysis to observe and analyze the real-time logs.
As all FunctionGraph instances write to the same log, it can be difficult to
distinguish logs of different requests.
Writing to stdout or stderr will need to log the requestId of the
request obtained from the incoming request header x-cff-request-id.
(see Common Function Request Headers)
Using a logging framework the user is responible for adding the request id to the log output.
This can be achieved by using ThreadContext object.
The provided example OTCRequestContextLoggingFilter.java uses SpringBoot @Component
annotation and request/reponse filtering to add header values to the ThreadContext.
/*
 * Copyright (c) 2025 T-Systems International GmbH.
 * Licensed under the Apache License, Version 2.0 (the "License");
 * you may not use this file except in compliance with the License.
 * You may obtain a copy of the License at
 *
 *      http://www.apache.org/licenses/LICENSE-2.0
 *
 * Unless required by applicable law or agreed to in writing, software
 * distributed under the License is distributed on an "AS IS" BASIS,
 * WITHOUT WARRANTIES OR CONDITIONS OF ANY KIND, either express or implied.
 * See the License for the specific language governing permissions and
 * limitations under the License.
 */

package com.opentelekomcloud.samples.springboot.components;

import java.io.IOException;
import java.util.Enumeration;

import javax.servlet.Filter;
import javax.servlet.FilterChain;
import javax.servlet.ServletException;
import javax.servlet.ServletRequest;
import javax.servlet.ServletResponse;
import javax.servlet.http.HttpServletRequest;

import org.apache.logging.log4j.ThreadContext;
import org.slf4j.Logger;
import org.slf4j.LoggerFactory;
import org.springframework.core.annotation.Order;
import org.springframework.stereotype.Component;

/**
 * OTCRequestContextLoggingFilter is a filter that logs request context information.
 * It captures specific headers from the HTTP request and stores them in ThreadContext
 * for logging purposes. This allows for better tracking of requests in logs.
 */
@Component
@Order(1)
public class OTCRequestContextLoggingFilter implements Filter {
  private static final Logger logger = LoggerFactory.getLogger(OTCRequestContextLoggingFilter.class);

  /**
   * Default header fields of an HTTP function.
   * </p>
   * @see <a href="https://docs.otc.t-systems.com/function-graph/umn/building_functions/creating_a_function_from_scratch/creating_an_http_function.html#id10">Creating a function from scratch</a>
   */
  private static final String[] X_CFF_HEADERS = {
      "x-cff-request-id",
      "x-cff-memory",
      "x-cff-timeout",
      "x-cff-func-version",
      "x-cff-func-name",
      "x-cff-project-id",
      "x-cff-package",
      "x-cff-region" };

  /**
   * Store requestId in ThreadLocal to be accessible in all classes.
   */
  private static final ThreadLocal<String> requestId = new ThreadLocal<>();

  public static String getRequestId() {
    return requestId.get();
  }

  /**
   * This method is called for each request to log the request context.
   * It retrieves the request ID from the HTTP header and stores it in a ThreadLocal variable.
   * It also logs all available headers if debug logging is enabled.
   *
   * @param request the ServletRequest object
   * @param response the ServletResponse object
   * @param chain the FilterChain to pass the request and response to the next filter or servlet
   * @throws IOException if an I/O error occurs
   * @throws ServletException if a servlet error occurs
   */
  @Override
  public void doFilter(ServletRequest request, ServletResponse response, FilterChain chain)
      throws IOException, ServletException {

    HttpServletRequest httpServletRequest = (HttpServletRequest) request;

    String cffRequestID = httpServletRequest.getHeader("x-cff-request-id");

    if (logger.isDebugEnabled()) {
      // Display all available headers
      Enumeration<String> headerNames = httpServletRequest.getHeaderNames();
      while (headerNames.hasMoreElements()) {
        String value = headerNames.nextElement();
        logger.debug("{} = {}", value, httpServletRequest.getHeader(value));
      }
    }

    // Store values in ThreadLocal variables:
    requestId.set(cffRequestID);

    // Put X_CFF_HEADERS to Logging ThreadContext:
    for (String header : X_CFF_HEADERS) {
      ThreadContext.put(header, httpServletRequest.getHeader(header));
    }

    chain.doFilter(request, response);

    // Remove X_CFF_HEADERS from Logging ThreadContext:
    for (String header : X_CFF_HEADERS) {
      ThreadContext.remove(header);
    }

    // Remove values from ThreadLocal variables:
    requestId.remove();
  }

}
For more details on request filtering, see: How to Define a Spring Boot Filter
In the logging configuration of application.yaml
spring:
  application:
    name: doc-sample-springboot-2.x-rest

server:
  port: 8000

logging:
  pattern:
    console: "%clr(%d{yyyy-MM-dd'T'HH:mm:ss.SSS'Z', UTC}) '%X{x-cff-request-id}' %p %F:%L %t - %m%n"
- you can see that for
logging.pattern.consolethe x-cff-request-idis added to the log line.
What user permissions does my code have?
Like ordinary event functions, the code is executed without root privileges, so code or commands that require root privileges cannot be executed in HTTP functions.
How to change Java and SpringBoot version?
Adapt pom.xml
1<parent>
2  <groupId>org.springframework.boot</groupId>
3  <artifactId>spring-boot-starter-parent</artifactId>
4  <version>2.7.17</version>    <!-- NEW: <version>3.4.5</version> -->
5  <relativePath />
6</parent>
1<properties>
2  <java.version>11</java.version> <!-- NEW: <version>17</version> -->
3  <start-class>com.opentelekomcloud.samples.springboot.RestServiceApplication</start-class>
4</properties>
Adapt bootstrap file
For runtime location path, see Table 1 Paths for different runtimes
1/opt/function/runtime/java11/rtsp/jre/bin/java \
2  -Dfile.encoding=utf-8 \
3  -cp $RUNTIME_CODE_ROOT/doc-sample-springboot.jar:$RUNTIME_CODE_ROOT/lib/* \
4  com.opentelekomcloud.samples.springboot.RestServiceApplication
Update project
Run following command in project root folder:
doc-sample-springboot-2.x-rest$ ./mvnw clean install