Seller
Section covers the features available for Seller from becoming a seller, publishing a Product Offering to enabling end of life for Product Offering.
Become a Seller
Pre-requisite: OTC user with Tenant Admin Role
Click on ‘Become a Seller’. Please refer to Diagram 1.
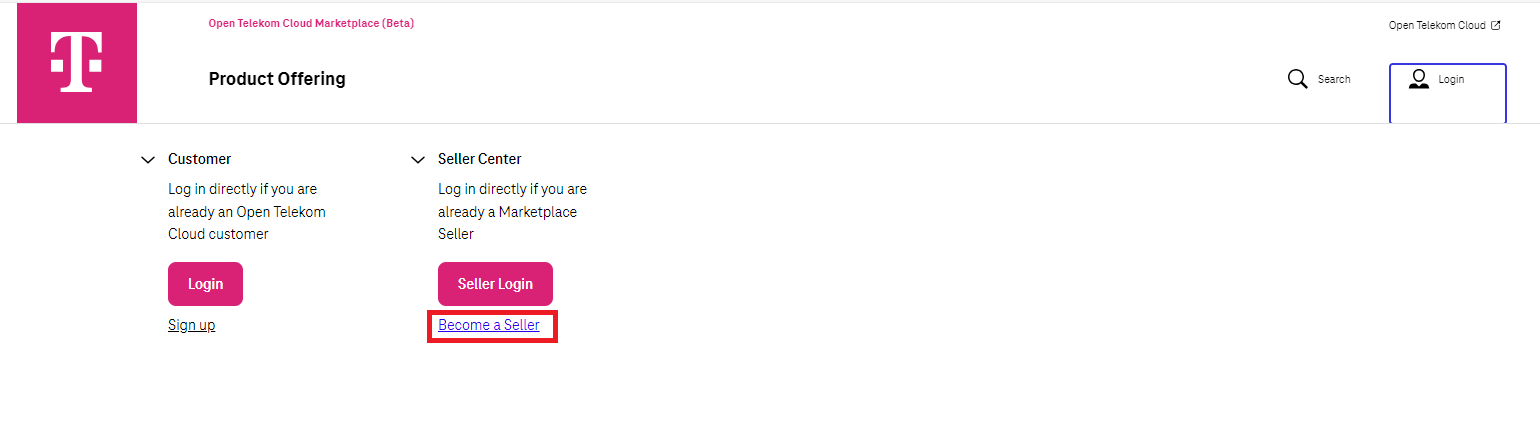
Diagram 1 Become a Seller
Next, you will be redirected to the screen below (Diagram 2) to validate the Pre-Requisite (OTC user with Tenant Admin Role) to become a Seller.
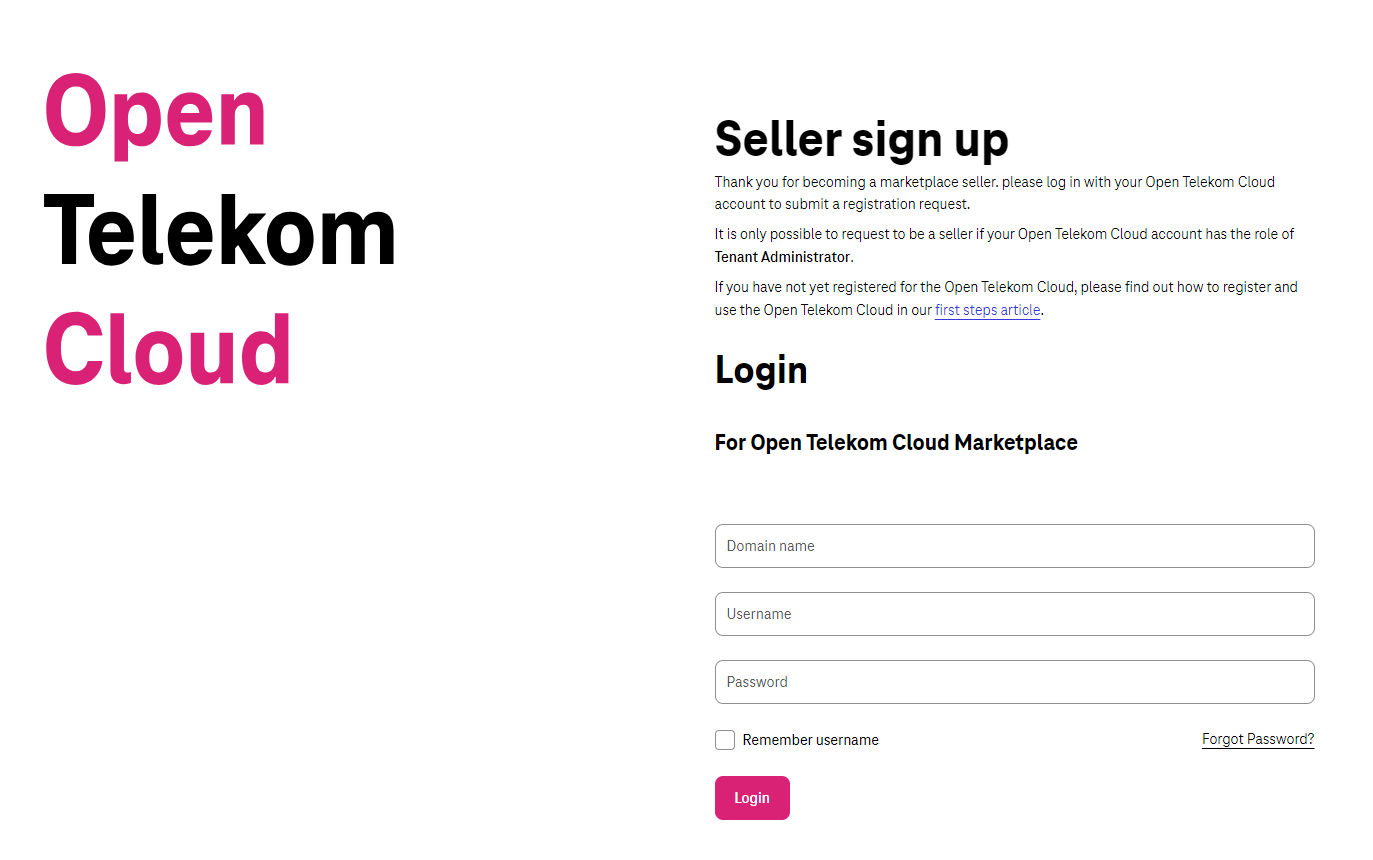
Diagram 2 Login (Validate OTC user with Tenant Admin role)
After login, you are directed to provide basic Organizational Information of your company and accept the Terms and Conditions.
Please refer to Diagram 3.
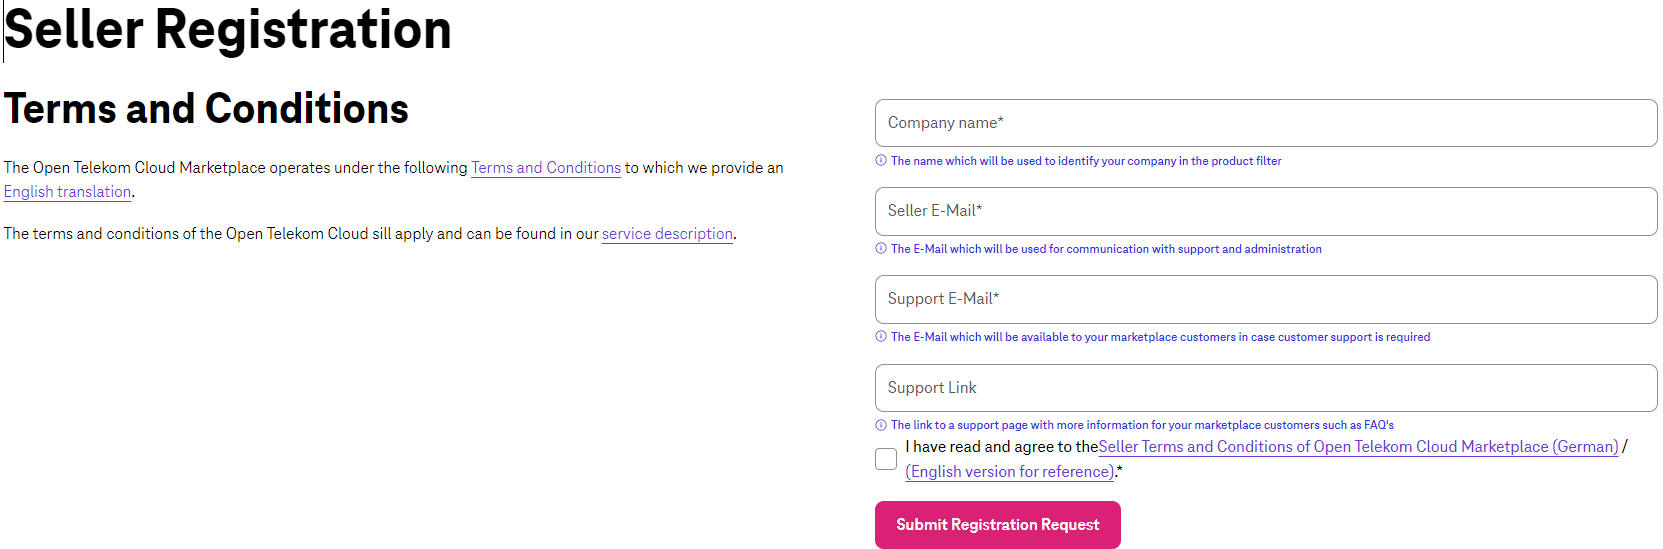
Diagram 3 Seller Organizational Information
After the request is submitted, Open Telekom Cloud will activate the Seller and will keep you informed via e-mail (Seller E-mail) about the request.
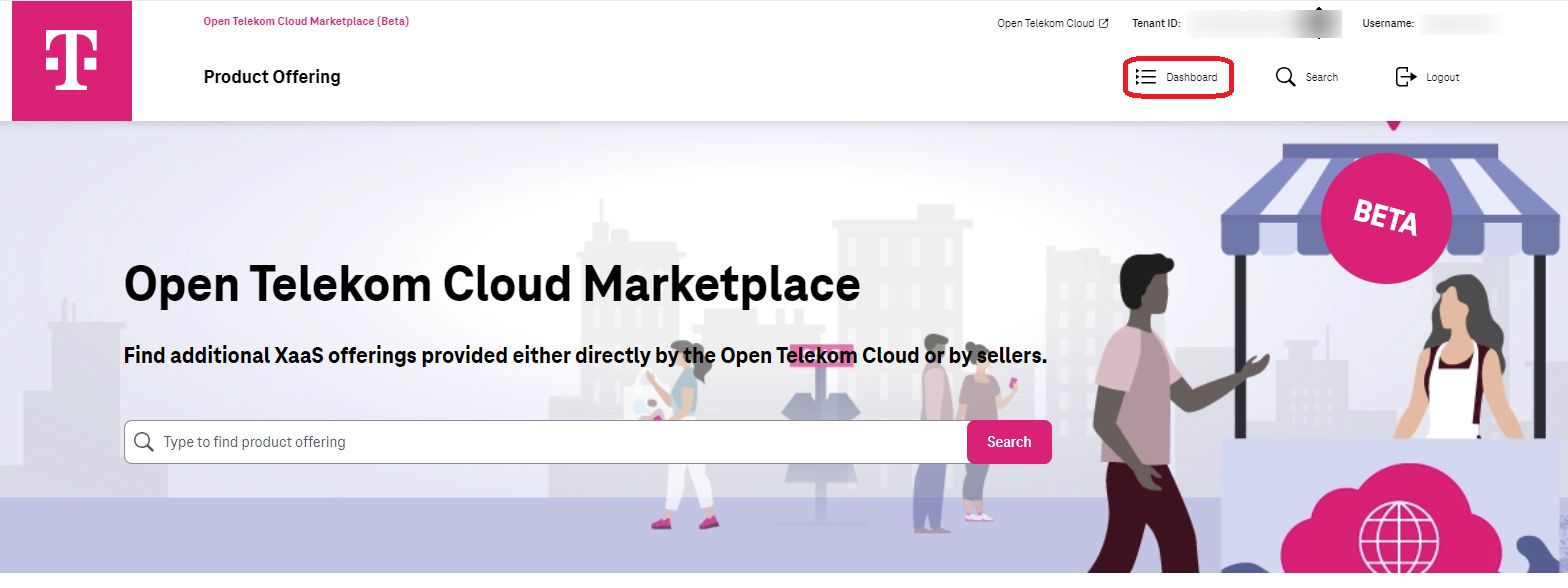
Login
Login is only possible after the user has become a Seller. Click on the ‘Seller Login’ to access the Marketplace Seller Center (Diagram 4).
Note: It is recommended to use Chrome or Microsoft Edge to login as the seller.

Diagram 4a Seller Login
Only OTC user with ‘Tenant Administration’ role can login in Marketplace Beta now.
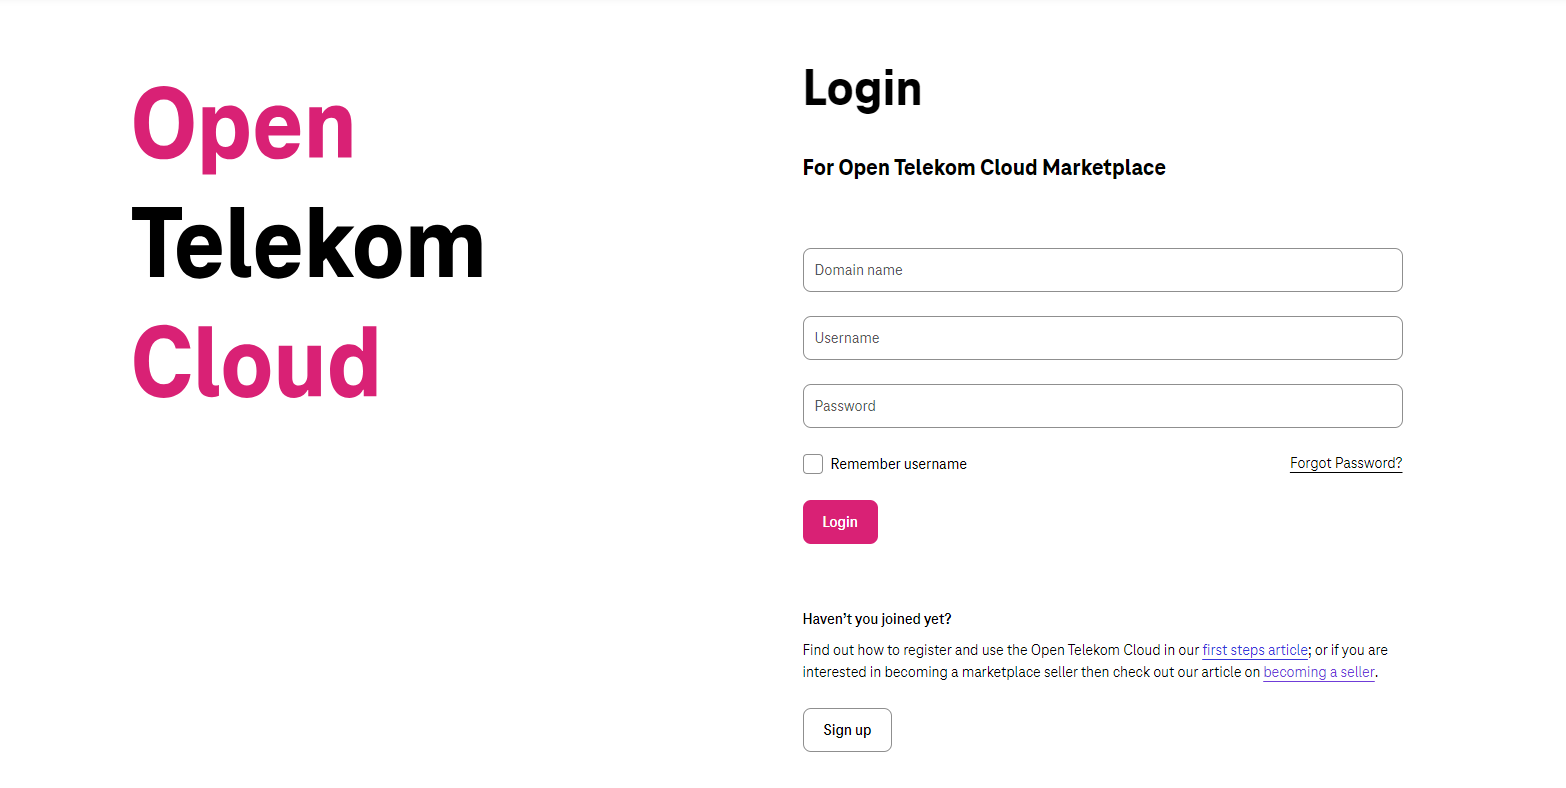
Diagram 4b Seller Login
If the login is successful, then you are directed to the Marketplace Homepage (Diagram 5).

Diagram 5 Marketplace Homepage
Login via MyWorkplace
If user wants to use ‘MyWorkplace’, User needs to find the corresponding IAM user for his/her ‘MyWorkplace’ account.
The process is straight forward. User needs to login to MyWorkplace.
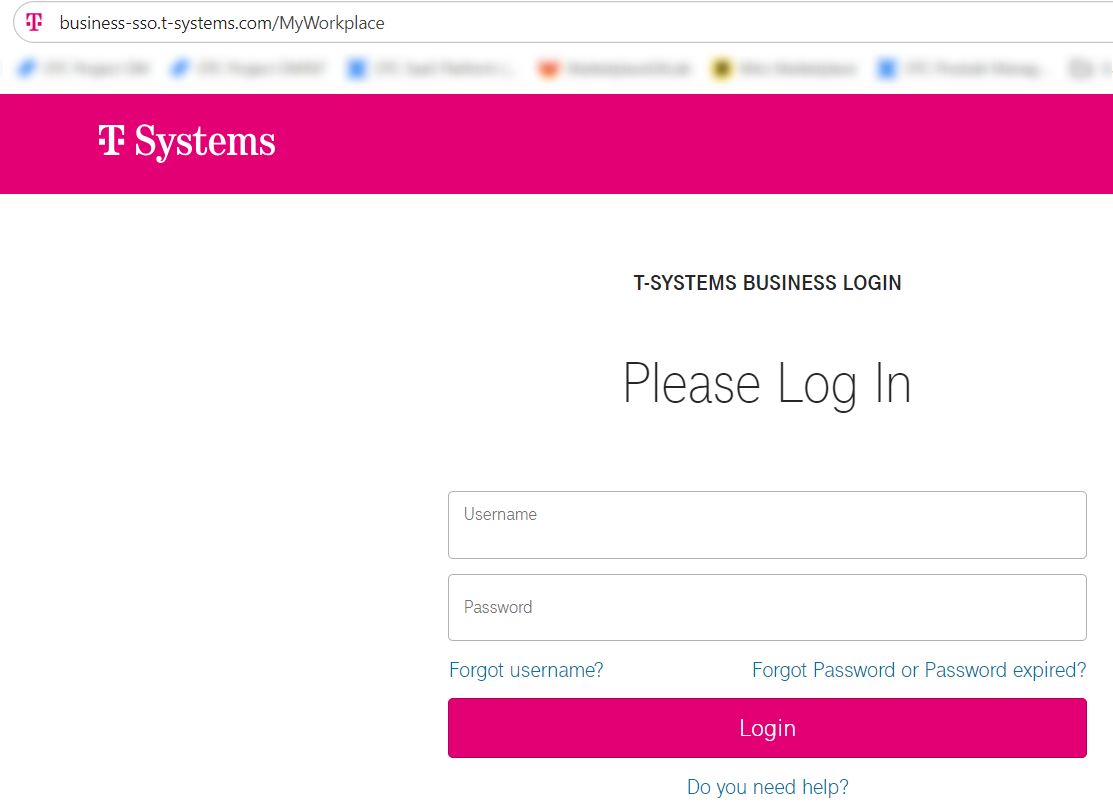
Diagram 6 MyWorkplace
After login then please select the domain that you owned and click on it to open ‘OTC Console’.
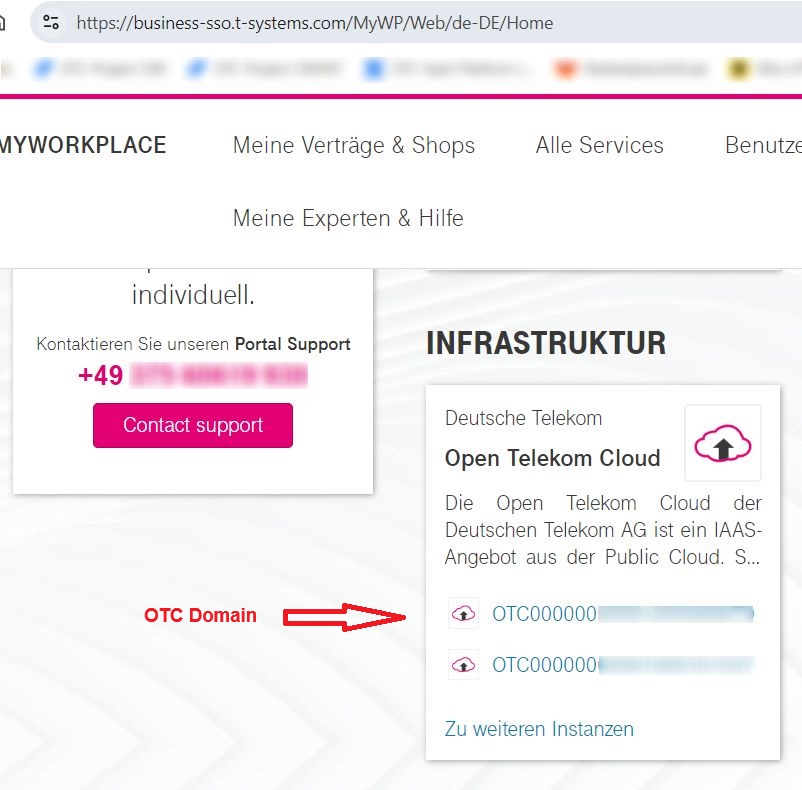
Diagram 7 MyWorkplace Login
It would redirect user to the ‘OTC Console’ where user can understand what is his/her Information required for login (‘Domain name’ and ‘Username’).
In the ‘OTC Console’ user can find the (‘Domain name’ and ‘Username’).
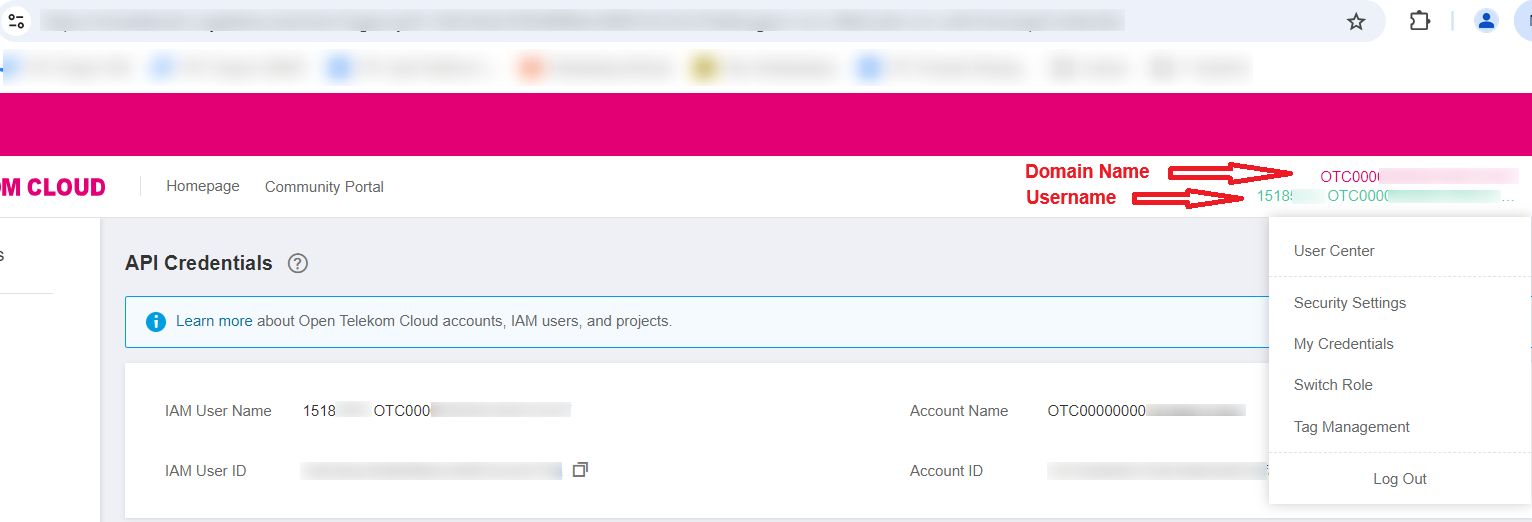
Diagram 8 OTC Console
Reset MyWorkplace IAM User
It is very importatnt to consider that this ‘IAM User’ does not have the same ‘Password’ as ‘MyWorkplace’ which means to be able to use, user needs to reset it's credential.
To reset the ‘Password’, user needs to try to reset the password by reaching OTC Console and then click on Forgot ‘password?’.

Diagram 9 Forgot Password
In the following page user should put ‘Domain name’ inside the ‘Name of the administrator account’ and ‘Username’ inside the IAM user name, email and the the CAPTCHA code to request to reset the password.
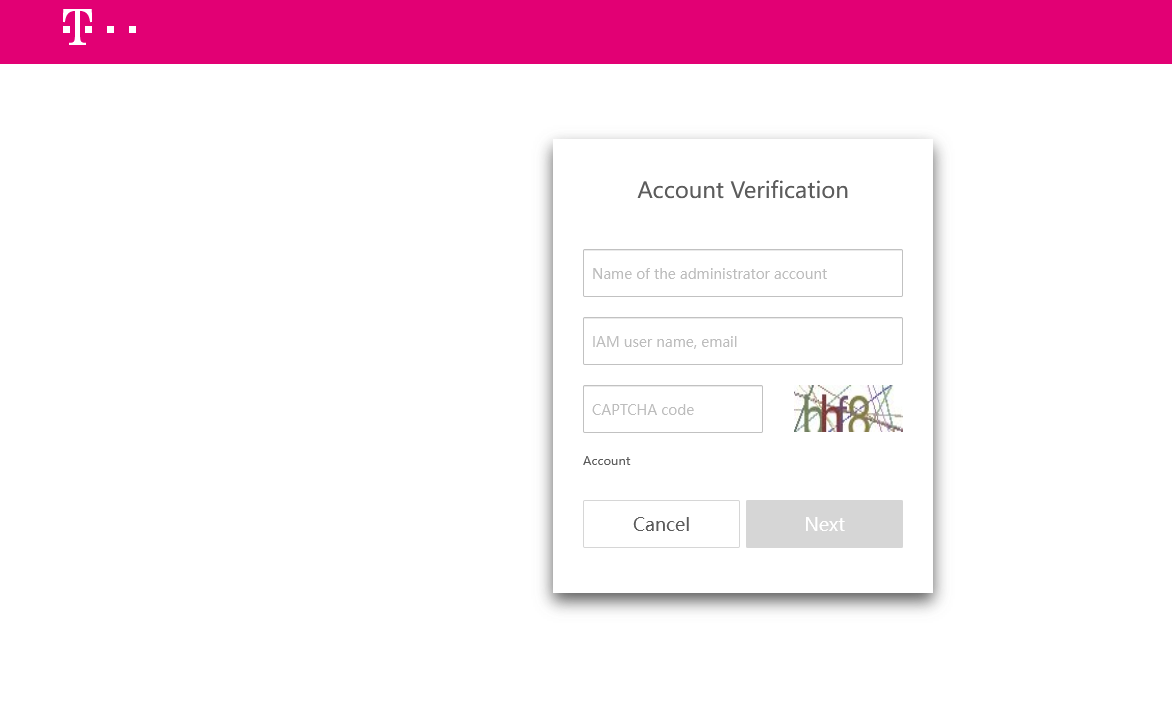
Diagram 10 Reset Password
Login via IAM
Having a user created by IAM and proper privilege, users would be able to login to Marketplace. Information required for login (‘Domain name’ and ‘Username’) can be fetched from OTC as following diagram.
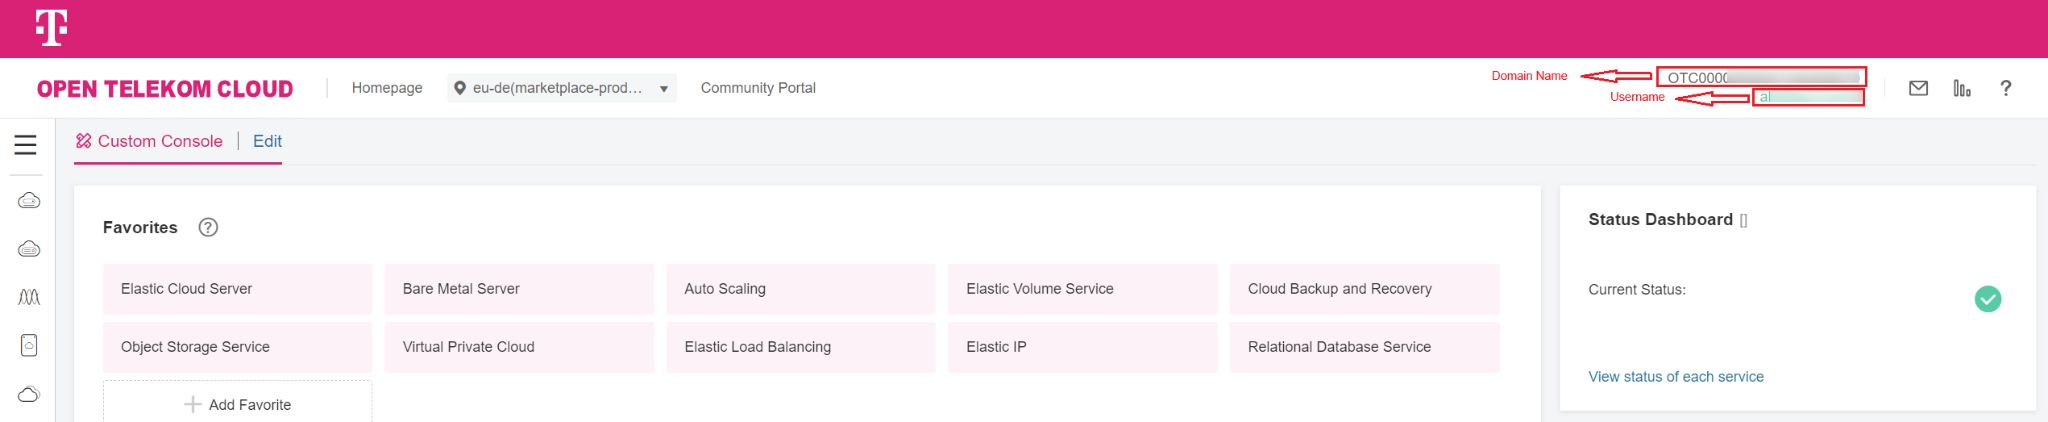
Diagram 11 OTC Console
Role Management
With Marketplace Role management, the Tenant Owener would be able to deligate the role to any other IAM users of the tenant.
Please not that this process would happened gradually and this means that thoses who have "Tenant Administrator" can still login to Marketplace with no restriction. However, as the next step it would be revoked and only those who have role can login.
Who is the Tenant Owner?
Each tenant has one IAM user that is linked to OTC MyworkPlace. This the first account that the customer of OTC can use to access OTC Console. This account has been created automatically and is a combination of a random number plus Domain-ID. This is a unique account and cannot be deleted.
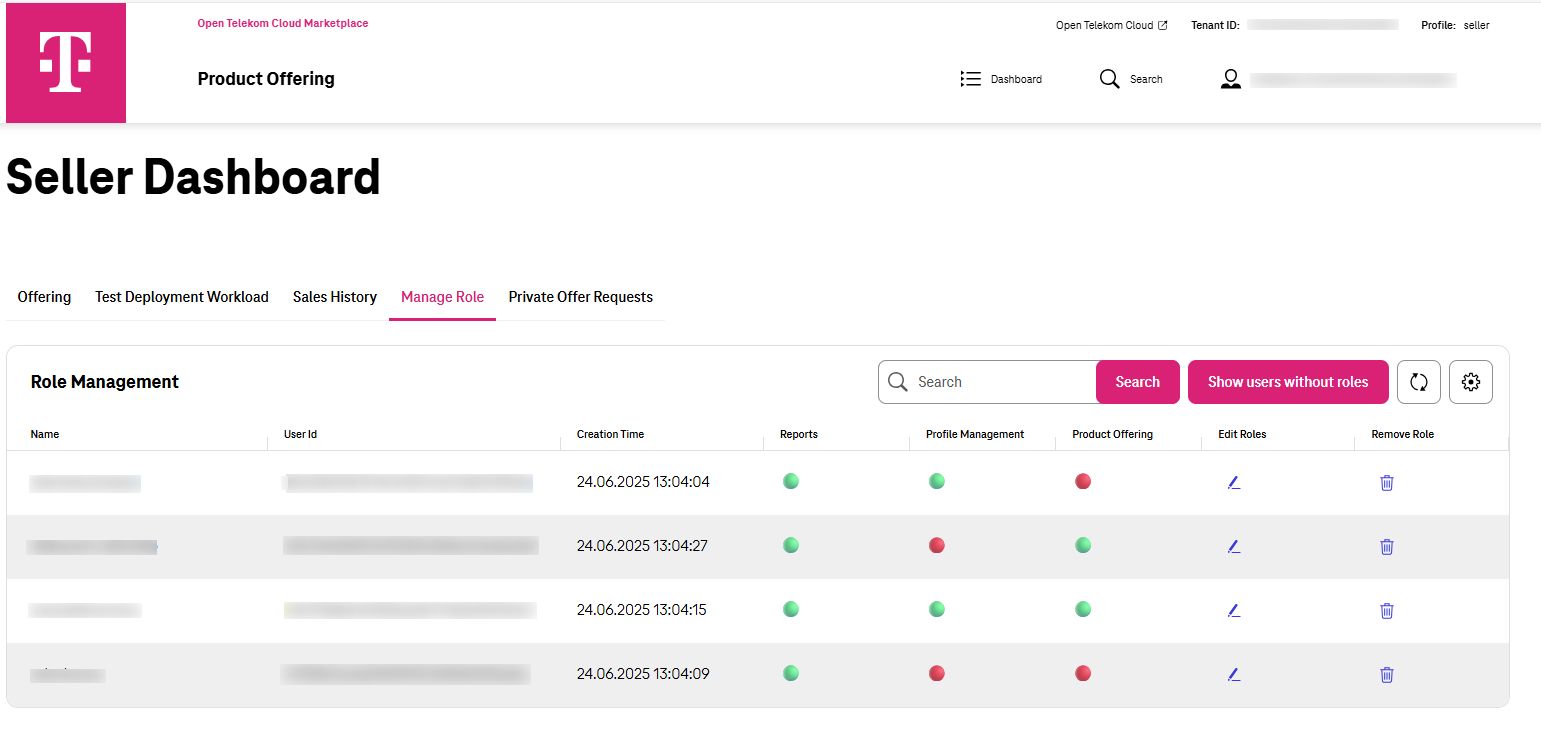
Manage Role Dashboard
When the tenant owner logs in to Marketplace as the seller, there is specific Dashboard for him/her named "Manage Role". There all the users that have role can be seen. Alternatively by clicking on "Show users without roles", all of the remaining IAM users that has no role can be seen and get a role.
Manage Role
Marketplace Roles
Marketplace has three different Roles as seller which can be assigend to any IAM user.
Reports: This is the minimum priviledge which is also a mandatory role. IAM users having this role can have access to any report inside the Marketplace such as the Sales history, information about the Product Offering. This Role does not allow anyone to be able to change something, includein the Seller Profile information on any Product Offering.
Profile Management: IAM users that have this role has all the priviledges that Reports has. they can also update information about the Seller Profile.
• Product Offering: IAM users that have this role has all the priviledges that Reports has. they can also manage any Product Offering includeing on-boarding off-boarding and updating.
Assign Marketplace Roles
Tenant owner can reach the Manage Role Dashboard and then click on "Show users without roles" to assign a new user a role.
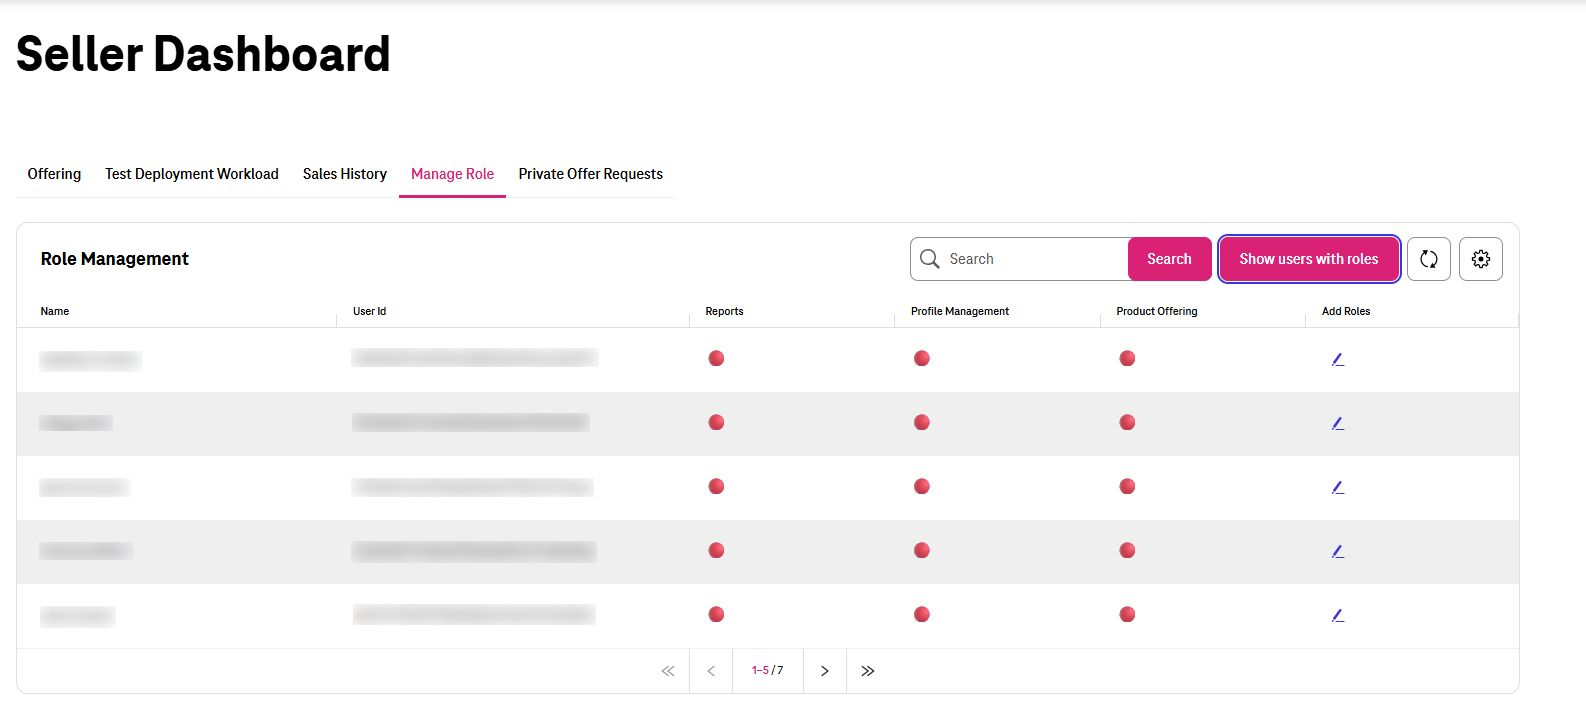
Add Role to new IAM User
Then he/she can edit any User that does not any Role and the select which Role shall be assign to that IAM User.
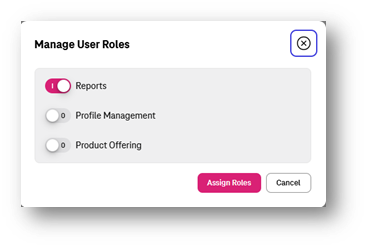
Add Role to new IAM User
Update Marketplace Roles
Tenant owner can reach the Manage Role Dashboard and then click on "Show users with roles" to edit Roles of a User.
Update Roles of an IAM User
Then he/she can edit any User that has Role and the select which Role shall be assign/revoked for that IAM User.
Update Roles of an IAM User
Revoke Marketplace Roles
Tenant owner can reach the Manage Role Dashboard and then click on "Show users with roles" to Revoke Roles of a User.
Revoke Roles of an IAM User
Then he/she can click on delete icon of any User that has Role to remove his/her Roles.
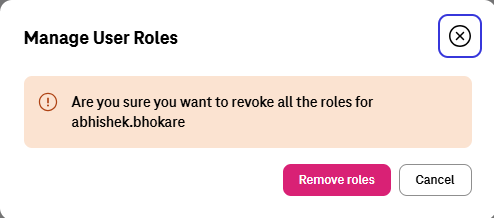
Revoke Roles of an IAM User
Publish Product Offering
Sellers can use the component ‘Dashboard’ and sub-component ‘Product Offering Provisioning’ to publish the Product Offering.
Service Type: Private Offer
This product type allows sellers to advertise offerings on the OTC Marketplace and collect customer leads in a structured way.
These products are not purchased directly through the Marketplace. Instead, interested customers "request" the product. Sellers can also define specific questions which customers have to answer to more easily qualify leads. Once a customer requested a product, the lead will show up in the sellers dashboard and additionally a mail is sent to the seller. The seller can then contact the customer directly to establish a business relationship and initiate the process towards a business deal.
This product type is ideal for products that are not yet / supposed to be fully integrated into the Marketplace. It typically includes offerings that:
Lack the technical requirements for a deep integration.
Are from sellers not yet ready to commit to a full integration.
Are from sellers who are working on a full integration but want to already establish a presence.
Are from sellers who are working on a full integration but want to already establish a presence.
Are a type not yet technically supported by the Marketplace.
Are better suited for a private, custom offer (e.g., professional services).
Eligible Product Offerings
Only the following types of product offerings may be advertised:
Software products * That can be delivered to customers on the Open Telekom Cloud (OTC). Professional services: * Related to the OTC or to products running on it. * Related to the broader Telekom ecosystem. * Provided by a Telekom-owned business unit. Note: Offerings that do not fit these criteria are not permitted on the OTC Marketplace.
After login, please go the ‘Dashboard’ and then click on ‘New Offering’.
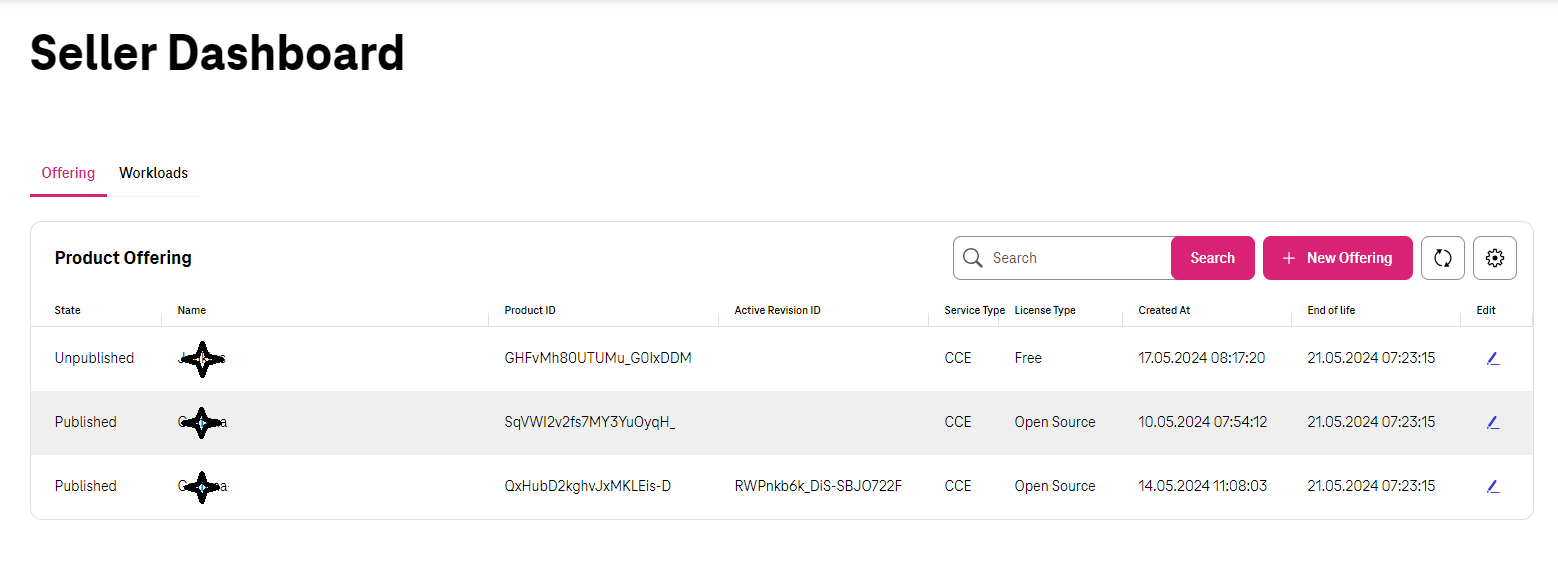
Diagram 12 New Offering
Products which sellers publish on the OTC marketplace are called ‘Product Offerings’.
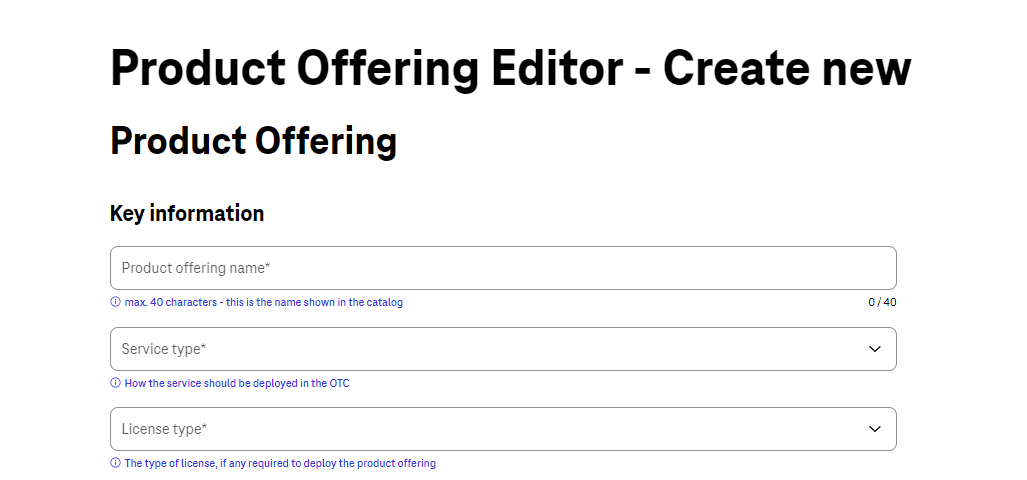
Diagram 13 Product Offering (Key Information)
Product Offering Name
The name of the Product Offering. Please be aware that the name cannot be changed after publication.
Service Type
The Service Type is the type of product offering to be created Select ‘Private Offer’.
Category
Choose the most appropriate category or add a new one if needed.
Short Description
Add a short description for your product offering in the text field.
Full Description
Add a short summary for your product offering in the text field.
Logo
Upload a logo for the specific offering (preferred) or your company logo.
Set Product Plans
You can offer customers multiple plans (e.g.: Standard, Enterprise, Platinum) for your product offering which will all be displayed on your product offering page. The number of plans is not restricted. Each plan can have different details for example regarding pricing, SLAs, features and services.
To create a new plan click on ‘Click to set product plans’
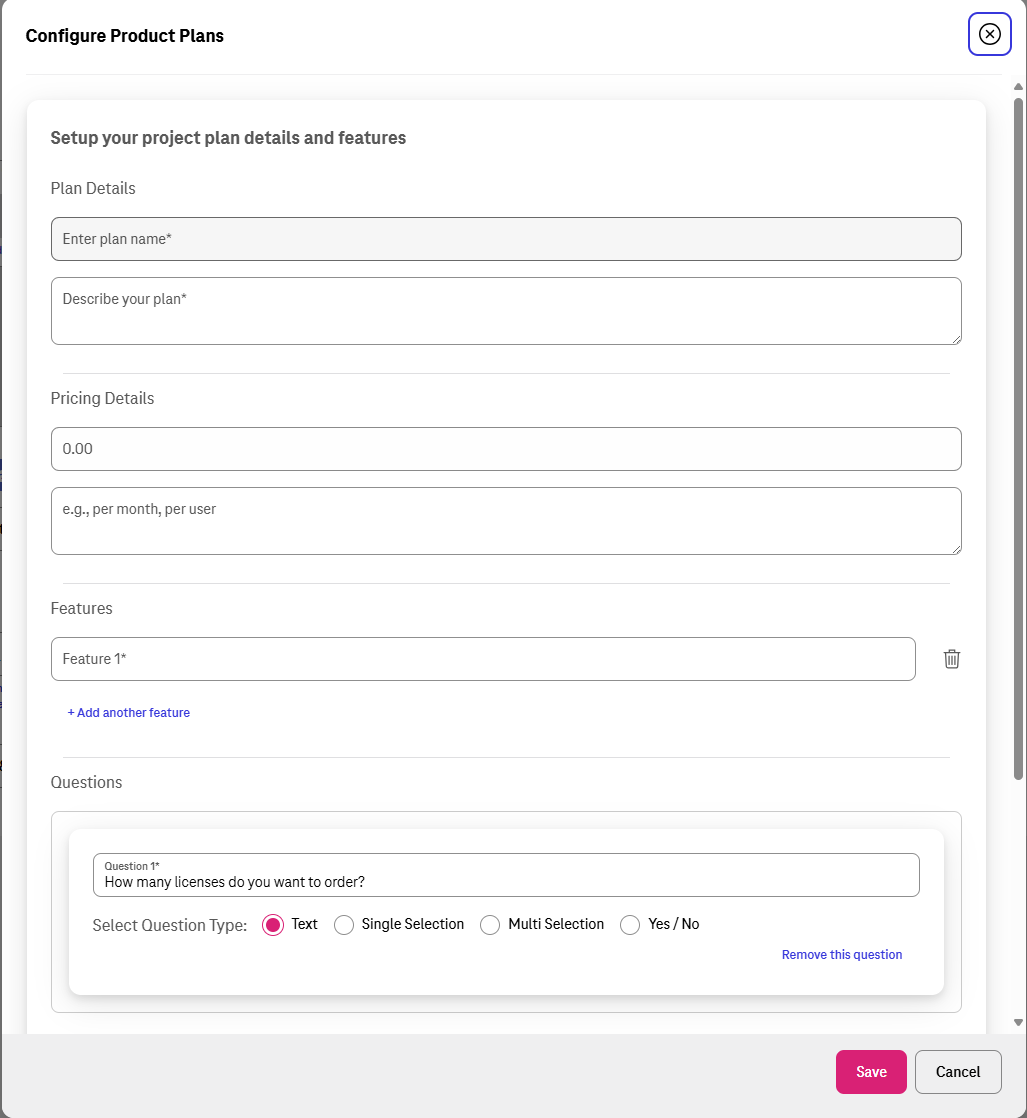
Plan name (mandatory)
Provide a name for the plan (e.g.: Standard, Enterprise, Platinum)
Plan description (mandatory)
Add a description for the plan which briefly explains what the plan includes.
Pricing details
Enter pricing details. You can leave this blank if the price is variable or quote-based.
Features
Add key features as bullet points (e.g., "Up to 5 user accounts," "24/7 Support") one by one.
Questions
In this section you can create questions for the customer to answer when they request the plan. This helps you to qualify leads. Be aware that answering the questions is optional and customers can skip this step if they choose to do so. You can set the answer format to: • Text Input: For open-ended answers. • Single Selection: For dropdown or radio button lists. • Multi-Selection: For checkbox lists. • Yes / No: For simple binary questions.
Saving the plan
To save the configuration of the plan click "Save".
Release Date
Choose the date you want your offering to become visible in the Marketplace.
Save or Publish
Click "Save" to save your progress as a draft or click "Save & Publish" to request the release of your product offering the OTC Marketplace. When the OTC Marketplace team has reviewed your request your product offering will be published.
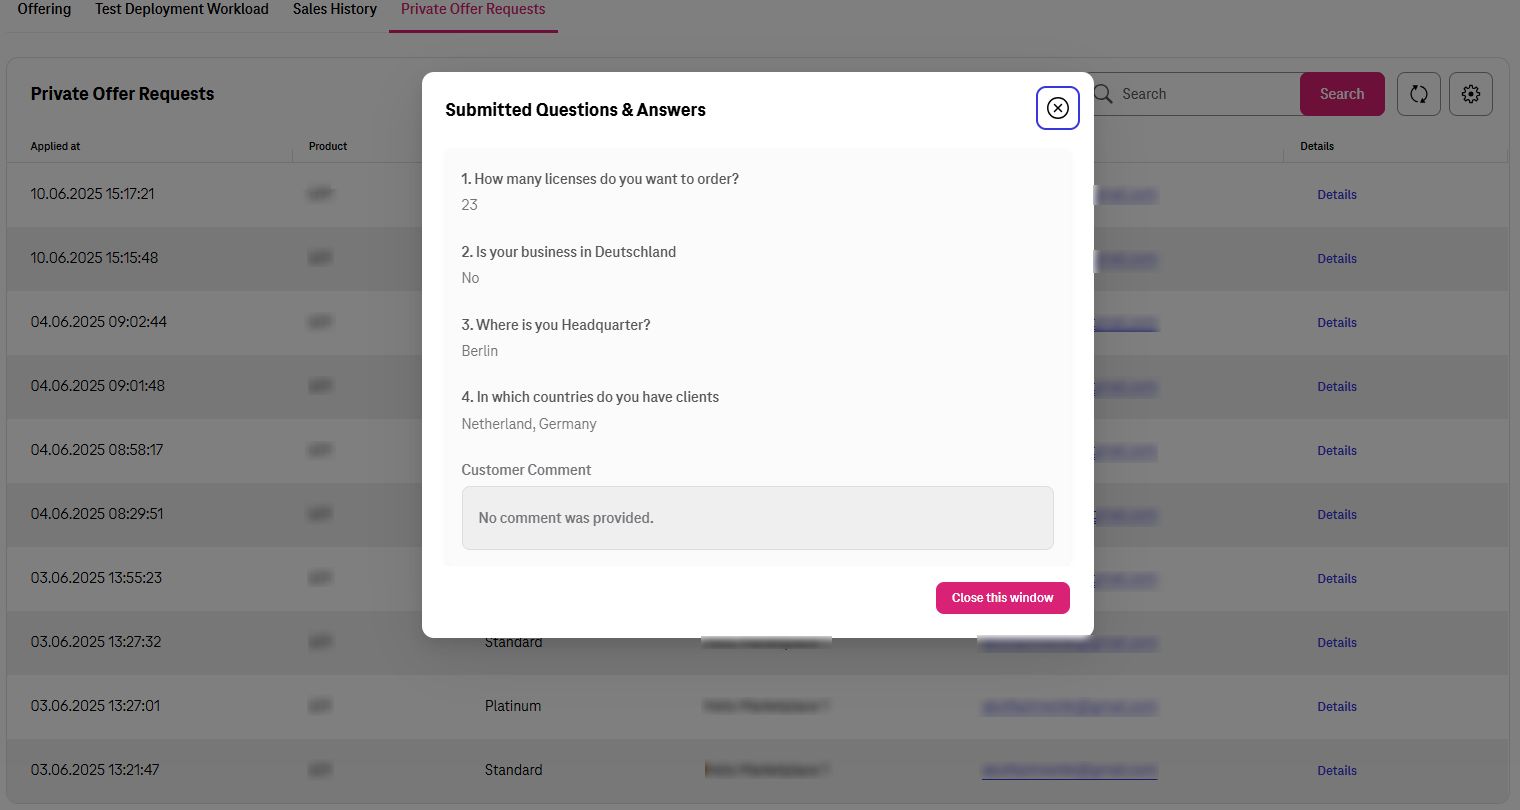
Reviewing Private Offer Requests
Private offer requests by customers will be visible in your dashboard to track them. Additionally you will receive a notification mail to the mail address which is tied to your OTC account.
To see the answers which customers provided to your questions click on “Details” on the request you are interested in. A pop-up window will list all the information.
Be aware that the marketplace solely facilitates the creation and connection between sellers and customers, while all responsibilities for contacting customers and initiating business deals rests with the seller.
Service Type: CCE, License Type: Open Source, Free, Trial
Seller can use the license type ‘Open source, free or trial’ to use offer helm chart based Product Offering. After login, please go the ‘Dashboard’.
Diagram 12 New Offering
Product Offering is the seller’s published software (incl. service type of the Open Telekom Cloud, license type and seller’s software name) on the Marketplace.
Seller has to provide Helm chart of the Seller’s software to publish CCE based Product Offering. Currently only Service Type - ‘CCE’ is available with License types ‘Open Source, Free, Trial or BYOL (Bring Your Own License).’ The key information cannot be changed once a draft is created.
Diagram 13 Product Offering (Key Information)
Product Offering Name
Name of the Product Offering cannot be changed after publication.
Service Type
Service Type is the type of IaaS provided by OTC to create the offering (Prerequisite of Service Type CCE: Helm-chart of the product/service).
CCE is OTC’s Cloud Container Engine.
License Type
License type is the license option (Open Source, Free, Trial or BYOL (Bring Your own License)) to create the offering.
License Info
Field for additional information on license that the seller needs to provide to the customer.
Contractual Documents
The EULA (End User License Agreement) of the Product Offering (i.e. Seller’s Software) must be provided. The customer and seller relation is bound by the EULA.
Category
Category of the Product Offering ex. Monitoring, Security etc. is selected.
Version
Version of the seller’s software can be provided.
Short Description
Short description of the Product Offering can be provided in the text field.
Full Description
Detailed description of the Product Offering can be provided the text field.
Logo
Logo of the Seller’s software can be uploaded in the section.
“Used Software”, “Used Software License Name” and “Link to License”
Addition information of used softwares in the Product Offering (i.e. Seller’s Software) can be provided in these fields.
Seller is obliged to provide transparency on used softwares to the customer.
Information includes the software names, licenses and links to the terms and conditions of license.
Examples of license are MIT or Apache v2.0.
Add Configuration
Seller can configure the parameters of helm charts of the Product Offering (seller’s software).
Configurations can be (Diagram 8) a “Text input” (Text or Array), Option (Text or Array) such as “Text Input” or a Toggle (Boolean) that customer needs to provide as True or False.
Text input
Option can be used for adding a key that is of type string or array.
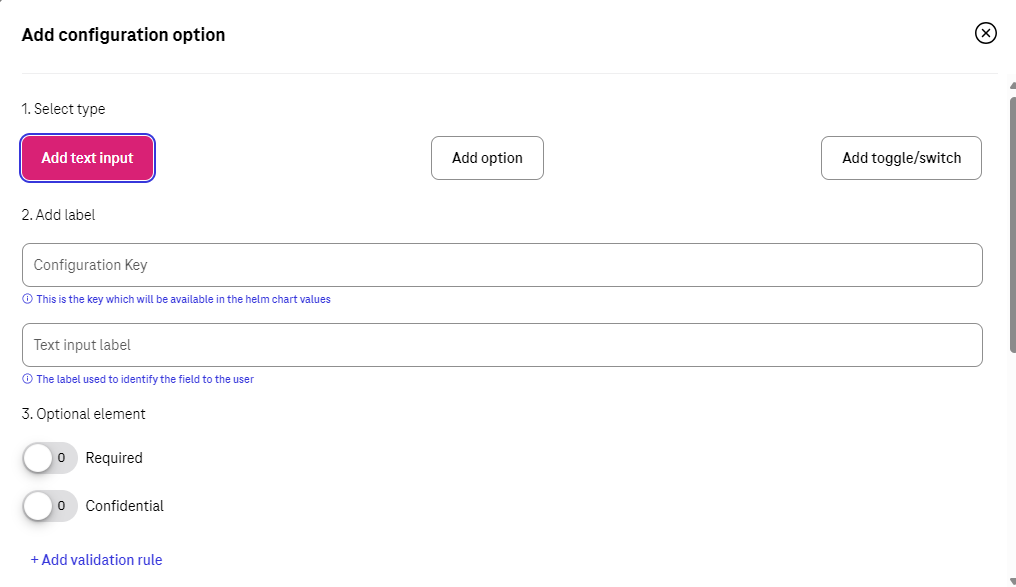
Diagram 14 Configuration Options
Configuration Key
Is the equivalent of Helm Chart key. It means that rules of the Yaml shall be followed here.
For example, if inside values.yaml file there is main key as “global” and then “storageClass” as sub key, then the content of “Configuration Key” would be “global. storageClass”.
Text input label
This column is the label that customer see during configuration of deployment. Instead of the content of the key they would see this name for that configuration which means the name should be clear to understand for customer.
For example, for the key as “global. storageClass”, seller can pick up the label as “storageClass”. In that case customers would understand that they are supposed to put the name of the preferred Storage Class in here.
Required
There are some configurations that could be optional or mandatory. If customer sets it then during deployment it would be overwrite and if not the default value form “values.yaml” would be picked up.
If there is a configuration that seller wants the customer to change it, then he/she can enable the required toggle so customers should put value for that.
Confidential
Some keys include some confidential information that during filling the key by customer, it should be treated as a confidential information and the content should be hidden.
For example, if the key is the default password of the application, then the seller can enable this feature. During the configuration it would be treated as a password and content cannot be seen during filling the information.
Validation Rule
If sellers want to restrict the content that customer would write as the value of that key, he/she can put regex rule, so customer are forced to follow that rule during filling the value. For that regex rule there is a “Error message” which seller can put hint or example to help customers to understand about the condition that is required.
Hidden
If seller enables that, then that configuration would be overwrite default helm chart value. However, customers are not able to see or change the content of that.
Please be aware that in that case “Default value” needs to be filled.
Multiple
This is the place where seller can set this configuration as an array. If multiple has been enabled, then customer can put more than one value for that key.
Default value
If seller wants, he/she can default value for that configuration. Customers would still be able to overwrite that.
Hint text
This column could help customers by adding a hint under the label which could provide more help for Customers. It appears as a short line beneath that configuration label.
For example, for the key as “global. storageClass” with the label of “storageClass”, seller can pick up the Hint text as “Kubernetes Storage Class for disk”. In that case customer would see a label named “storageClass” and beneath that a like which says, “Kubernetes Storage Class for disk”.
Tooltip text
This column would be used to show additional help when customer hover his/her mouse on that configuration column.
For example, for the key as “global.storageClass” with the label of “storageClass”, seller can pick up the Tooltip text as “You can use kubectl get storageclass to list them”. In that case customer would see a label named “storageClass” and whenever hover his/her mouse over that label would see “You can use kubectl get storageclass to list them” above that column.
Option
This can be used for adding a key which is the type of string or array. The only difference is that Seller makes the values to pick up prepared so customers can only pick from those lists. For instance, imagine you have a key “serviceType” and the answer should only be “ClusterIP”, “Nodeport” or “LoadBalancer”. Then the seller can pick that as the type of configuration and already add those as the pre-defined values.
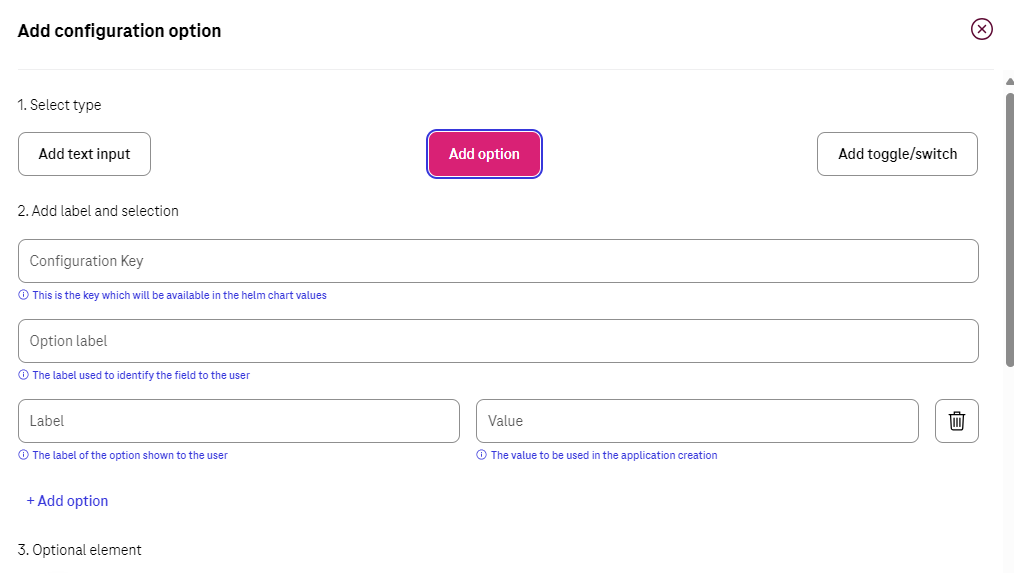
Configuration Key
Is the equivalent of Helm Chart key. It means that rules of the Yaml shall be followed here.
For example, if inside values.yaml file there is main key as “global” and then “storageClass” as sub key, then the content of “Configuration Key” would be “global. storageClass”.
Optional label
This column is the label that customer see during configuration of deployment. Instead of the content of the key they would see this name for that configuration which means the name should be clear to understand for customer.
For example, for the key as “global. storageClass”, seller can pick up the label as “storageClass”. In that case customers would understand that they are supposed to put the name of the preferred Storage Class in here.
Label/Value
There should a list of possible values to choose and a label for reach to help customer to understand which one to choose based on the situation.
Multiple
This is the place where seller can set this configuration as an array. If multiple has been enabled, then customer can put more than one value for that key.
Default value
If seller wants, he/she can default value for that configuration. Customers would still be able to overwrite that.
Hint text
This column could help customers by adding a hint under the label which could provide more help for Customers. It appears as a short line beneath that configuration label.
For example, for the key as “global. storageClass” with the label of “storageClass”, seller can pick up the Hint text as “Kubernetes Storage Class for disk”. In that case customer would see a label named “storageClass” and beneath that a like which says, “Kubernetes Storage Class for disk”.
Tooltip text
This column would be used to show additional help when customer hover his/her mouse on that configuration column.
For example, for the key as “global. storageClass” with the label of “storageClass”, seller can pick up the Tooltip text as “You can use kubectl get storageclass to list them”. In that case customer would see a label named “storageClass” and whenever hover his/her mouse over that label would see “You can use kubectl get storageclass to list them” above that column.
Toggle
This can be used for adding a key which is the type of Boolean.
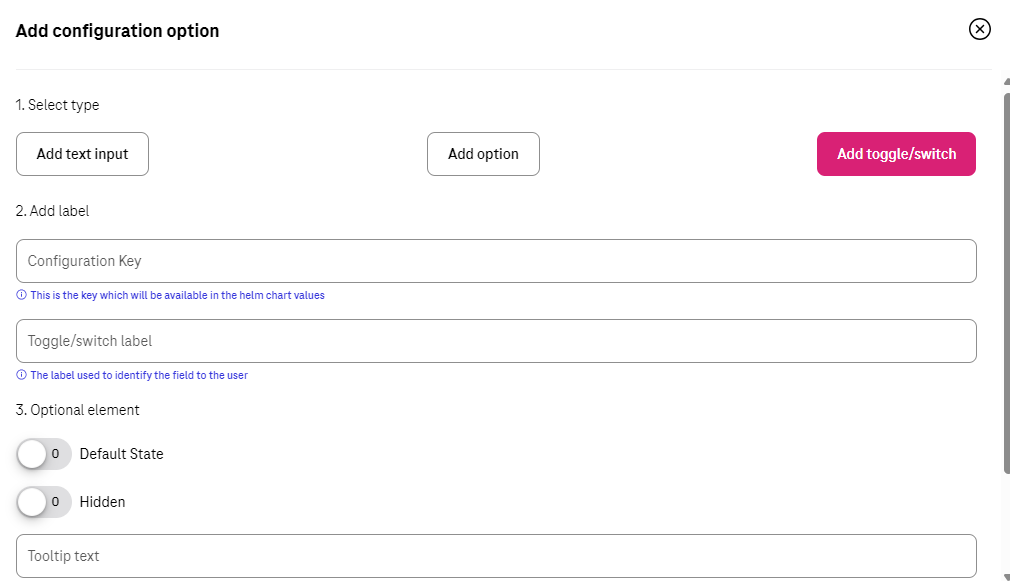
Configuration Key
Is the equivalent of Helm Chart key. It means that rules of the Yaml shall be followed here.
For example, if inside values.yaml file there is main key as “global” and then “storageClass” as sub key, then the content of “Configuration Key” would be “global. storageClass”
Toggle/label
This column is the label that customer see during configuration of deployment. Instead of the content of the key they would see this name for that configuration which means the name should be clear to understand for customer.
For example, for the key as “global. storageClass”, seller can pick up the label as “storageClass”. In that case customers would understand that they are supposed to put the name of the preferred Storage Class in here.
Default State
This variable by default is whether true or false.
If seller enables that, then that configuration would be overwrite default helm chart value. However, customers are not able to see or change the content of that.
Please be aware that in that case “Default value” needs to be filled.
Tooltip text
This column would be used to show additional help when customer hover his/her mouse on that configuration column.
For example, for the key as “global. storageClass” with the label of “storageClass”, seller can pick up the Tooltip text as “You can use kubectl get storageclass to list them”. In that case customer would see a label named “storageClass” and whenever hover his/her mouse over that label would see “You can use kubectl get storageclass to list them” above that column.
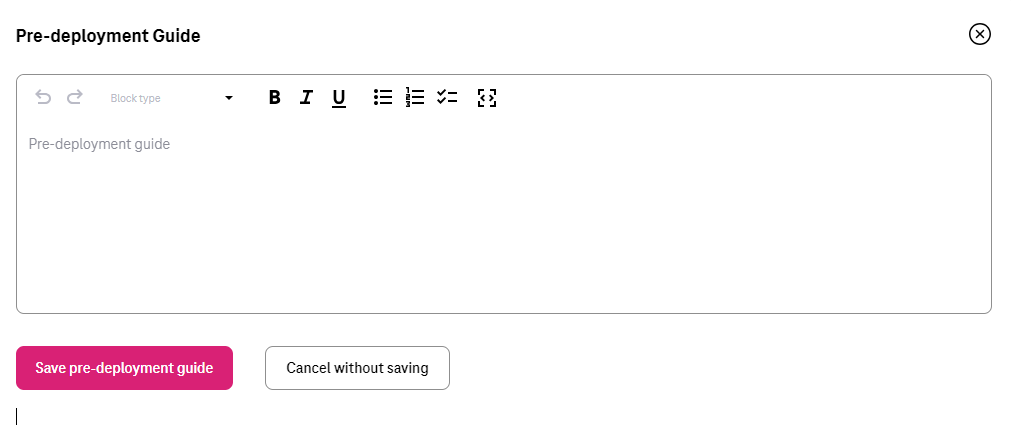
Add pre-Deployment guide
Seller can provide pre-deployment information that a customer needs to know before deployment.
Information such as suggested infrastructure environment or sizing etc.
This is a good place for guiding customers who wants to use the product offering.
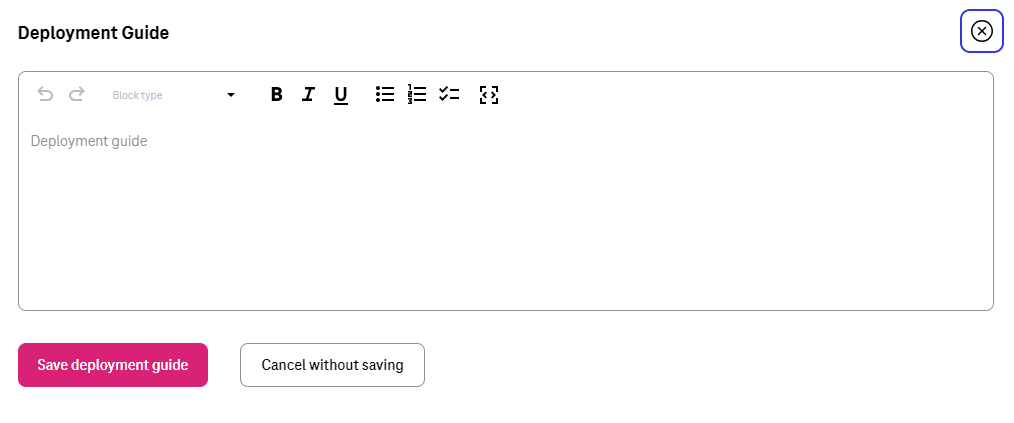
Add deployment guide
Although hints and tooltips that seller would add to each configuration could be descriptive, seller may prepare small document to depict how to deploy and customize that product. The whole content would be shown to customer as an installation guide.
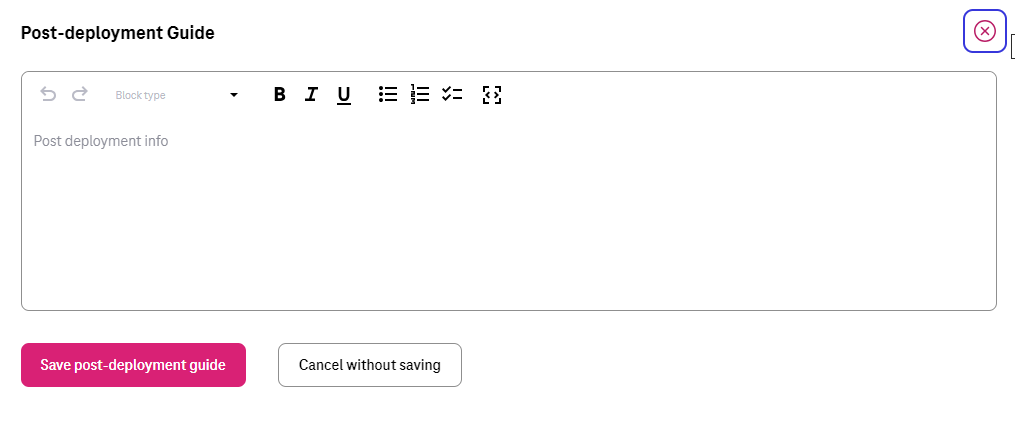
Post post-deployment guide
Information provided to support customer after the deployment of the Product Offering. Ex. How can the customer operate seller’s product offering.
Seller Helm Chart Address
Marketplace will fetch the helm chart of the Product Offering (seller’s software) from the provided link and eventually store the helm chart in an internal repository.
Seller Helm Chart Version
Helm chart version that the Marketplace will use in Product Offering.
Requested Release Date
Seller can request a release date to publish the Product Offering.
The publication (date and time) lies solely on discretion of Marketplace due to internal processes.
Request release date is not guaranteed but will be considered to the best of case.
Submit the request
Seller can submit the request when all fields have been duly filled.
Marketplace will review the request and approve the publication.
Please note that the review process will take some time.
E-mail notification will be sent to keep you updated on the status.
Service Type: CCE, License Type: BYOL (Bring your own license)
Seller can use the option of Bring own your license to publish the helm chart based Product Offering. After login, please go the ‘Dashboard’.
Product Offering is the seller’s published software (incl. service type of the Open Telekom Cloud, license type and seller’s software name) on the Marketplace.
Seller has to provide Helm chart of the Seller’s software to publish CCE based Product Offering. Currently only Service Type - ‘CCE’ is available with License types ‘Open Source, Free, Trial or BYOL (Bring Your Own License).’ The key information cannot be changed once a draft is created.
Product Offering Name
Name of the Product Offering cannot be changed after publication.
Service Type
Service Type is the type of IaaS provided by OTC to create the offering (Prerequisite of Service Type CCE: Helm-chart of the product/service).
CCE is OTC’s Cloud Container Engine.
License Type
License type is the license option (Open Source, Free, Trial or BYOL (Bring Your own License)) to create the offering.
License Info
Field for additional information on license that the seller needs to provide to the customer.
Secret Based License
For Cloud-native products, normally customers are supposed to prepare a Kubernetes secret including the content of secret as a license file. Seller can user this toggle to activate that.
When this has been activated then seller can let the customers know what the secret name inside Kubernetes would be and what would be the file name of the license inside that secret. This means that anytime a customer deploys that product then before the deployment a Kubernetes secret named “Secret Name” having a file name as “License File Name” containing customer's license key would be created.
Webshop Link
Seller would put the shopping link here so customers who want to use that product would use this link to be redirected to sellers' shopping address and purchase the license.
Secret Name
If the product is a cloud-native application and the activation would be automatically, then Kubernetes Secret is required. Here seller can set the secret name which is supposed to be created before deployment of the Helm Chart
Filename in the secret
Here seller can set the license filename inside the Kubernetes secret.
Licensing Guide
If the product is not a cloud-native application and the activation would be manually, then no Kubernetes Secret is required. Then the seller is supposed to deactivate the “License Secret Creation”.
In that case the seller might have documentation already available and all he/she should do is to put the documentation link here so Customers can reach and learn about the activation.
Contractual Documents
The EULA (End User License Agreement) of the Product Offering (i.e. Seller’s Software) must be provided. The customer and seller relation is bound by the EULA.
Category
Category of the Product Offering ex. Monitoring, Security etc. is selected.
Version
Version of the seller’s software can be provided.
Short Description
Short description of the Product Offering can be provided in the text field.
Full Description
Detailed description of the Product Offering can be provided the text field.
Logo
Logo of the Seller’s software can be uploaded in the section.
“Used Software”, “Used Software License Name” and “Link to License”
Addition information of used softwares in the Product Offering (i.e. Seller’s Software) can be provided in these fields.
Seller is obliged to provide transparency on used softwares to the customer.
Information includes the software names, licenses and links to the terms and conditions of license.
Examples of license are MIT or Apache v2.0.
Add Configuration
Seller can configure the parameters of helm charts of the Product Offering (seller’s software).
Configurations can be (Diagram 8) a “Text input” (Text or Array), Option (Text or Array) such as “Text Input” or a Toggle (Boolean) that customer needs to provide as True or False.
Text input
Option can be used for adding a key that is of type string or array.
Diagram 8 Configuration Options
Configuration Key
Is the equivalent of Helm Chart key. It means that rules of the Yaml shall be followed here.
For example, if inside values.yaml file there is main key as “global” and then “storageClass” as sub key, then the content of “Configuration Key” would be “global. storageClass”.
Text input label
This column is the label that customer see during configuration of deployment. Instead of the content of the key they would see this name for that configuration which means the name should be clear to understand for customer.
For example, for the key as “global. storageClass”, seller can pick up the label as “storageClass”. In that case customers would understand that they are supposed to put the name of the preferred Storage Class in here.
Required
There are some configurations that could be optional or mandatory. If customer sets it then during deployment it would be overwrite and if not the default value form “values.yaml” would be picked up.
If there is a configuration that seller wants the customer to change it, then he/she can enable the required toggle so customers should put value for that.
Confidential
Some keys include some confidential information that during filling the key by customer, it should be treated as a confidential information and the content should be hidden.
For example, if the key is the default password of the application, then the seller can enable this feature. During the configuration it would be treated as a password and content cannot be seen during filling the information.
Validation Rule
If sellers want to restrict the content that customer would write as the value of that key, he/she can put regex rule, so customer are forced to follow that rule during filling the value. For that regex rule there is a “Error message” which seller can put hint or example to help customers to understand about the condition that is required.
Hidden
If seller enables that, then that configuration would be overwrite default helm chart value. However, customers are not able to see or change the content of that.
Please be aware that in that case “Default value” needs to be filled.
Multiple
This is the place where seller can set this configuration as an array. If multiple has been enabled, then customer can put more than one value for that key.
Default value
If seller wants, he/she can default value for that configuration. Customers would still be able to overwrite that.
Hint text
This column could help customers by adding a hint under the label which could provide more help for Customers. It appears as a short line beneath that configuration label.
For example, for the key as “global. storageClass” with the label of “storageClass”, seller can pick up the Hint text as “Kubernetes Storage Class for disk”. In that case customer would see a label named “storageClass” and beneath that a like which says, “Kubernetes Storage Class for disk”.
Tooltip text
This column would be used to show additional help when customer hover his/her mouse on that configuration column.
For example, for the key as “global.storageClass” with the label of “storageClass”, seller can pick up the Tooltip text as “You can use kubectl get storageclass to list them”. In that case customer would see a label named “storageClass” and whenever hover his/her mouse over that label would see “You can use kubectl get storageclass to list them” above that column.
Option
This can be used for adding a key which is the type of string or array. The only difference is that Seller makes the values to pick up prepared so customers can only pick from those lists. For instance, imagine you have a key “serviceType” and the answer should only be “ClusterIP”, “Nodeport” or “LoadBalancer”. Then the seller can pick that as the type of configuration and already add those as the pre-defined values.
Configuration Key
Is the equivalent of Helm Chart key. It means that rules of the Yaml shall be followed here.
For example, if inside values.yaml file there is main key as “global” and then “storageClass” as sub key, then the content of “Configuration Key” would be “global. storageClass”.
Optional label
This column is the label that customer see during configuration of deployment. Instead of the content of the key they would see this name for that configuration which means the name should be clear to understand for customer.
For example, for the key as “global. storageClass”, seller can pick up the label as “storageClass”. In that case customers would understand that they are supposed to put the name of the preferred Storage Class in here.
Label/Value
There should a list of possible values to choose and a label for reach to help customer to understand which one to choose based on the situation.
Multiple
This is the place where seller can set this configuration as an array. If multiple has been enabled, then customer can put more than one value for that key.
Default value
If seller wants, he/she can default value for that configuration. Customers would still be able to overwrite that.
Hint text
This column could help customers by adding a hint under the label which could provide more help for Customers. It appears as a short line beneath that configuration label.
For example, for the key as “global. storageClass” with the label of “storageClass”, seller can pick up the Hint text as “Kubernetes Storage Class for disk”. In that case customer would see a label named “storageClass” and beneath that a like which says, “Kubernetes Storage Class for disk”.
Tooltip text
This column would be used to show additional help when customer hover his/her mouse on that configuration column.
For example, for the key as “global. storageClass” with the label of “storageClass”, seller can pick up the Tooltip text as “You can use kubectl get storageclass to list them”. In that case customer would see a label named “storageClass” and whenever hover his/her mouse over that label would see “You can use kubectl get storageclass to list them” above that column.
Toggle
This can be used for adding a key which is the type of Boolean.
Configuration Key
Is the equivalent of Helm Chart key. It means that rules of the Yaml shall be followed here.
For example, if inside values.yaml file there is main key as “global” and then “storageClass” as sub key, then the content of “Configuration Key” would be “global. storageClass”
Toggle/label
This column is the label that customer see during configuration of deployment. Instead of the content of the key they would see this name for that configuration which means the name should be clear to understand for customer.
For example, for the key as “global. storageClass”, seller can pick up the label as “storageClass”. In that case customers would understand that they are supposed to put the name of the preferred Storage Class in here.
Default State
This variable by default is whether true or false.
Hidden
If seller enables that, then that configuration would be overwrite default helm chart value. However, customers are not able to see or change the content of that.
Please be aware that in that case “Default value” needs to be filled.
Tooltip text
This column would be used to show additional help when customer hover his/her mouse on that configuration column.
For example, for the key as “global. storageClass” with the label of “storageClass”, seller can pick up the Tooltip text as “You can use kubectl get storageclass to list them”. In that case customer would see a label named “storageClass” and whenever hover his/her mouse over that label would see “You can use kubectl get storageclass to list them” above that column.
Add pre-Deployment guide
Seller can provide pre-deployment information that a customer needs to know before deployment.
Information such as suggested infrastructure environment or sizing etc.
This is a good place for guiding customers who wants to use the product offering.
Add deployment guide
Although hints and tooltips that seller would add to each configuration could be descriptive, seller may prepare small document to depict how to deploy and customize that product. The whole content would be shown to customer as an installation guide.
Post post-deployment guide
Information provided to support customer after the deployment of the Product Offering. Ex. How can the customer operate seller’s product offering.
Seller Helm Chart Address
Marketplace will fetch the helm chart of the Product Offering (seller’s software) from the provided link and eventually store the helm chart in an internal repository.
Seller Helm Chart Version
Helm chart version that the Marketplace will use in Product Offering.
Requested Release Date
Seller can request a release date to publish the Product Offering.
The publication (date and time) lies solely on discretion of Marketplace due to internal processes.
Request release date is not guaranteed but will be considered to the best of case.
Submit the request
Seller can submit the request when all fields have been duly filled.
Marketplace will review the request and approve the publication.
Please note that the review process will take some time.
E-mail notification will be sent to keep you updated on the status.
Test Deploy
Seller has the option to test the Product Offering via ‘Test Deploy’ button.
Test Deploy feature gives the Seller a possibility to test the configurations set.
It is highly advisable to test the Product Offering in order to submit a valid request for publication and to ensure a working Product Offering is offered to customers.
Test deployment may incur charges based on the infrastructure used to test the Product Offering.
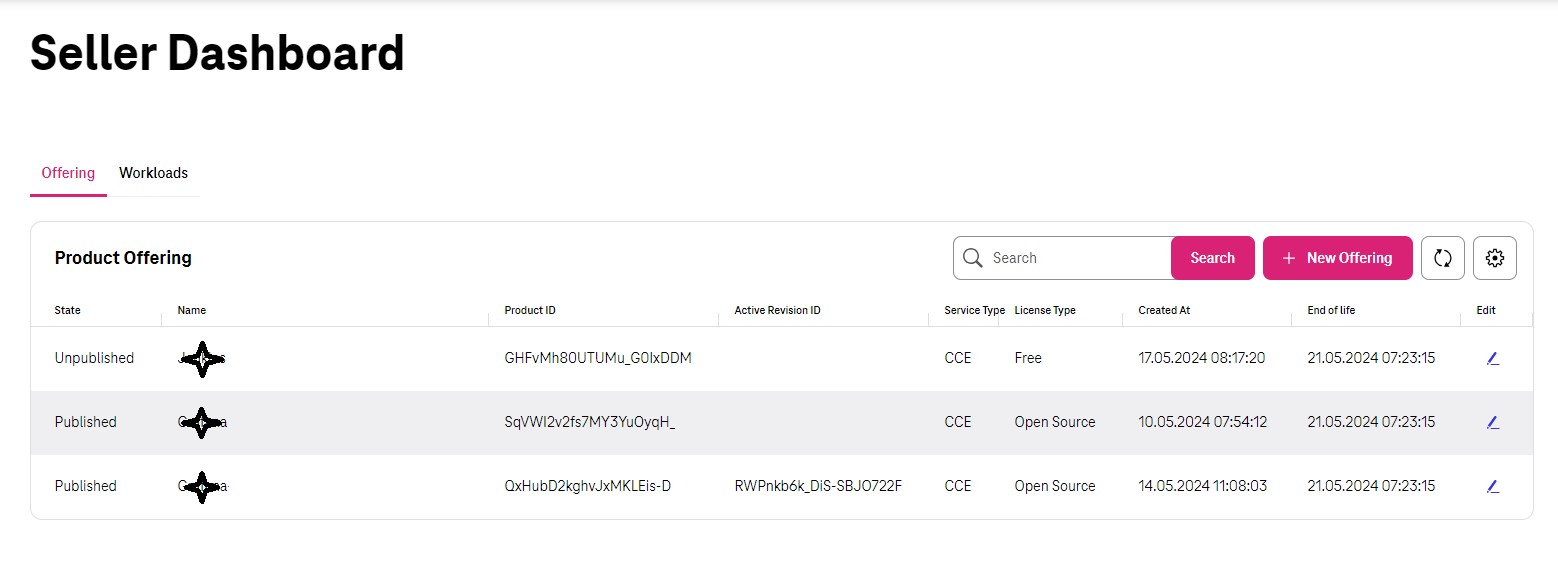
Seller Dashboard
After a successful login, Seller would use the dashboard to manage the Offerings. This page is available to click on the top right corner of the page. Dashboard has been divided into two sections which we would discuss the details in below.
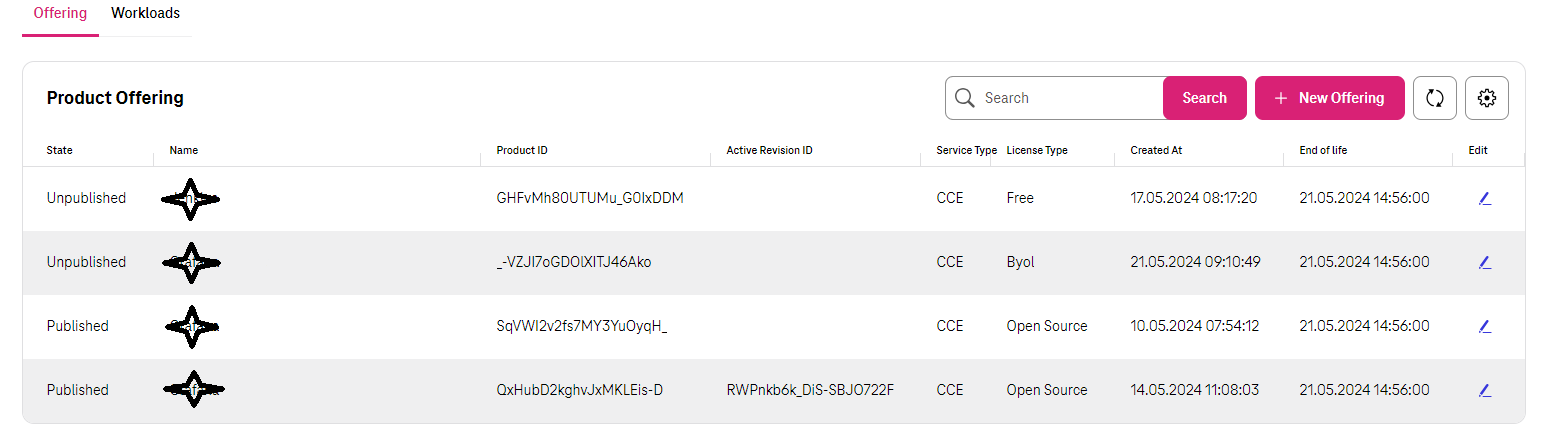
Offering
By clicking in Product section in dashboard, Sellers can see all the products which have been created by themselves. It would show the status of them, available revisions which customers can see and use (In any has been approved by Marketplace to be shown), the type of the product (which could be CCE), Licensing Model (which could be Free, Open source or BYOL) and if the Product EOL has been set for that or not.
Seller can Edit each “Product Offering” to manage the it by updating, Unpublish/Publish or even putting it to the “End of Life status”.
Details of how to do each action would be discussed in the corresponding pages.
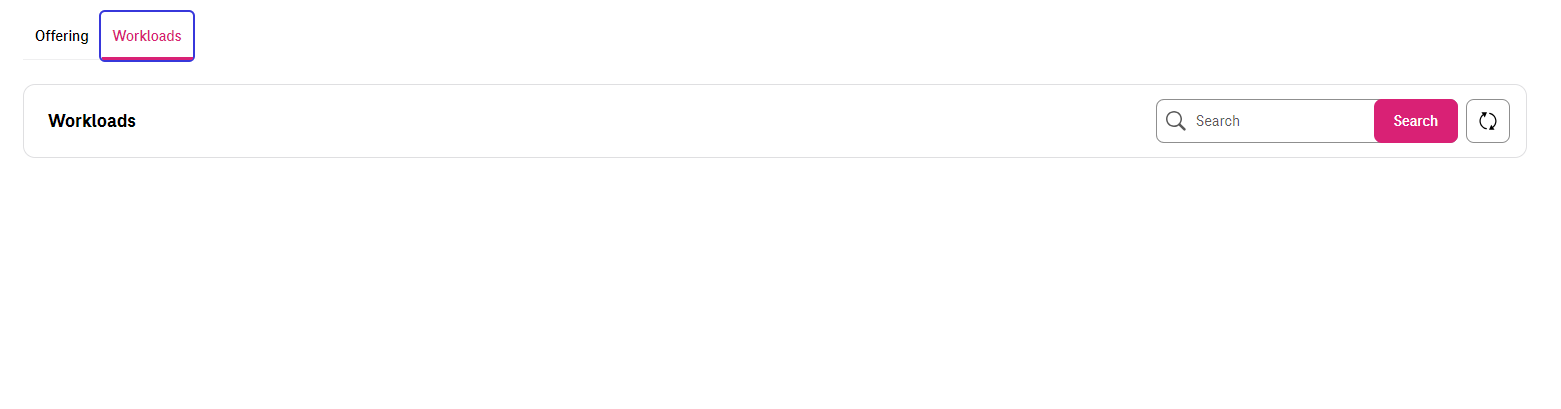
Workloads
Every time a deployment has been happened by seller, the status of that including the State, time and the name of the product would be recorded here so sellers can see if the deployment has been successful or not.
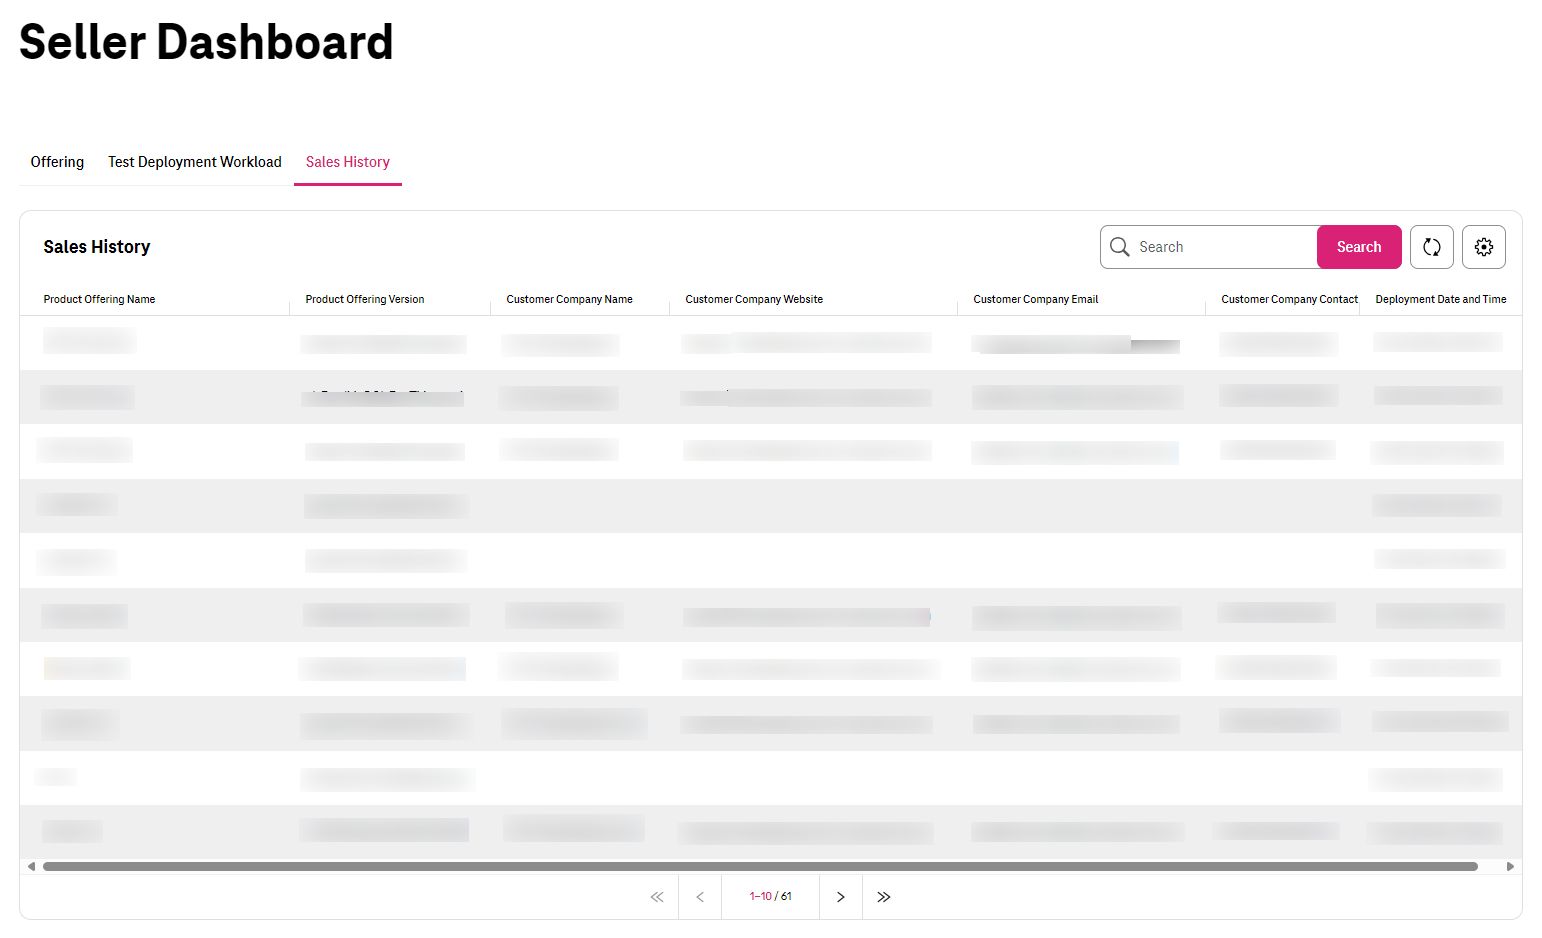
Sales History
Offering a product inside the marketplace would be a great opportunity for Sellers to reach Customers for future business establishment.
Marketplace offers this facility that if a customer used any product of any seller, the seller can see the name and time of deployment plus the contant details of the company.
Seller can use this opportunity to expand the business with the customers.
Private Offer Requests
Any Private Offer requests from customer would be shown here. Seller can see which customer is interested on which product and which Plan.

In additions, seller can see the answers and comment that customer has added during request.
Product Lifecycle
When a product has been created in Marketplace there are some activities which need to be done which requires some technical activities. Having said that, a product would have states as “Unpublished”, “Published” and “End of Life (EOL)”.
Unpublished
Unpublish is a temporary state which hide a product from customers to find and use which is revertible. When a Product born, the status of that would be “Unpublished”. This means this could not be seen by any customer at all. When the first version of its details (revision) gets approved then State of the product would change to “Published” that makes it possible for customers to see and use it in Marketplace. The state of product remains “Published” until Seller or Marketplace decide to change the status of that.
Please keep this in mind that status of Product and its revisions decide when a product would be visible to use.
Published
This the status of the product when it is active and can be shown to customers. Normally a product would remain as “Published” until a decision to hide temporarily or permanently that from Marketplace has been planned.
Please keep this in mind that status of Product and its revisions decide when a product would be visible to use.
“End of Life (EOL)”
A product would be available in Marketplace forever, until the seller has decided to off-board that from Marketplace. For instance, when a seller decides to retire his/her product form market and not support that anymore or when a re-branding has happened, and the product is supposed to be presented with new commercial name. in that case the seller can off-board the product from Marketplace. In Marketplace there a concrete rule for off-boarding based on the time of request as following:
If the request submitted until the middle of current month, then Marketplace would set the EOL time as the end of current month.
If the request submitted in the next half of the month, then Marketplace would set the EOL time as the end of upcoming month.
After the time for EOL has been reached, then none can see and use that product in the Marketplace.
Please be aware that this process is irreversible, and Seller cannot bring that product back to business anymore!
Revision Lifecycle
A Product is just an entity that represent an output regarding the application that seller wants to present inside Marketplace It would remain the same forever until a product get retired. Revision, however, is the list of attributes of that product which would change eventually. For instance, description, logo, configurations or even the price can change anytime. Revisions are the why to present changes of the same product every time the seller wants to update his/her product.
Revisions as needed to be approved by Marketplace has also lifecycle. Every time the seller wants to update a product, he/she should create a new revision and make sure that it is fine for the customers to use then Marketplace would take care of the reset of technical tasks. Eventually the new update of product (by on boarding the new revision) would be shown to customers on specific time that has been set for that revision by Marketplace.
Revision lifecycle would be as bellow.
Draft
The first time a revision has been created the status of that revision is “Draft”. This means this the time that Seller can play with the details and add as much information as he/she wants. During this time seller has the option to spend as much time as he/she needs to prepare the update for that product.
Read-to-Review
After all changes that the seller wanted has been done, he/she would submit this new revision to marketplace. It is time for Marketplace to review the information of that and make sure all technical requirements have been done and customers would be able to use the product with this revision or not.
Rejected
There might be some situations that the revision which has been offered by seller has some technical issue and marketplace want seller to take care of that. In that case the revision gets rejected and Seller would get informed about the reason of rejection.
A rejected revision can simply get back to “Draft” so seller can take care of the reason of rejection.
Approved
Finally, when the revision got reviewed by Marketplace and passed all the concerns of Marketplace, then the revision gets approved and can be shown to the customer at specific time which has been set by Marketplace.
Please be aware when a new revision of a product got approve, at the time of release, the old approve one will not be shown to customer and would be replaced by new one.
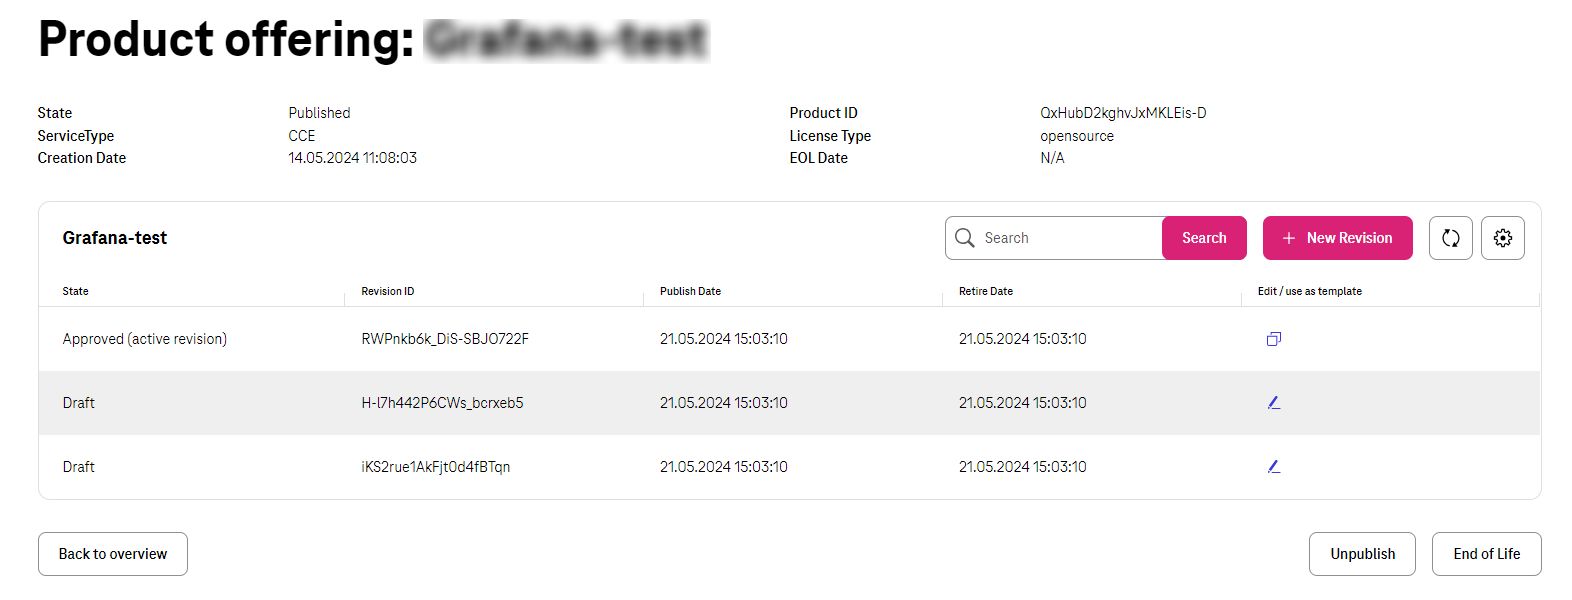
Update Product Offering
When a product has been released, it means it has the first revision approved that all details has been approved by marketplace. However, as all products eventually got new technical updates, Seller can update the content by updating that product by a new revision.
This process looks the same when seller created the Offering for the first time with only slight changes that the name, service type and the license type cannot be changed as we discussed previously during product creation.
The rest of the procedure and configuration would be the same as creating the product for the first time.
To update the product seller needs to click on “Dashboard” on the top right corner and then “Offering”.
There he/she can pick up the Offering he/she wants to update.
If there is already a revision with the status of “Draft”, then seller can edit that and continue working on that. If not, Seller has two options to create a new revision to update the product.
One way is to click on “New Revision” which automatically create a new revision with the exact data of the last approved revision for the ease of convenience.
The other way is to edit any already-approved revision and click to create a new revision out of it.
Unpublish/Re-Publish Product
There might be some reason that the seller/Marketplace want a product to be hidden from customers for coupe of day because of specific reason.
For instance, if there is a security issue on the current product and seller needs time to come up with a new version then the seller can temporarily hide the product by switching the product to “Unpublish”.
To unpublish a product, seller needs to click on “Dashboard” on the top right corner and then “Products”.
There he/she can pick up the Offering he/she wants to Unpublish.
Then there is a button named “Unpublish”. Seller can select that and change that product state to “Unpublished”.
Reverting the process is as Unpublishing. Seller just needs to select the product and this time click on the button named “Publish”.
Put Offering into “End of Life”
A product would be available in Marketplace forever, until the seller has decided to off-board that from Marketplace. For instance, when a seller decides to retire his/her product form market and not support that anymore or when a re-branding has happened, and the product is supposed to be presented with new commercial name. in that case the seller can off-board the product from Marketplace. In Marketplace there a concrete rule for off-boarding based on the time of request as following:
If the request submitted until the middle of current month, then Marketplace would set the EOL time as the end of current month.
If the request submitted in the next half of the month, then Marketplace would set the EOL time as the end of upcoming month.
To put a product into “End of Life”, seller needs to click on “Dashboard” on the top right corner.
Then select “Offering”. There he/she can pick up the Product he/she wants to retire.
Then there is a button named “End of Life”.
Please be aware that this process is irreversible, and Seller cannot bring that product back to business anymore!