Customer
In this section we talk about how to use Marketplace as a “Customer”. This includes how to login as a customer and pick up a product to deploy.
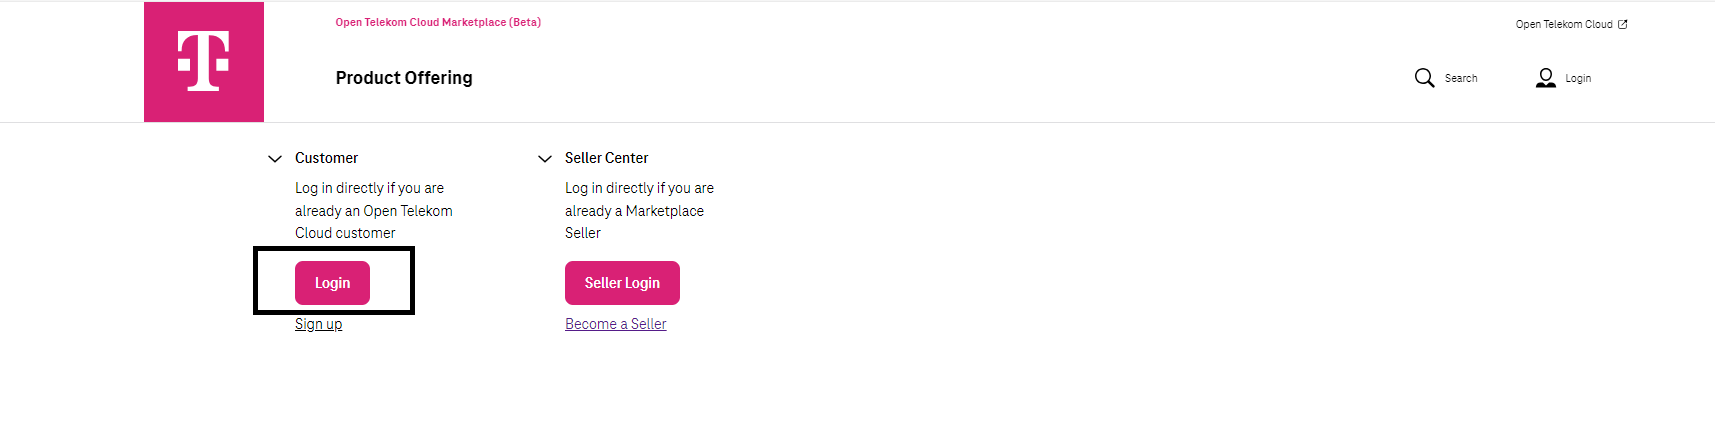
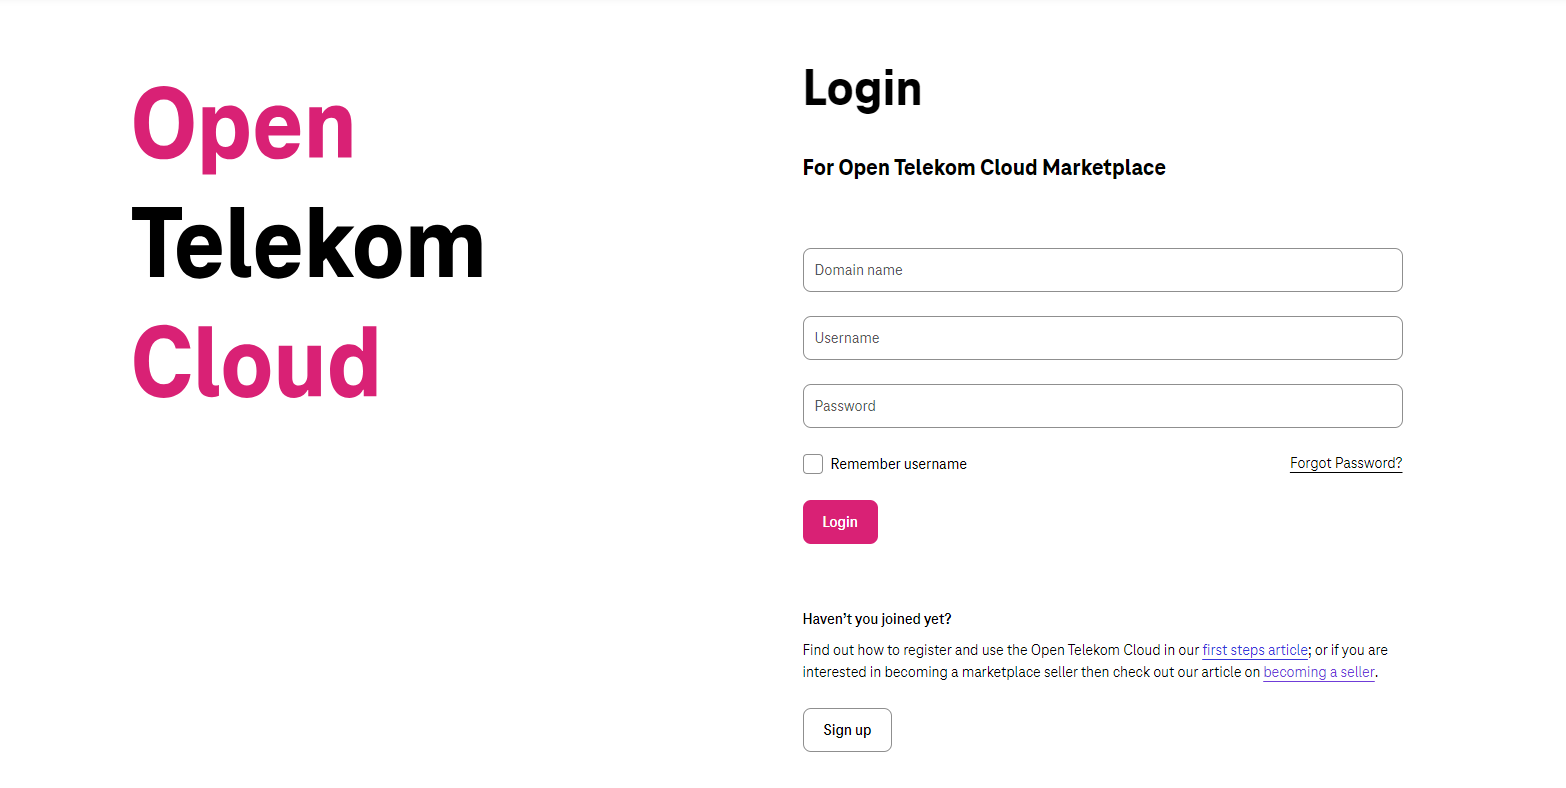
Login
As shown in the picture login to Marketplace as a Customer is straight forward and you can login using your OTC IAM account.
Please be aware that only users which have the “Tenant Administrator” role can login to the Marketplace as a Seller.
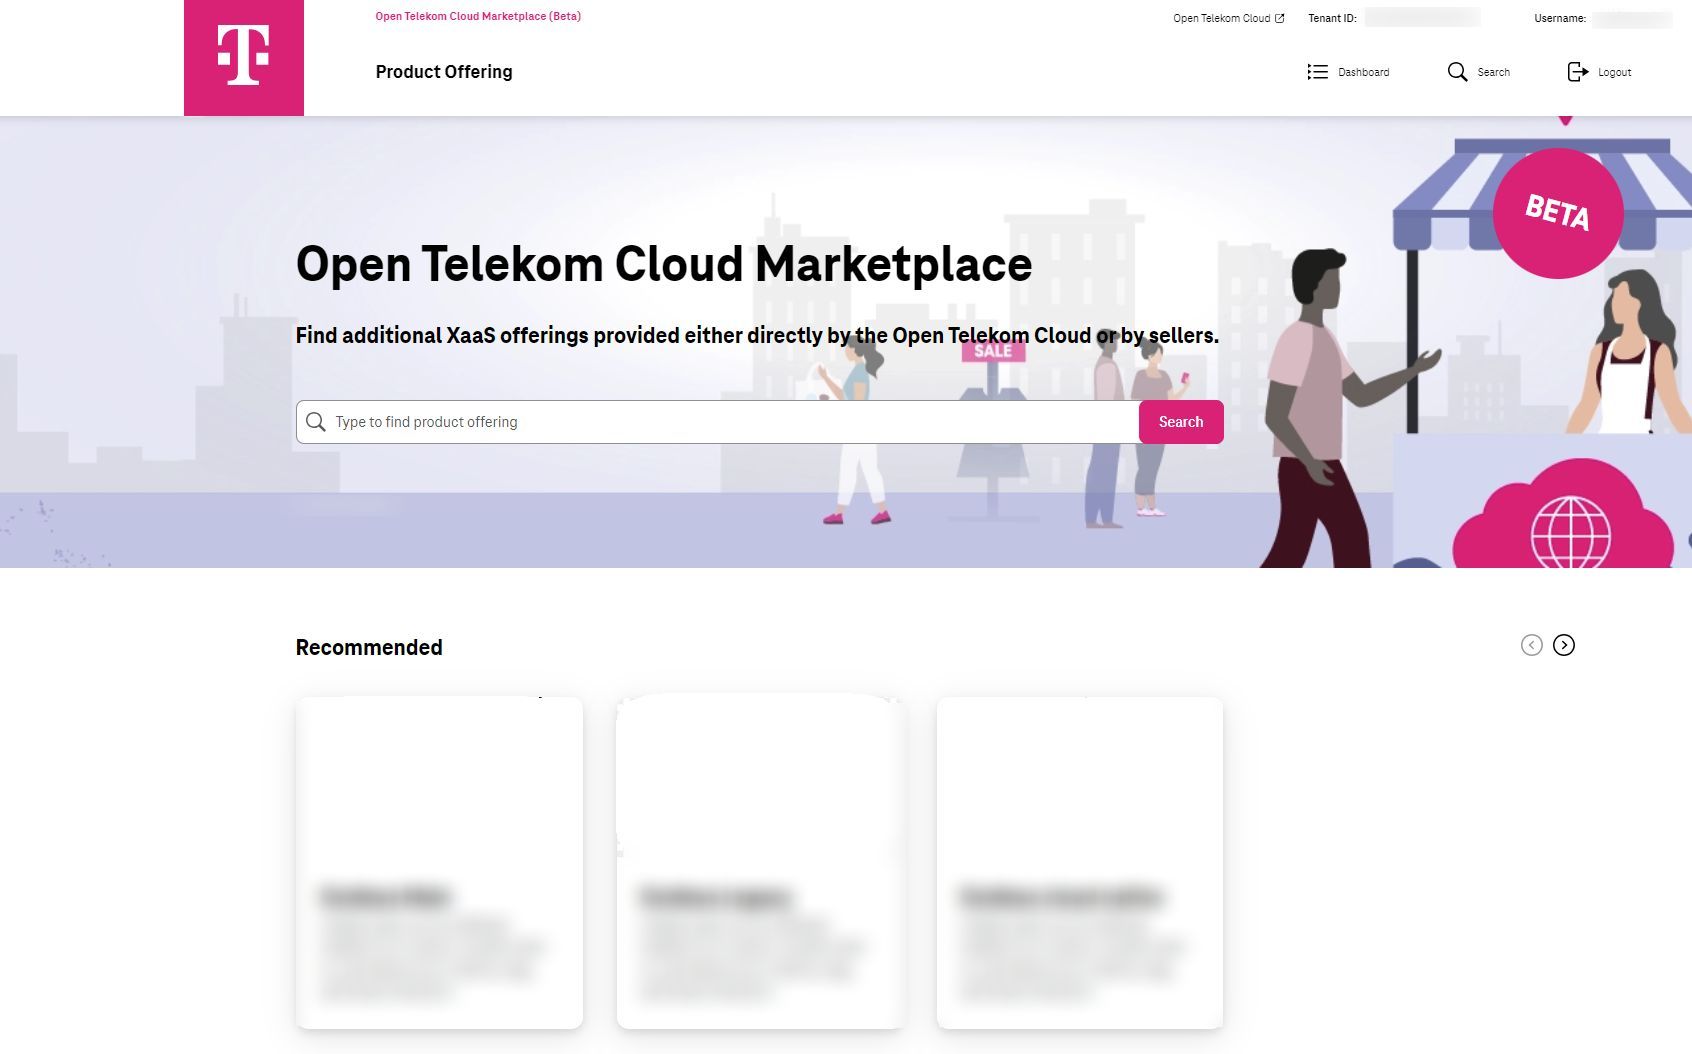
After successful login, the Catalog is visible. Here you can select a product to deploy and use.
Login via MyWorkplace
If you want to use an existing ‘MyWorkplace’ user, you first need to find the corresponding IAM user for your ‘MyWorkplace’ account.
First log in to MyWorkplace.
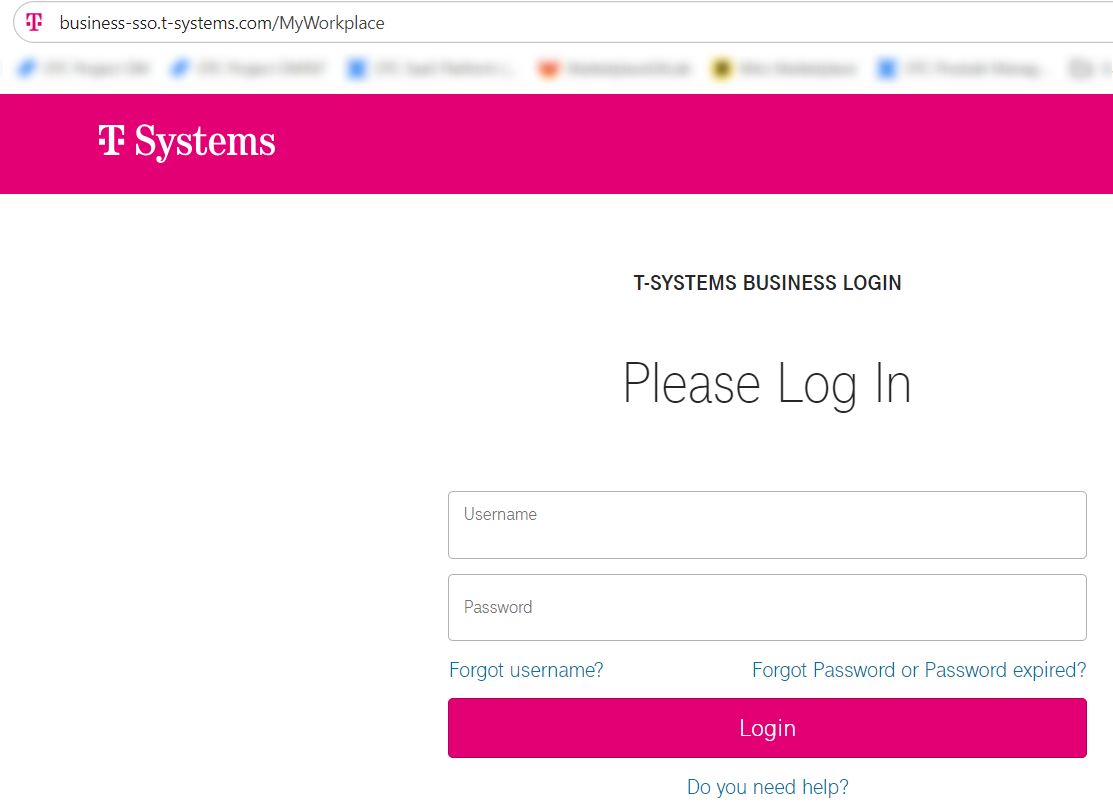
Diagram 6 MyWorkplace
After login select your OTC Domain ID to open ‘OTC Console’.
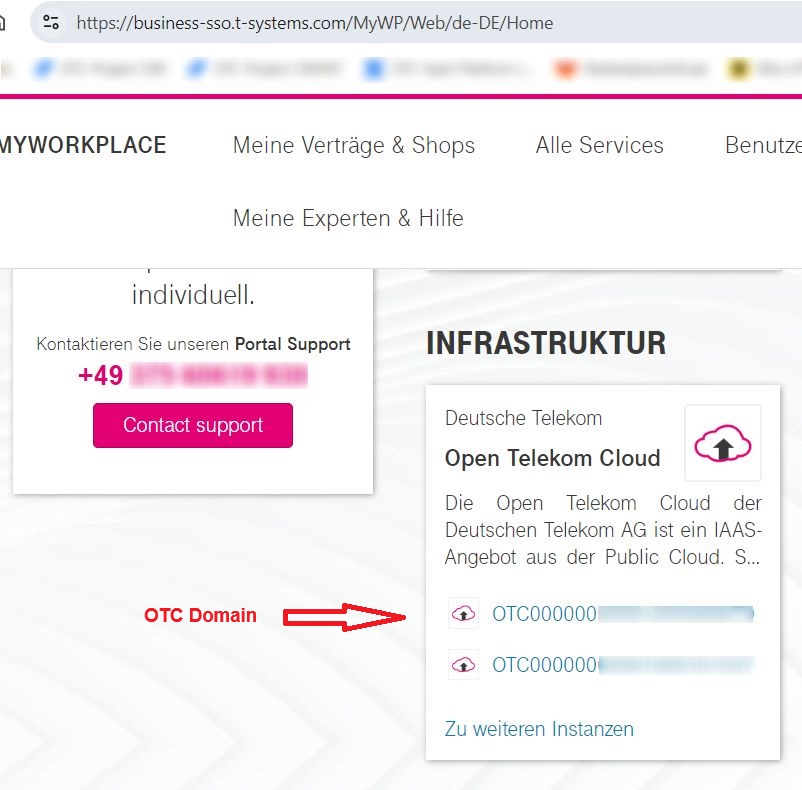
Diagram 7 MyWorkplace Login
You are then redirected to the ‘OTC Console’ where you can look up your OTC IAM ‘Domain name’ and ‘Username’.
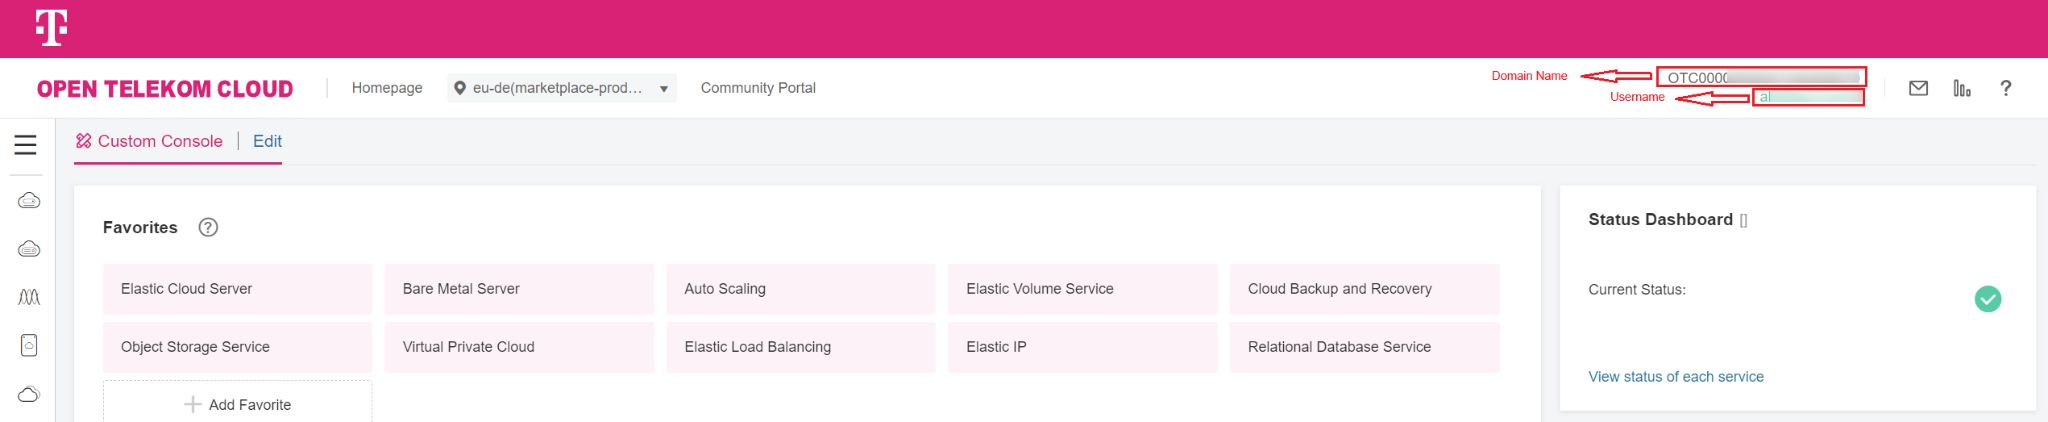
Diagram 8 OTC Console
Set a password in OTC IAM for the MyWorkplace User
Please note that this ‘OTC IAM User’ does not have the same ‘Password’ as used to log in to ‘MyWorkplace’. To allow direct login with the ‘OTC IAM’ user you need to add a password for the OTC IAM user.
To reset the ‘Password’, you need to reset the password via the login form (first log out of OTC Console) for OTC Console and click on ‘Forgot password?’.

Diagram 9 Forgot Password
To reset the password you provide the ‘Domain name’ for ‘Name of the administrator account’ and ‘Username’ for the ‘IAM user name’ and complete the CAPTCHA to request the password reset.
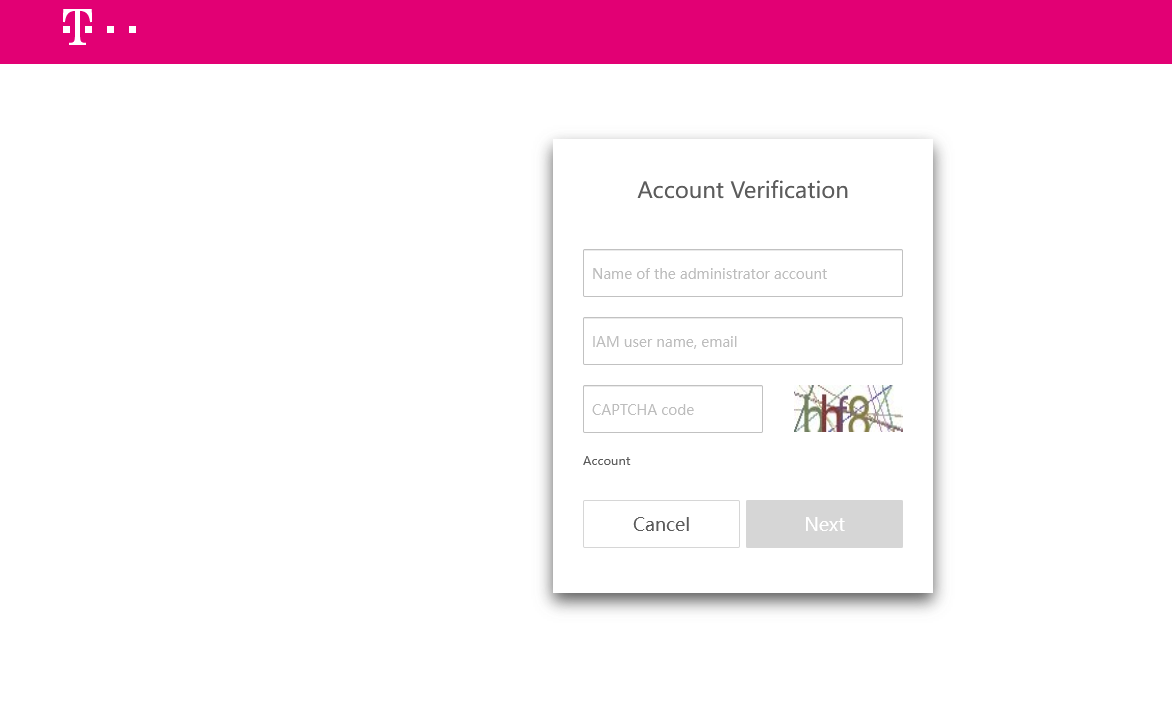
Diagram 10 Reset Password
Login using an OTC IAM user
With an OTC IAM user and the ‘Tenant Administrator’ role you can now log in to OTC Marketplace. Information required for login (‘Domain name’ and ‘Username’) can be looked up on Console .
Diagram 11 OTC Console
Customer Profile
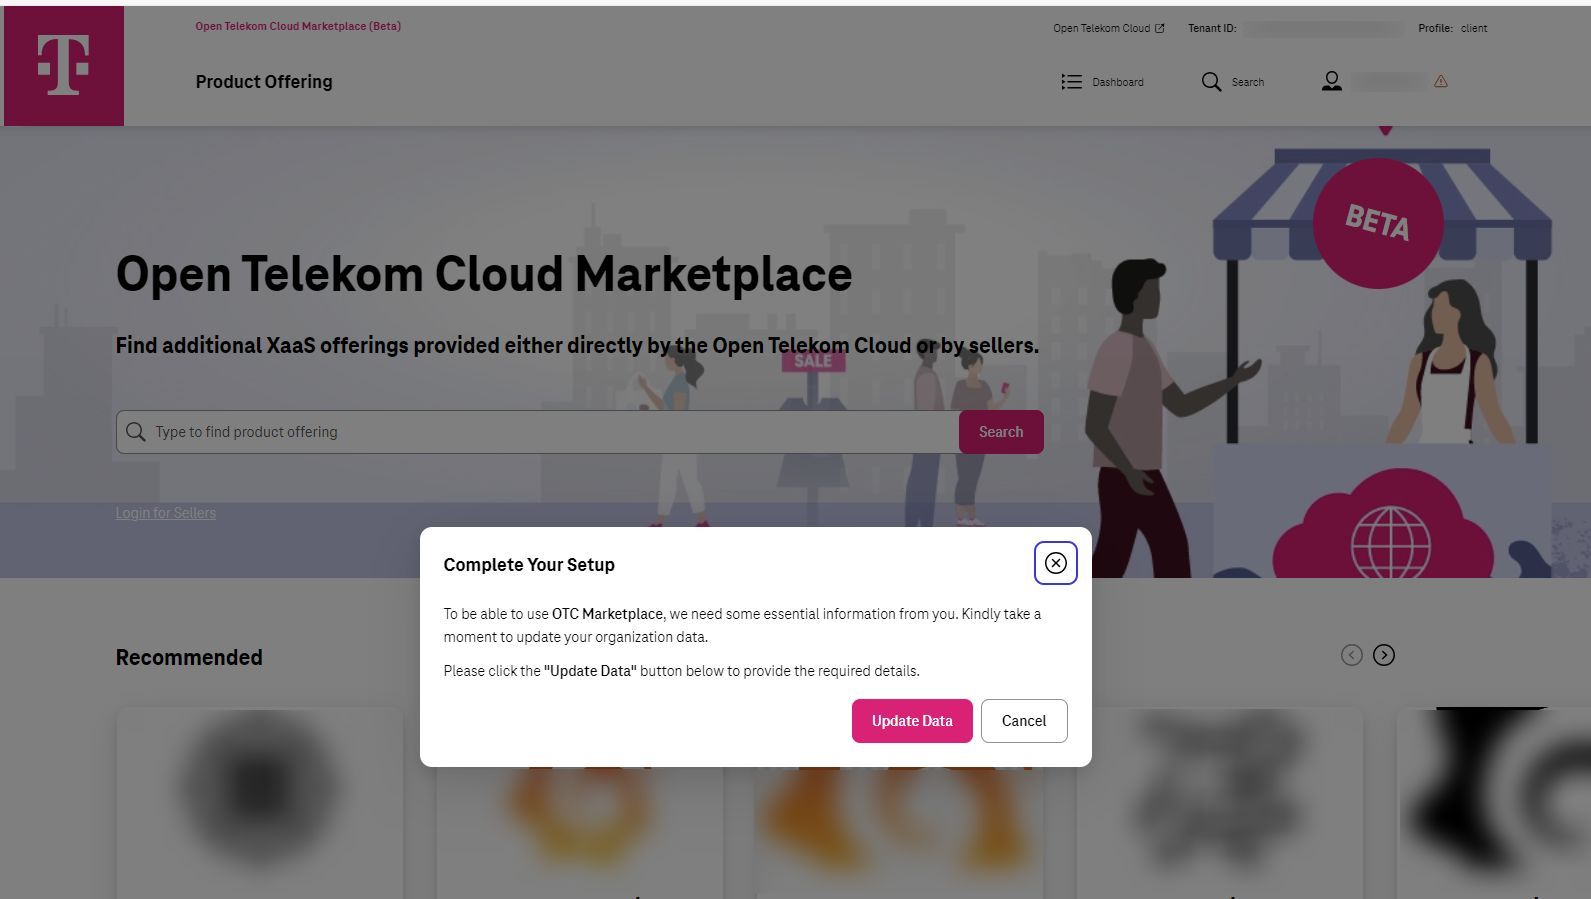
OTC Marketplace - beeing a B2B platform - wants to provide a sincere opportunity for customers and sellers to connect. When onboarding to Marketplace each customer is asked to provide some non-confidential information including the company name and website, a team email address sellers can use to contact customers using their product, and a team email address and optionally a phone number for the Marketplace team to contact. When a customer logs in as the first user for their Tenant, they get asked to complete their organization profile. Browsing through Marketplace is possible without completing this step.
Customer Profile
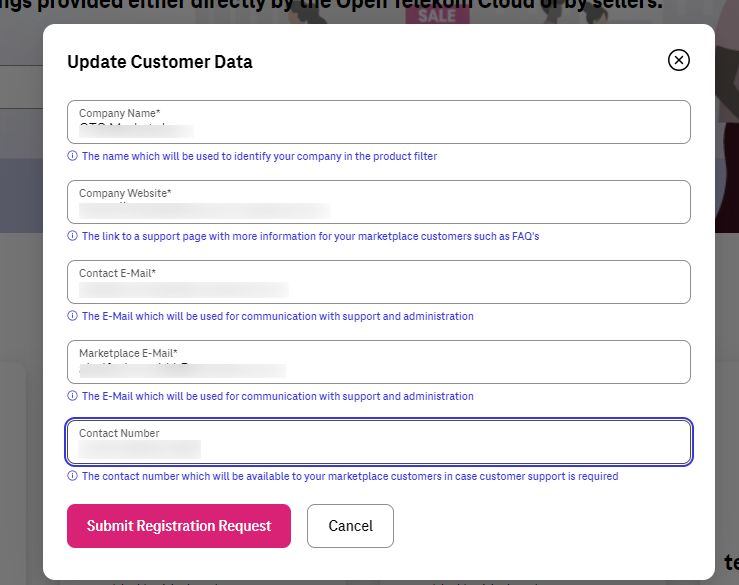
When selecting ‘Update Data’ you are asked to provide your data to submit your access request. Please note that this profile is shared with all users in your organization, you should use e.g. a shared team mailbox for this. After submitting your request it is reviewed. Untill approval you can already browse the Catalog and have a look at the listed products and optionsOTC Marketplace - beeing a B2B platform - wants to provide a sincere opportunity for customers and sellers to connect. but you will only be able to purchase when the review is finished.
Customer Profile Data
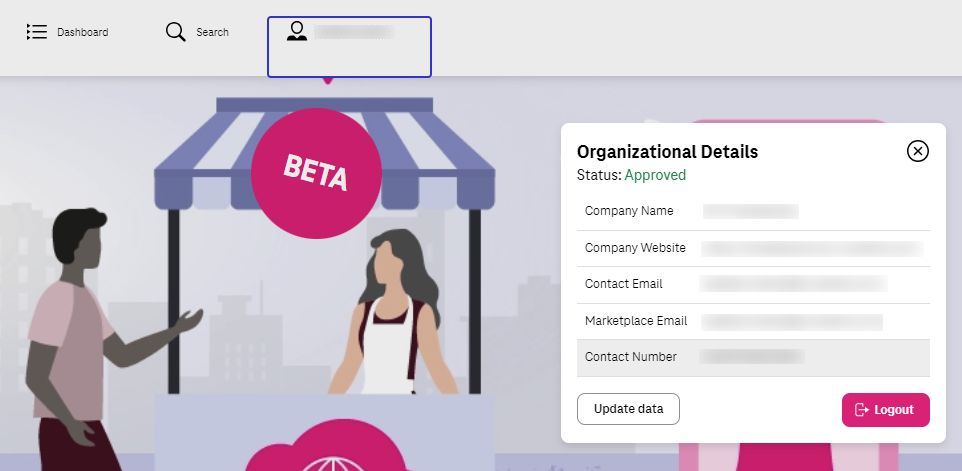
The information you provided and the approval status are visible in your profile, which is available via the ‘Profile’ button in the top bar. This is also where you can change your profile data, if neccessary.
Profile
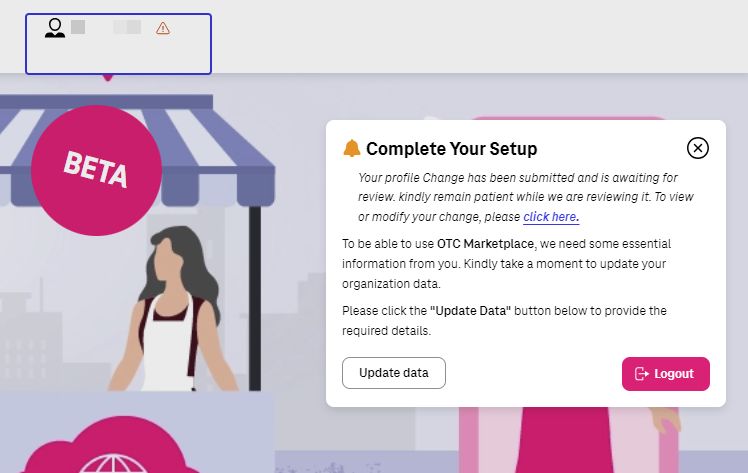
If you forgot to complete your profile or approval is still pending you will ne notified of this on the product configuration page.
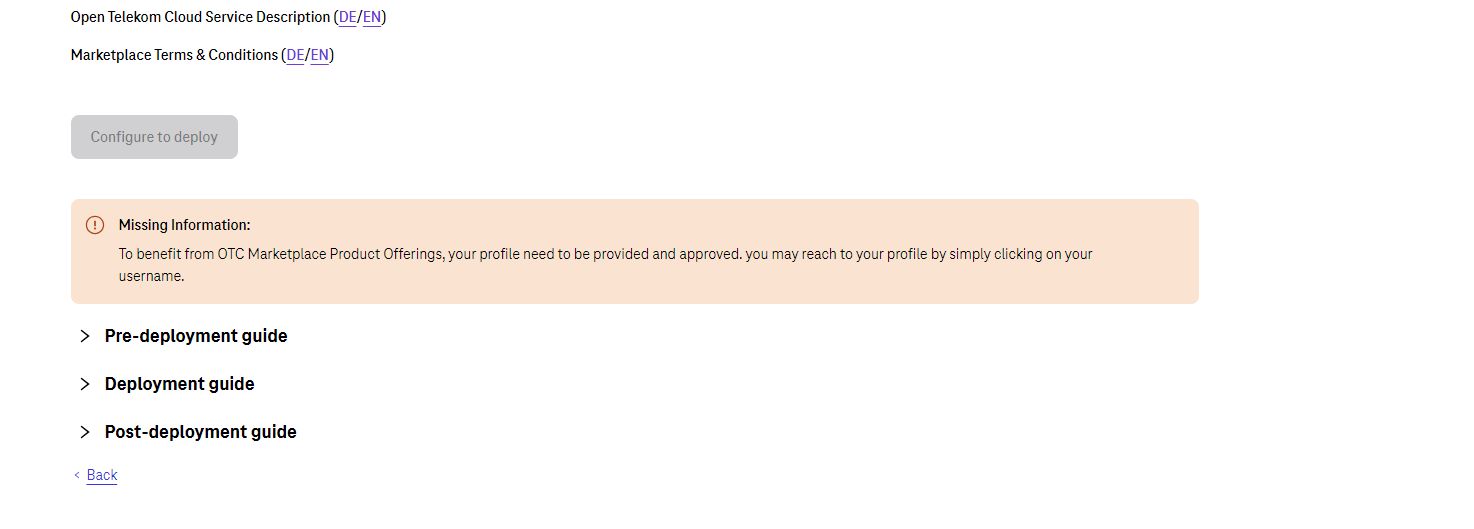
Profile not approved
As soon as the data has been reviewed and approved, all information can be seen as shown in the picture.
Profile
Role Management
With Marketplace Role management, the Tenant Owener would be able to deligate the role to any other IAM users of the tenant.
Please not that this process would happened gradually and this means that thoses who have "Tenant Administrator" can still login to Marketplace with no restriction. However, as the next step it would be revoked and only those who have role can login.
Who is the Tenant Owner?
Each tenant has one IAM user that is linked to OTC MyworkPlace. This the first account that the customer of OTC can use to access OTC Console. This account has been created automatically and is a combination of a random number plus Domain-ID. This is a unique account and cannot be deleted.
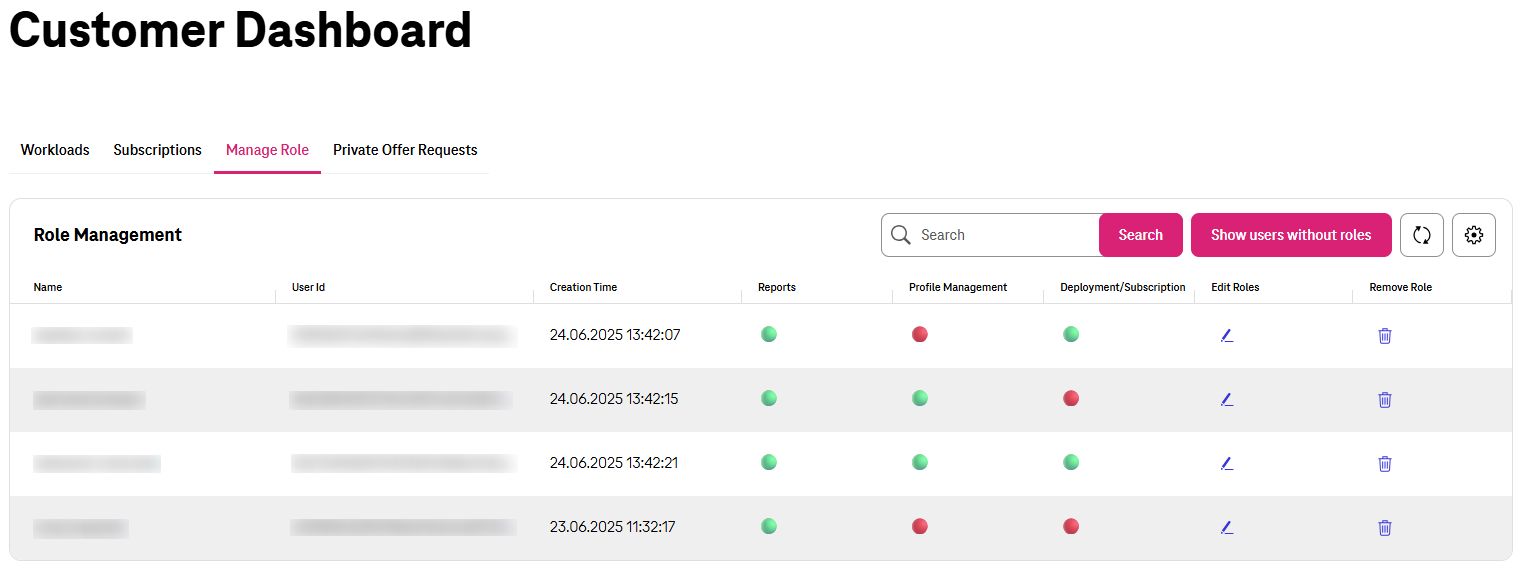
Manage Role Dashboard
When the tenant owner logs in to Marketplace as the customer, there is specific Dashboard for him/her named "Manage Role". There all the users that have role can be seen. Alternatively by clicking on "Show users without roles", all of the remaining IAM users that has no role can be seen and get a role.
Manage Role
Marketplace Roles
Marketplace has three different Roles as Customer which can be assigend to any IAM user.
Reports: This is the minimum priviledge which is also a mandatory role. IAM users having this role can have access to any report inside the Marketplace such as the Workloads, Subscription. This Role does not allow anyone to be able to change something, includein the Deploy or Subscribe any Product Offering.
Profile Management: IAM users that have this role has all the priviledges that Reports has. they can also update information about the Customer Profile.
Deployment/Subscription: IAM users that have this role has all the priviledges that Reports has. they can also Deploy or Subscribe any Product Offering.
Assign Marketplace Roles
Tenant owner can reach the Manage Role Dashboard and then click on "Show users without roles" to assign a new user a role.

Add Role to new IAM User
Then he/she can edit any User that does not any Role and the select which Role shall be assign to that IAM User.
Add Role to new IAM User
Update Marketplace Roles
Tenant owner can reach the Manage Role Dashboard and then click on "Show users with roles" to edit Roles of a User.
Update Roles of an IAM User
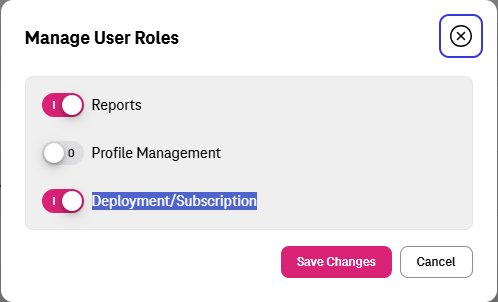
Then he/she can edit any User that has Role and the select which Role shall be assign/revoked for that IAM User.
Update Roles of an IAM User
Revoke Marketplace Roles
Tenant owner can reach the Manage Role Dashboard and then click on "Show users with roles" to Revoke Roles of a User.
Revoke Roles of an IAM User
Then he/she can click on delete icon of any User that has Role to remove his/her Roles.
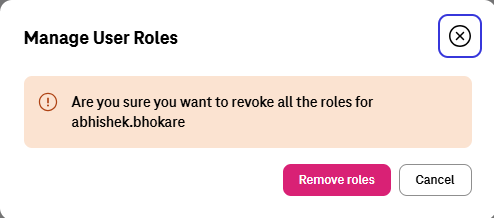
Revoke Roles of an IAM User
Purchase and Deploy a Product Offering
Applications that need to be deployed, need an environment to use as the deployment target. For instance, if you want to deploy a Product of type CCE a CCE cluster needs to be set up and running to deploy. For SaaS style products requiring a subscription there are normally no preparations neccessary to make the service available to your applications or users.
Private Offer
This product type allows sellers to advertise offerings on the OTC Marketplace and collect customer leads in a structured way.
These products are not purchased directly through the Marketplace. Instead, interested customers "request" the product. Sellers can also define specific questions which customers have to answer to more easily qualify leads. Once a customer requested a product, the lead will show up in the sellers dashboard and additionally a mail is sent to the seller. The seller can then contact the customer directly to establish a business relationship and initiate the process towards a business deal.
This product type is ideal for products that are not yet / supposed to be fully integrated into the Marketplace. It typically includes offerings that:
Lack the technical requirements for a deep integration.
Are from sellers not yet ready to commit to a full integration.
Are from sellers who are working on a full integration but want to already establish a presence.
Are from sellers who are working on a full integration but want to already establish a presence.
Are a type not yet technically supported by the Marketplace.
Are better suited for a private, custom offer (e.g., professional services).
When you select those products then as shown in the picture you would see wealth of information such as the details of that offer and the different levels of Plan to request.
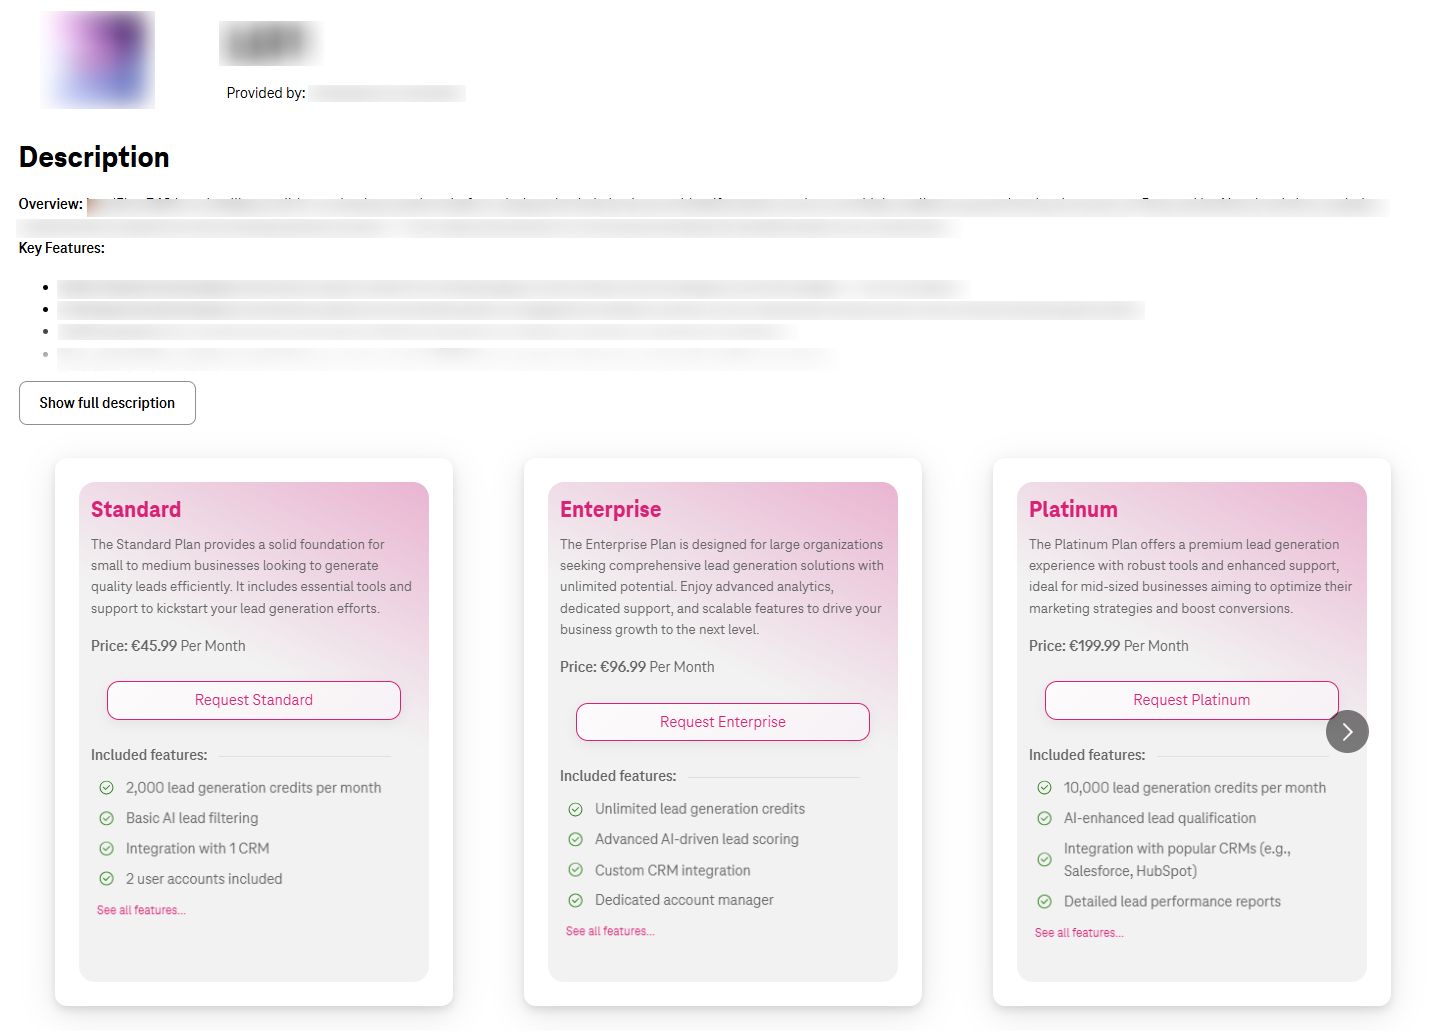
Customer can then read all the features that have been offered on each plan and eventually pick up the one that suits his requirements and click on ‘Request <Plan Name>’.
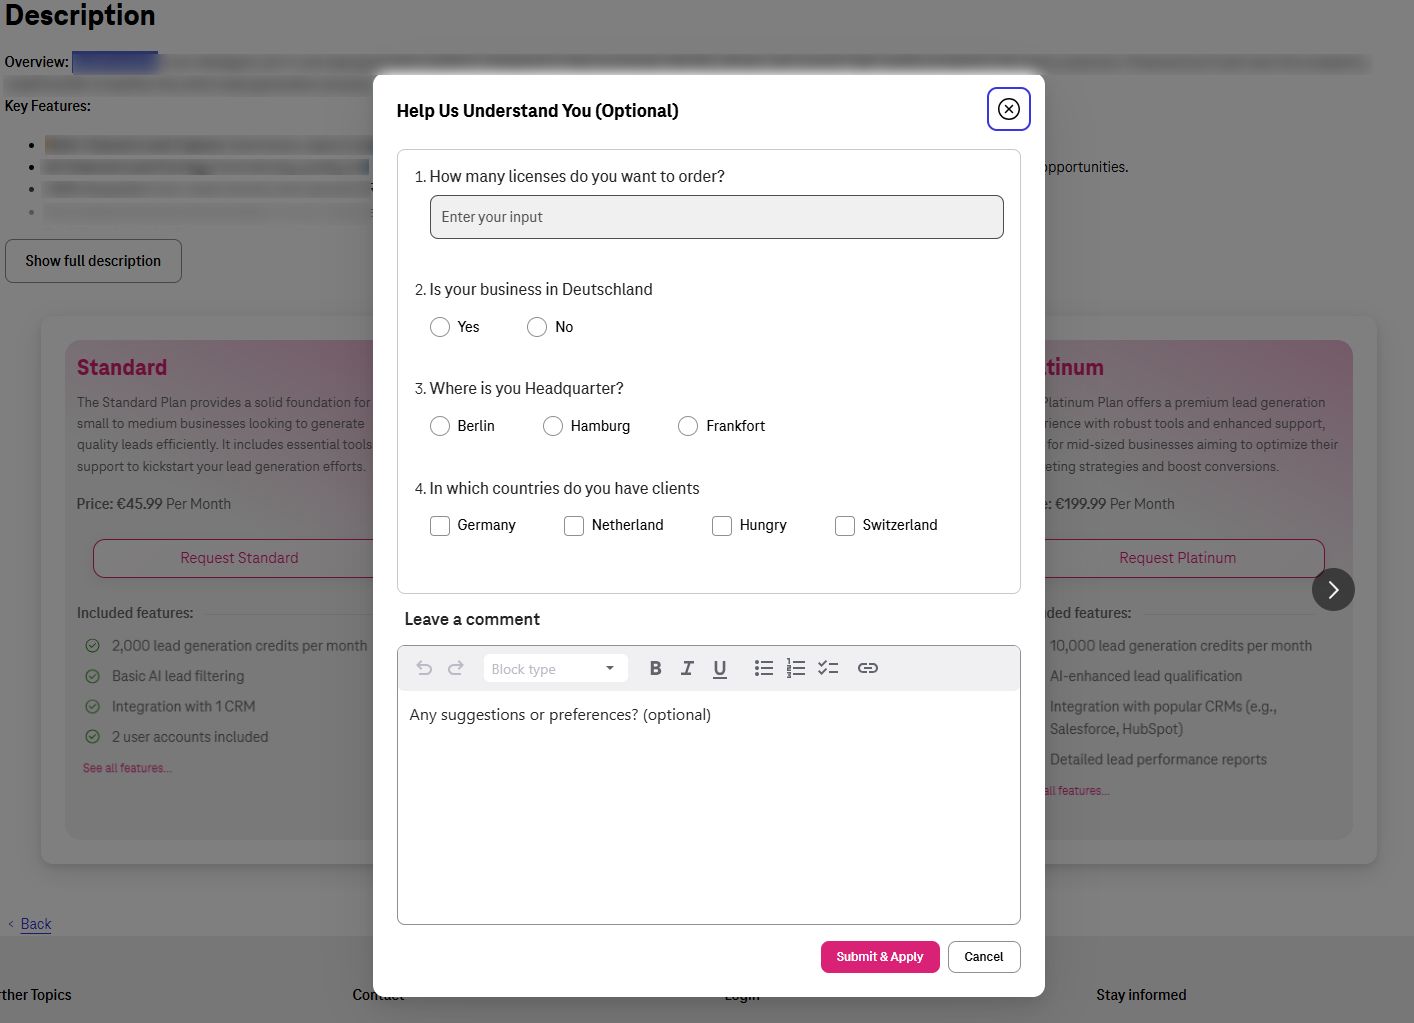
After Selecting Plan that suits you then there might be couple of questions to be answered.
Answering to those questions are quite optional and there are not mandatory.
At then end, also there is a section that Customer can write any extra comment if he will to provide more details.
CCE Open Source, Free or Trial
These types of products are CCE. This means that for using them you need to have an up and running CCE cluster before trying to use them. Your CCE cluster is supposed to have enough resource to allow the deployment. We recommend having an updated version of CCE to be used. As the name suggests, these products are weather Open Source or free of charge. Which means customer would not be charged to use them.
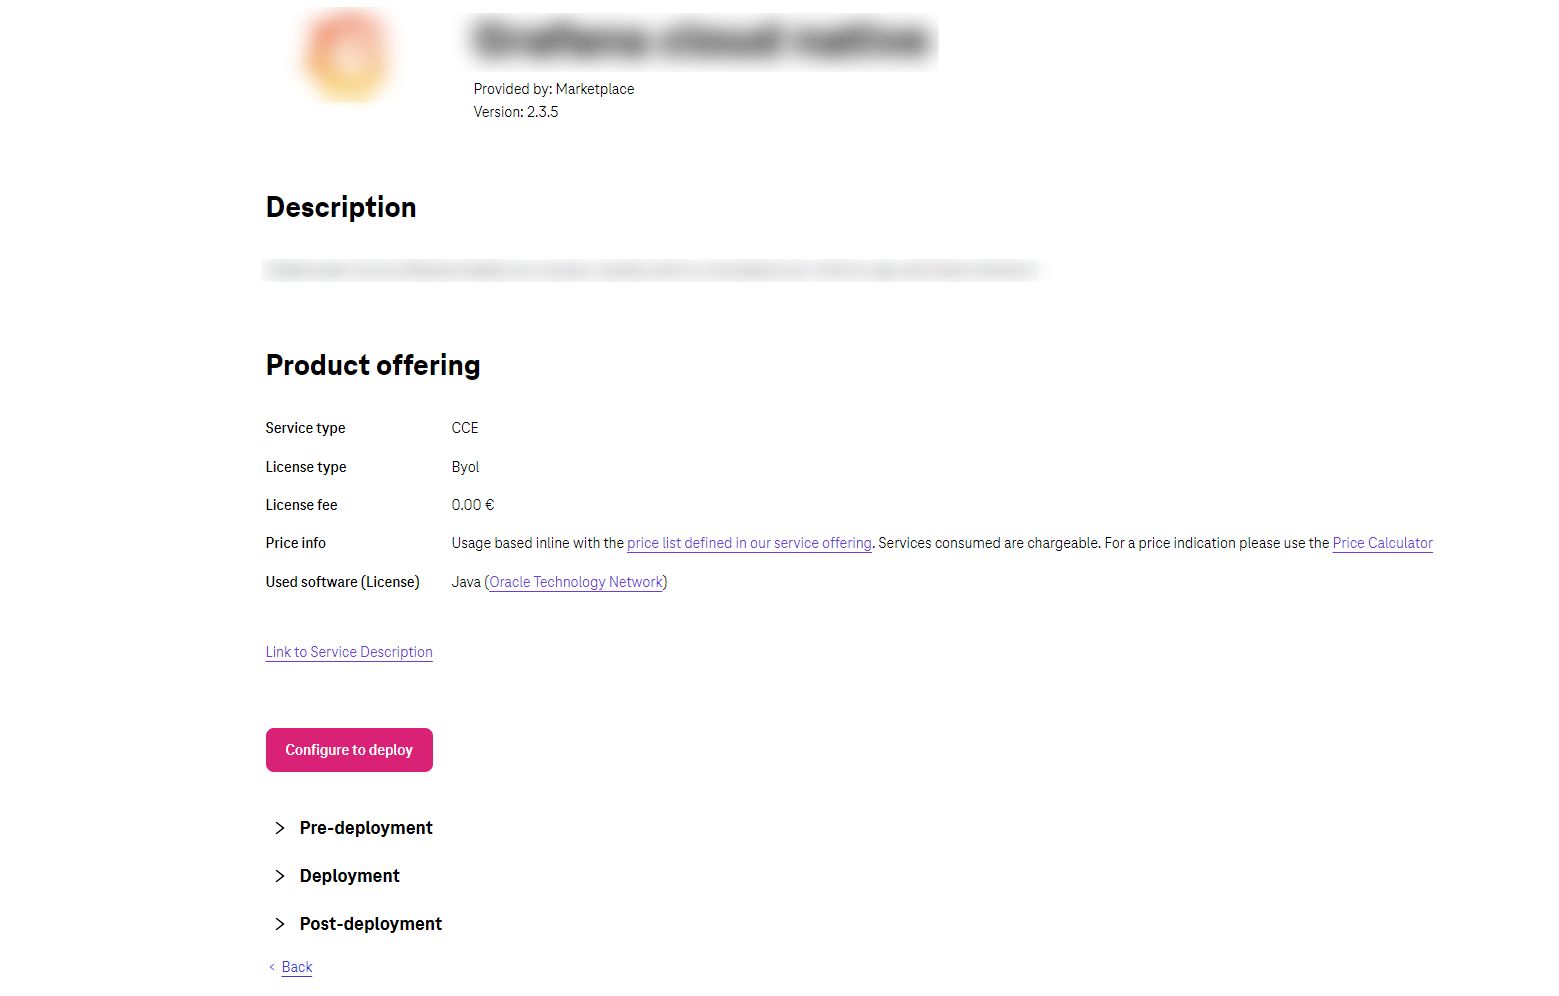
When you select those products then as shown in the picture you would see wealth of information such as the type and license or even the detailed data such as the technology and software that has been used to build this product.
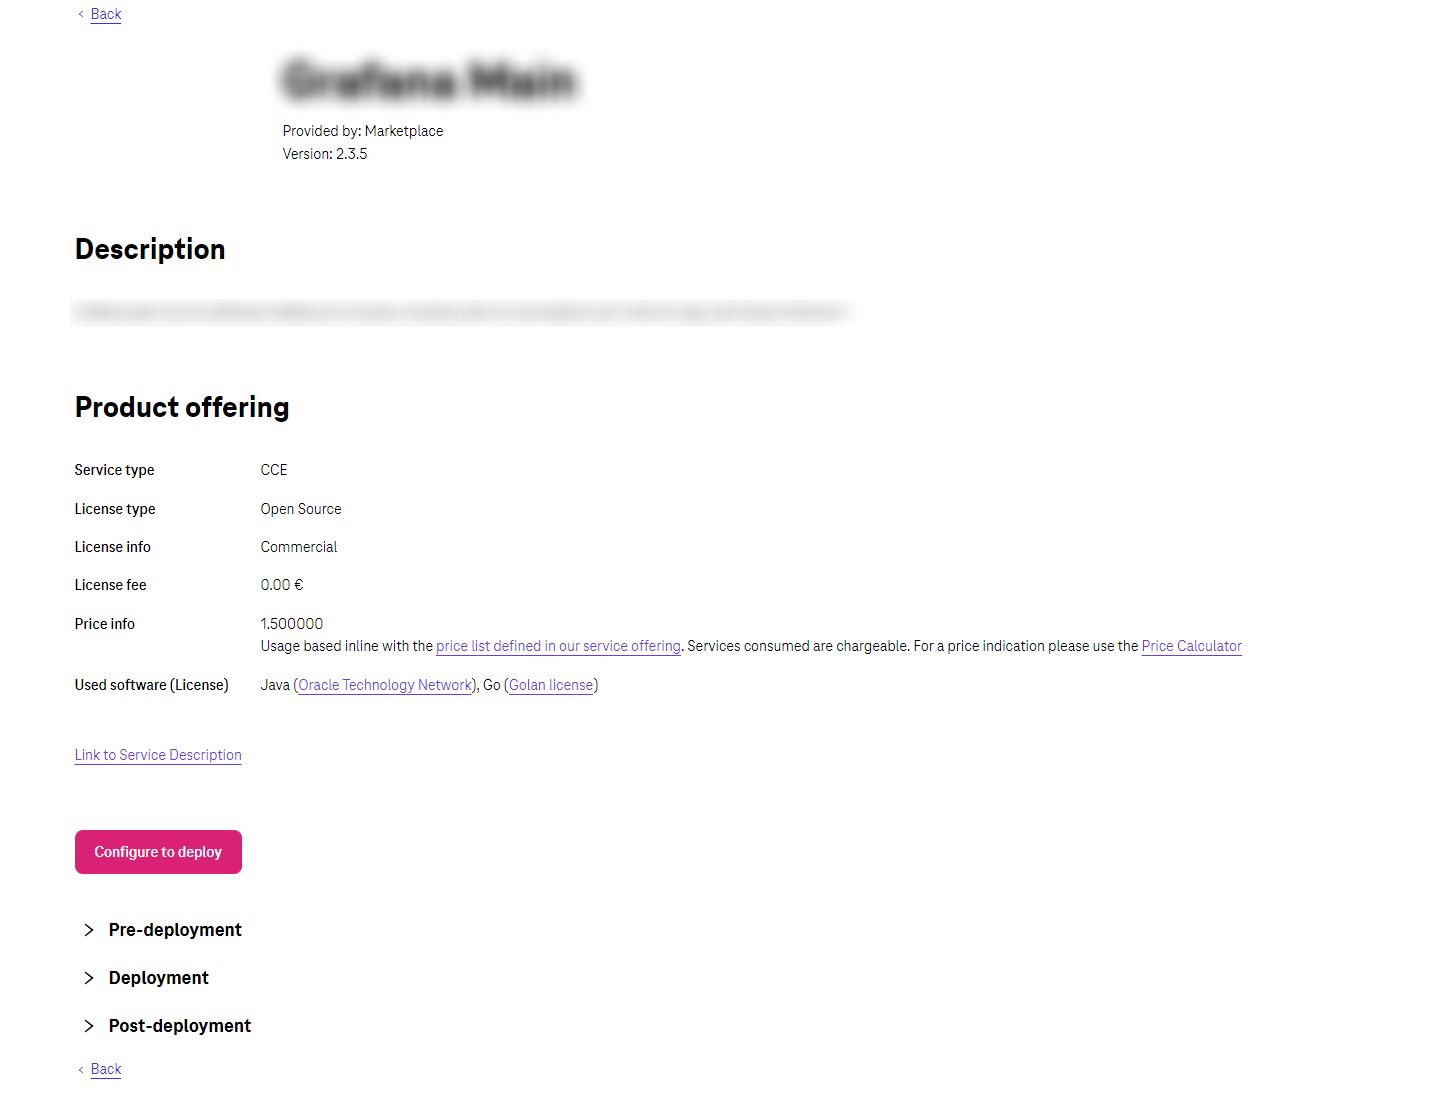
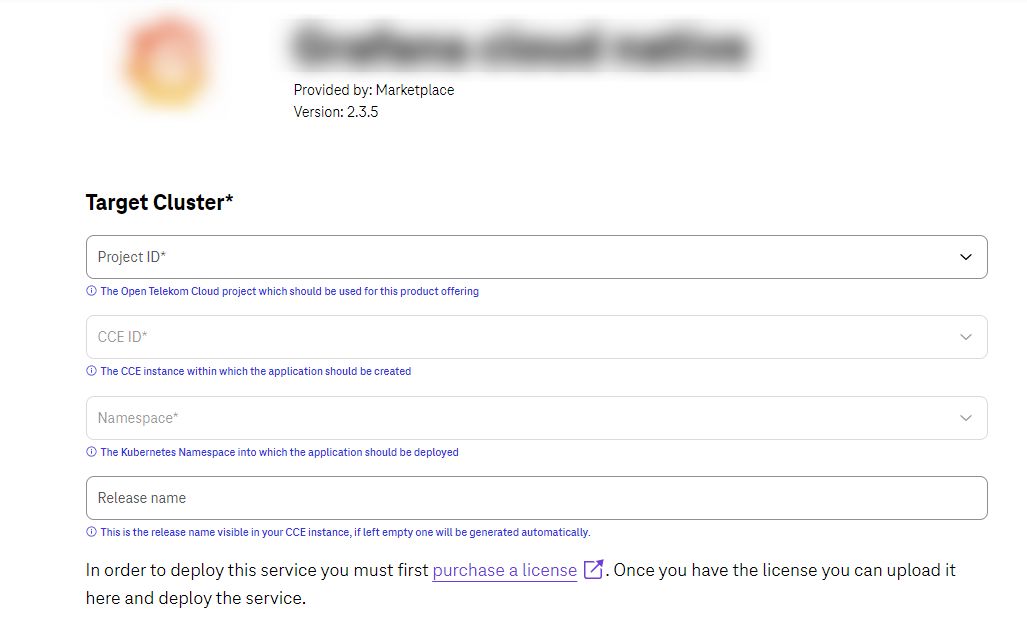
To try this kind of product you need to click on configure to deploy that on your CCE. There you should first select the destination CCE that needs to be chosen for deployment. You can select any project of your OTC tenant where your CCE cluster is available.
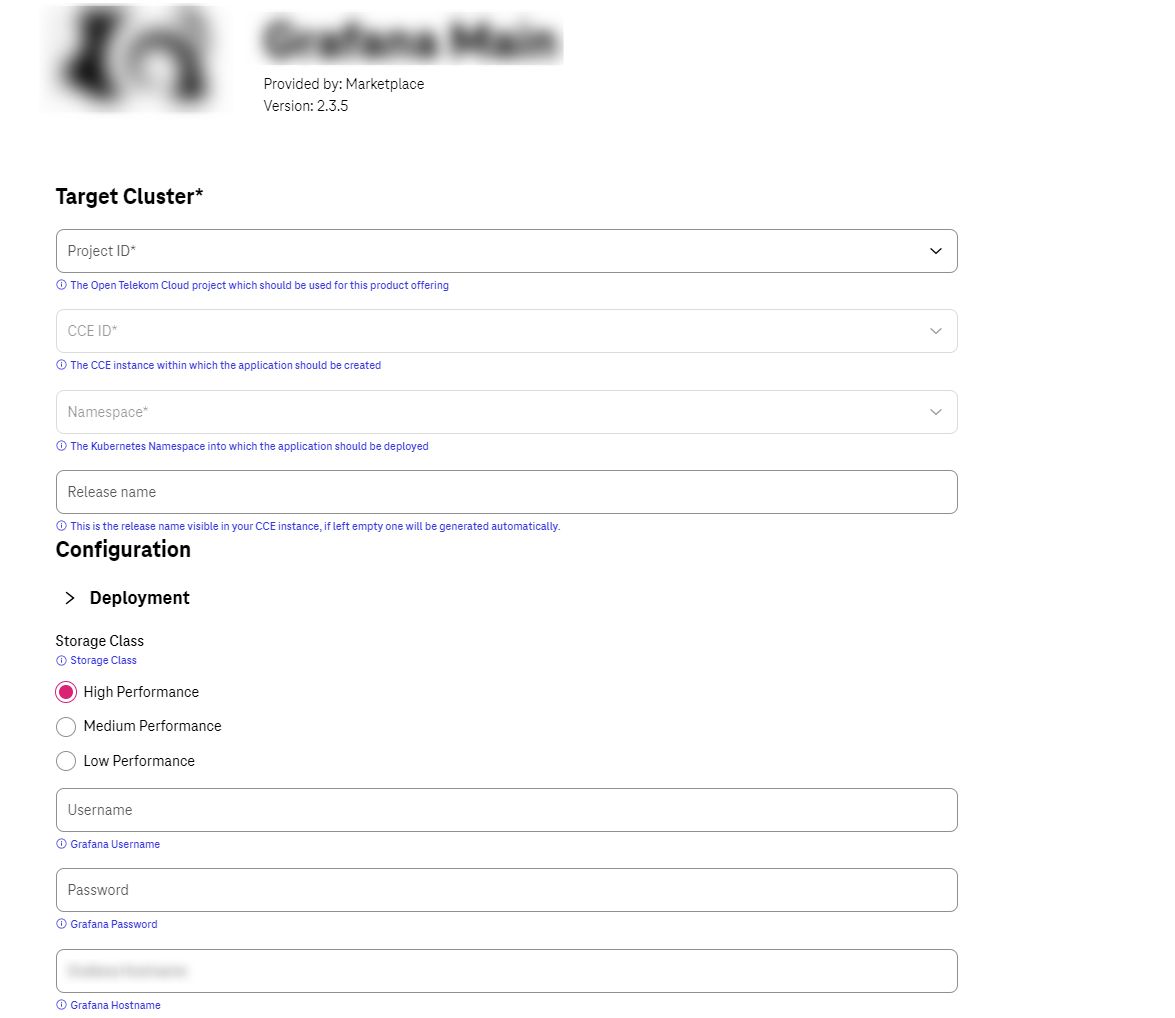
Then you can pick up the CCE cluster in that project as the destination. Finally, you can weather select the already available namespace or ask to pick up a new namespace to deploy.
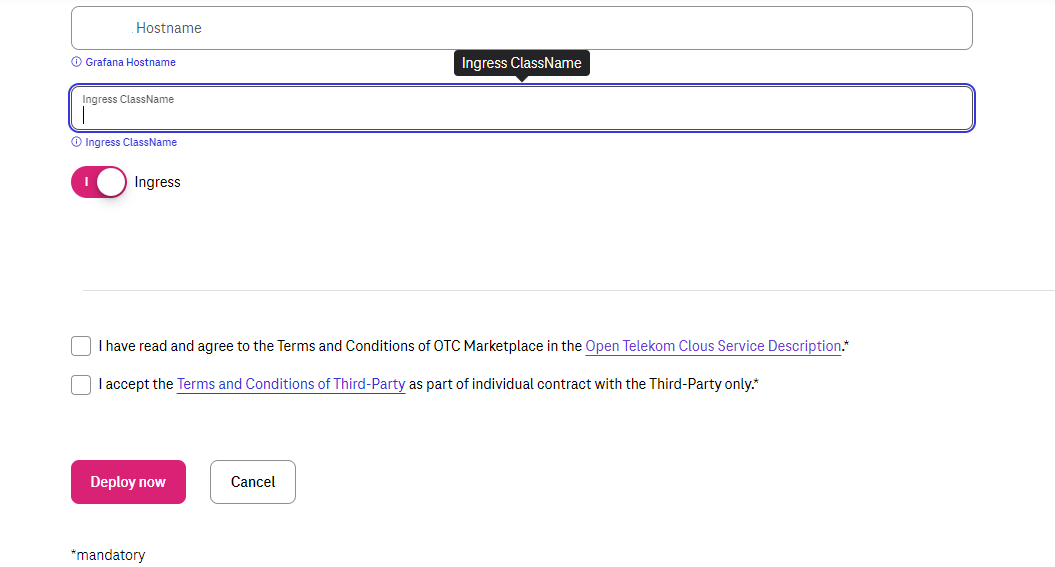
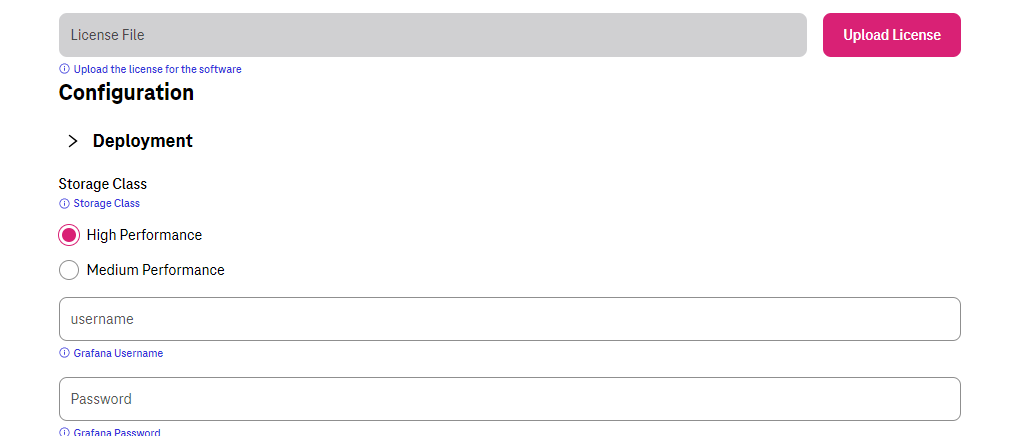
Next step would be to fill information that has been prepared for customizations of deployment. For instance, as you can see below, there are couple of configurations that needs to be filled for this deployment such as the Storage Class for creating the disk or the credentials that this application requires for user to be able to login to.
Eventually after filling all the information which are needed for this deployment, you would click on “Deploy now” to deploy that application.
A message would let you know that the deployment has been started. As some deployments needs some time to finish it may take around 2~5 minutes for that to finish.
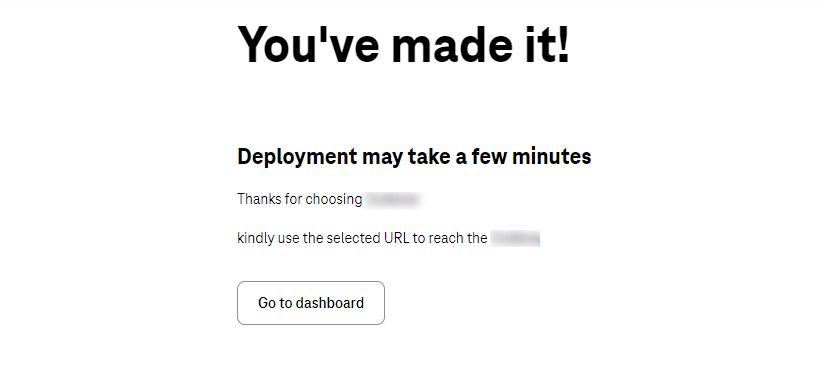
Meanwhile, you can see the manifests of that product in the namespace of your CCE. In addition, the record of your deployment would also be available in the “workload” dashboard.
Please be aware that tenant owner is supposed to pay for the services that he/she has deployed in his/her tenant. This means that for instance if the product required to have a permanent disk to be created for it to store information, then although the product is free of charge, customer is supposed to pay for price of provisioned disk.
CCE BYOL
These types of products are CCE. This means that for using them you need to have an up and running CCE cluster before trying to use them. Your CCE cluster is supposed to have enough resource to allow the deployment. We recommend having an updated version of CCE to be used. As the name suggests, these products are BYOL (Bring Your Own License). Which means customer needs to reach the seller shopping site and purchase the license. The using that license deploy that product.
When you select those products then as shown in the picture you would see wealth of information such as the type and license or even the detailed data such as the technology and software that has been used to build this product.
To try this kind of product you need to click on configure to deploy that on your CCE. There you should first select the destination CCE that needs to be chosen for deployment. You can select any project of your OTC tenant where your CCE cluster is available.
Then you can pick up the CCE cluster in that project as the destination. Finally, you can weather select the already available namespace or ask to pick up a new namespace to deploy.
Next, using the provided link of shopping, please reach the seller and purchase the license that suits your requirement. After grabbing the purchased license, you would go for the next step.
Next step would be to fill information that has been prepared for customizations of deployment. For instance, as you can see below, there are couple of configurations that needs to be filled for this deployment such as the Storage Class for creating the disk or the credentials that this application requires for user to be able to login to.
Eventually after filling all the information which are needed for this deployment, you would click on “Deploy now” to deploy that application.
A message would let you know that the deployment has been started. As some deployments needs some time to finish it may take around 2~5 minutes for that to finish.
Meanwhile, you can see the manifests of that product in the namespace of your CCE. In addition, the record of your deployment would also be available in the “workload” dashboard.
Please be aware that tenant owner is supposed to pay for the services that he/she has deployed in his/her tenant. This means that for instance if the product required to have a permanent disk to be created for it to store information, then although the product is free of charge, customer is supposed to pay for price of provisioned disk.
AI LLM HUB
These types of products are AI LLM HUB. It is a secure, and scalable model inference. Hosted in Germany and the EU, this platform provide access to a diverse range of open-source and proprietary LLMs, all formatted with an OpenAI-compatible API.
Subscription
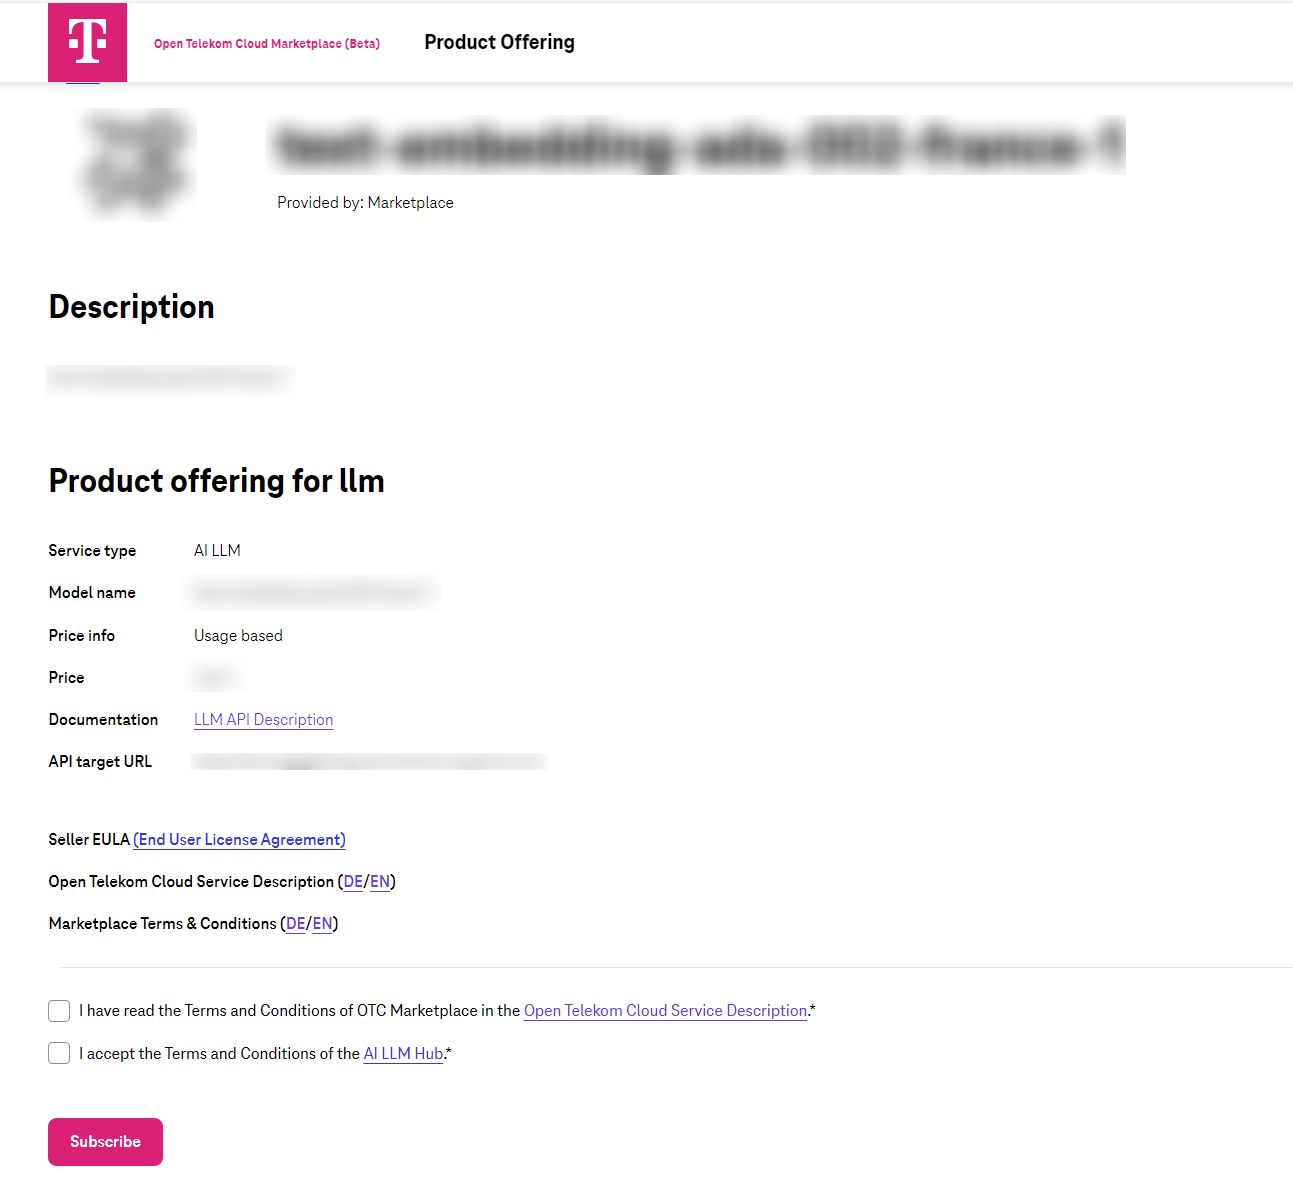
As this is a subscription based offer, customer needs to subscribe to it to be able to use it.
As shown in the picture, customer needs to agree on the EULA of the seller as well as the Open Telekom Cloud Terms and condition to be able to subscribe.
After a successful login then you would see the next page which show the subscription got activated and can be managed.
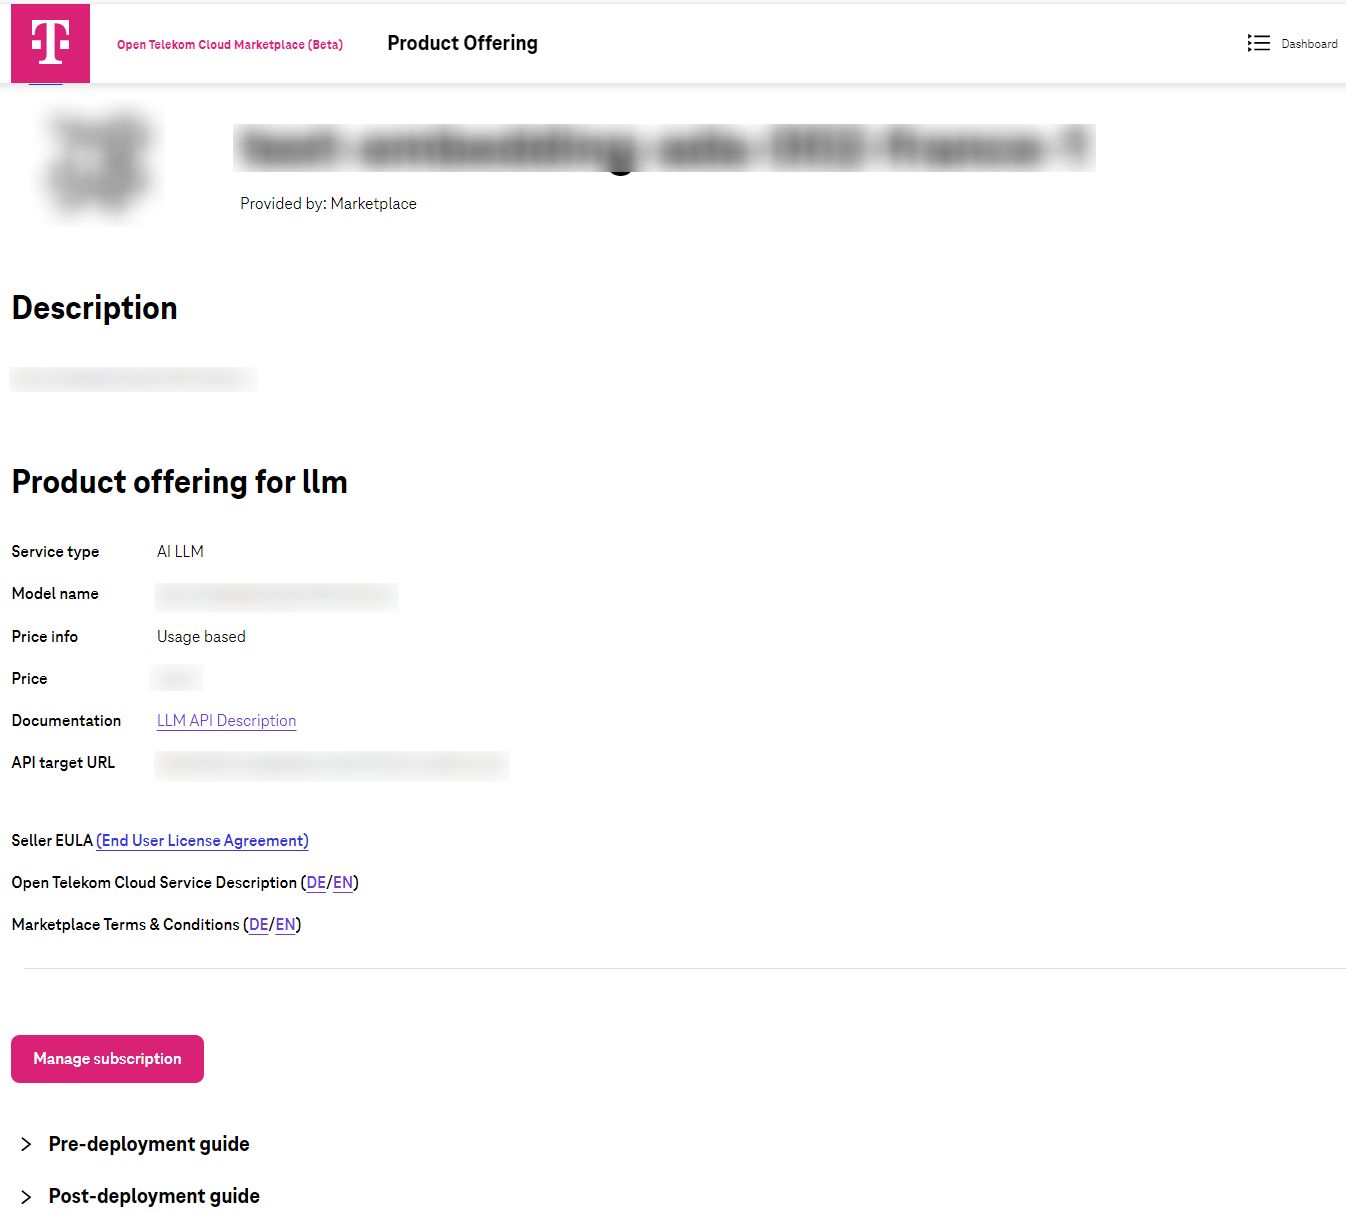
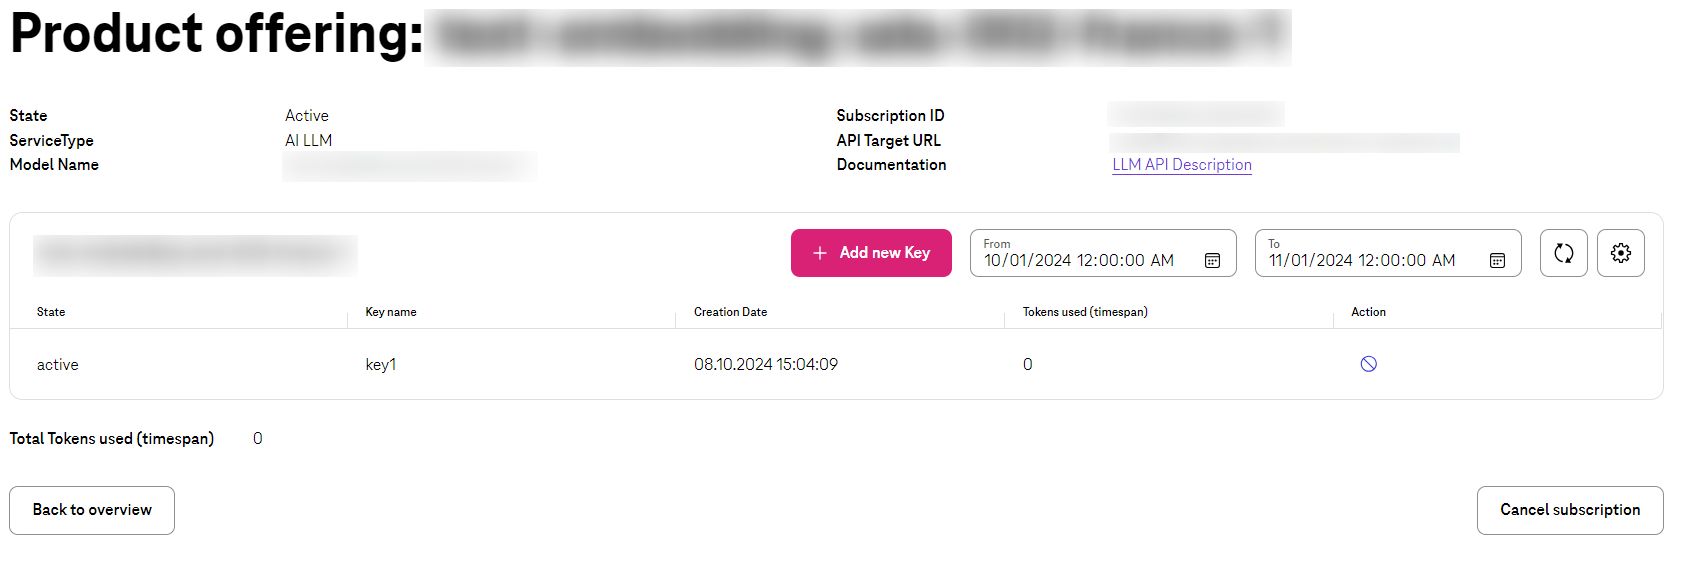
By clicking on ‘Manage subscription’ customer can manage the product. This would include adding a new key, invalidating a key or even cancelling the subscription.
Adding a new Key
To be able to use LLM HUB and integrate it with you application, you need to generate a key to be able to use it. Customer can generate any number of key based on the requirement.
The process is straight forward by just clicking on ‘Add new Key’. There you can just pick a name for that.
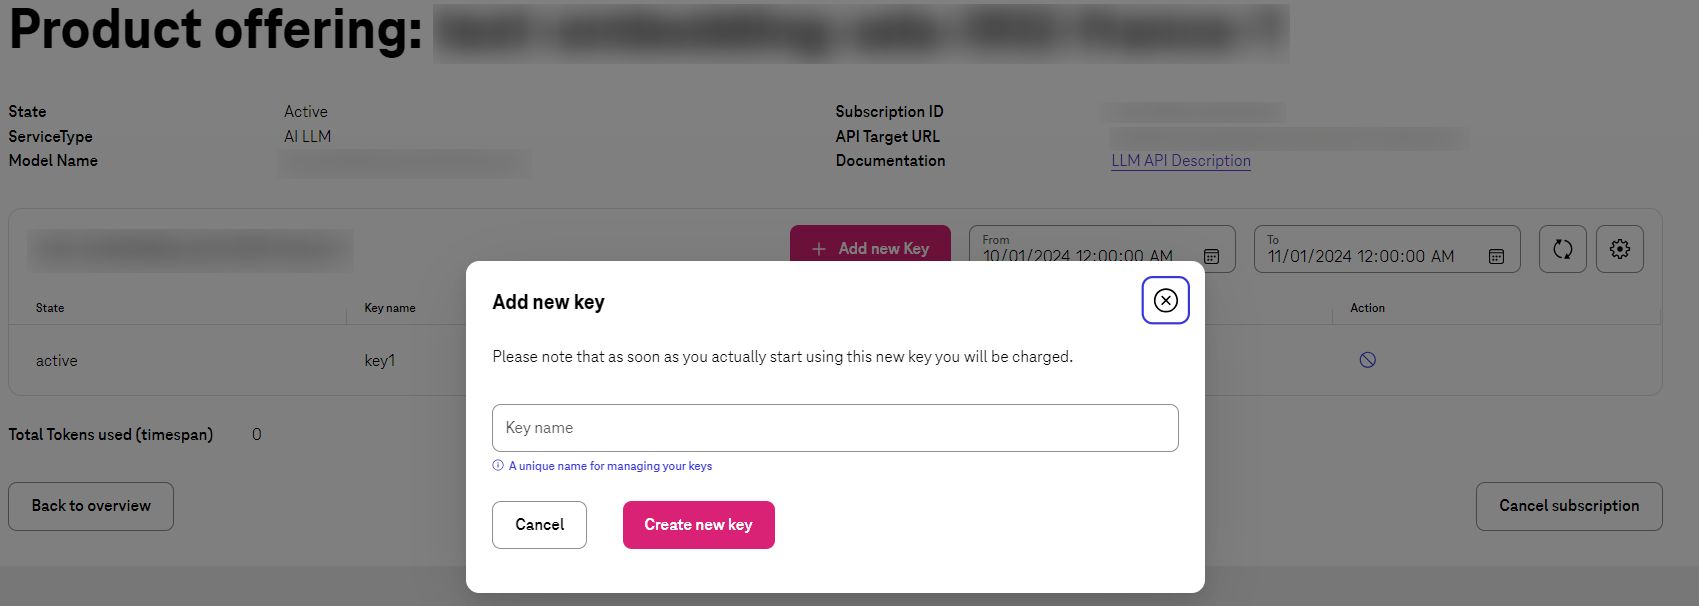
Finally, a new key would be generated. Please be aware that this key would only be shown one time and user cannot get the key information in future.
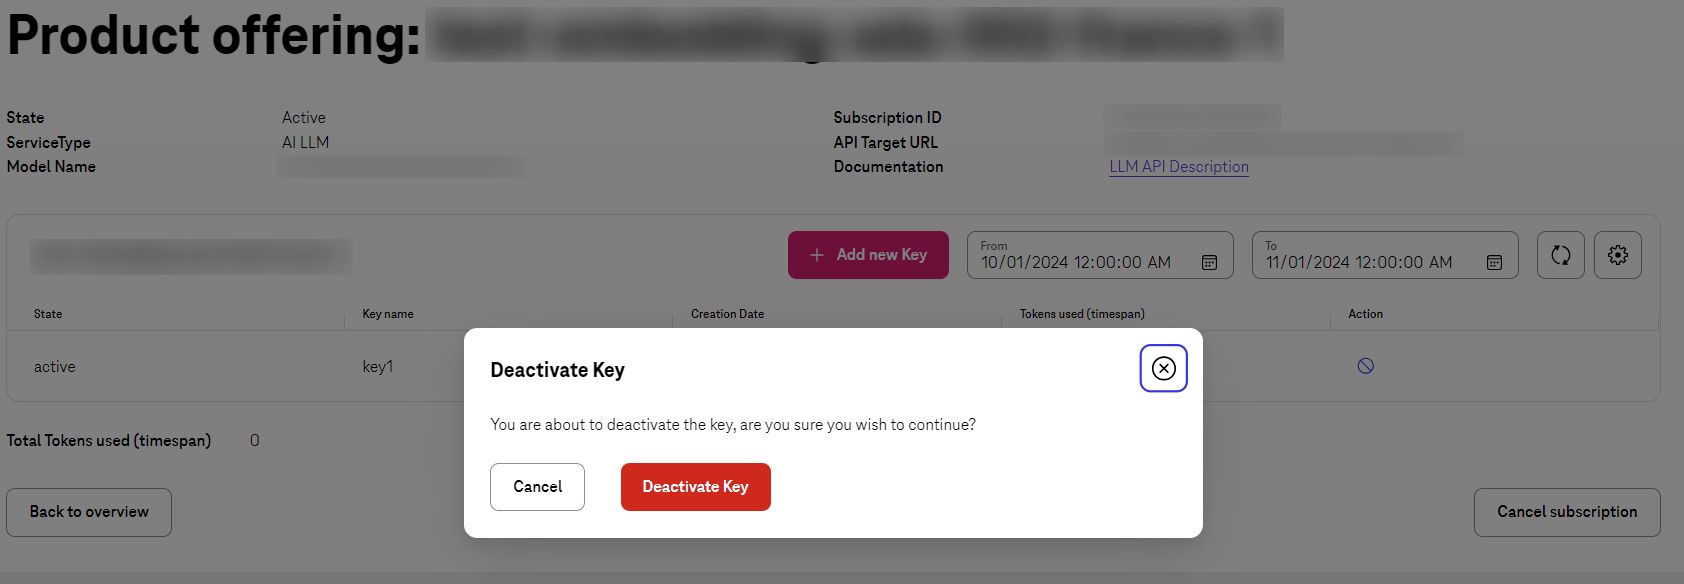
deactivate a Key
If customer wants to deactivate specific key then can click on ‘Action’ and request to deactivate it. Please be aware that deactivated key cannot be re-activated again.
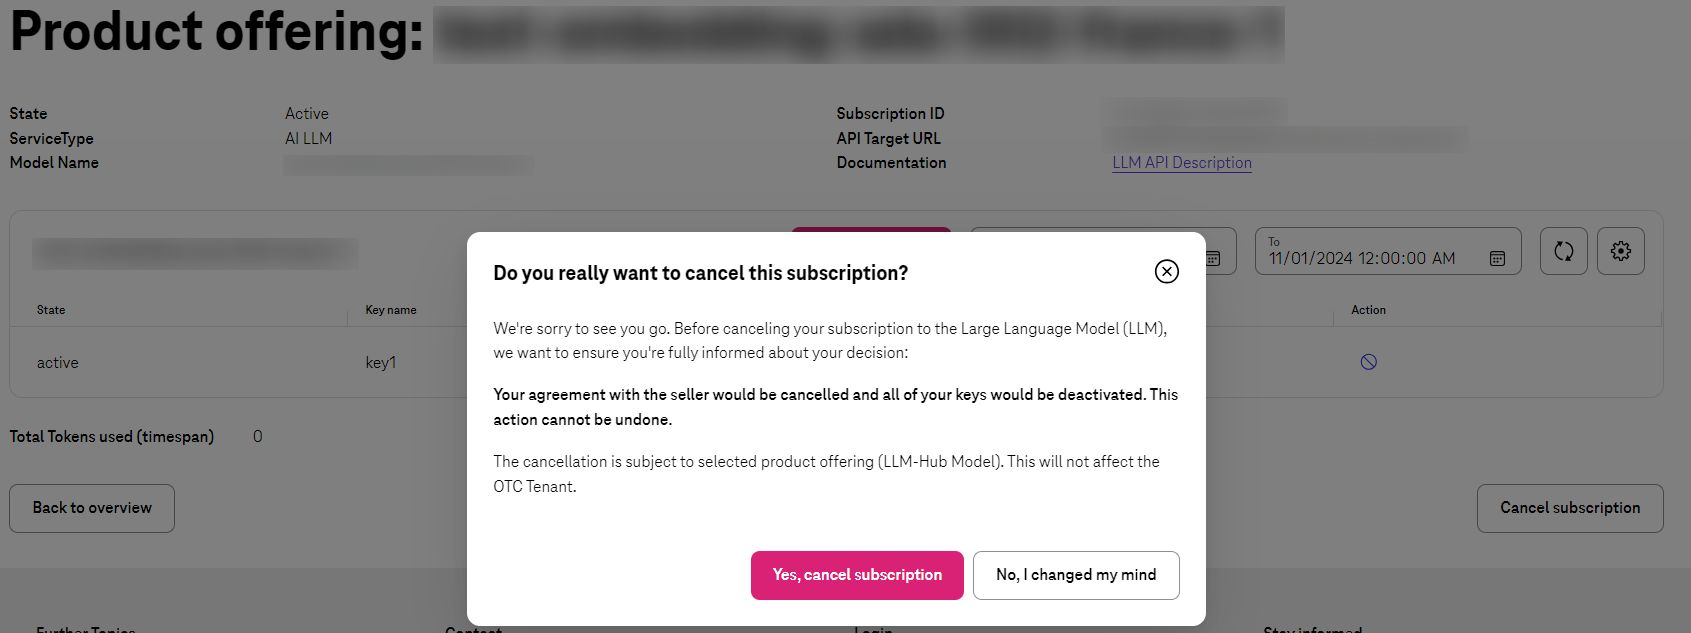
Cancel the Subscription
whenever a customer wants to cancel the subscription then he/she needs to select that product and click on Cancel subscription. This process would deactivate all keys and then cancel the subscription.
Application Integration
After key generation then the rest of the task would be to integrate application with LLM HUB. document regarding details of configuration can be found in AI Foundation Services Documentation.
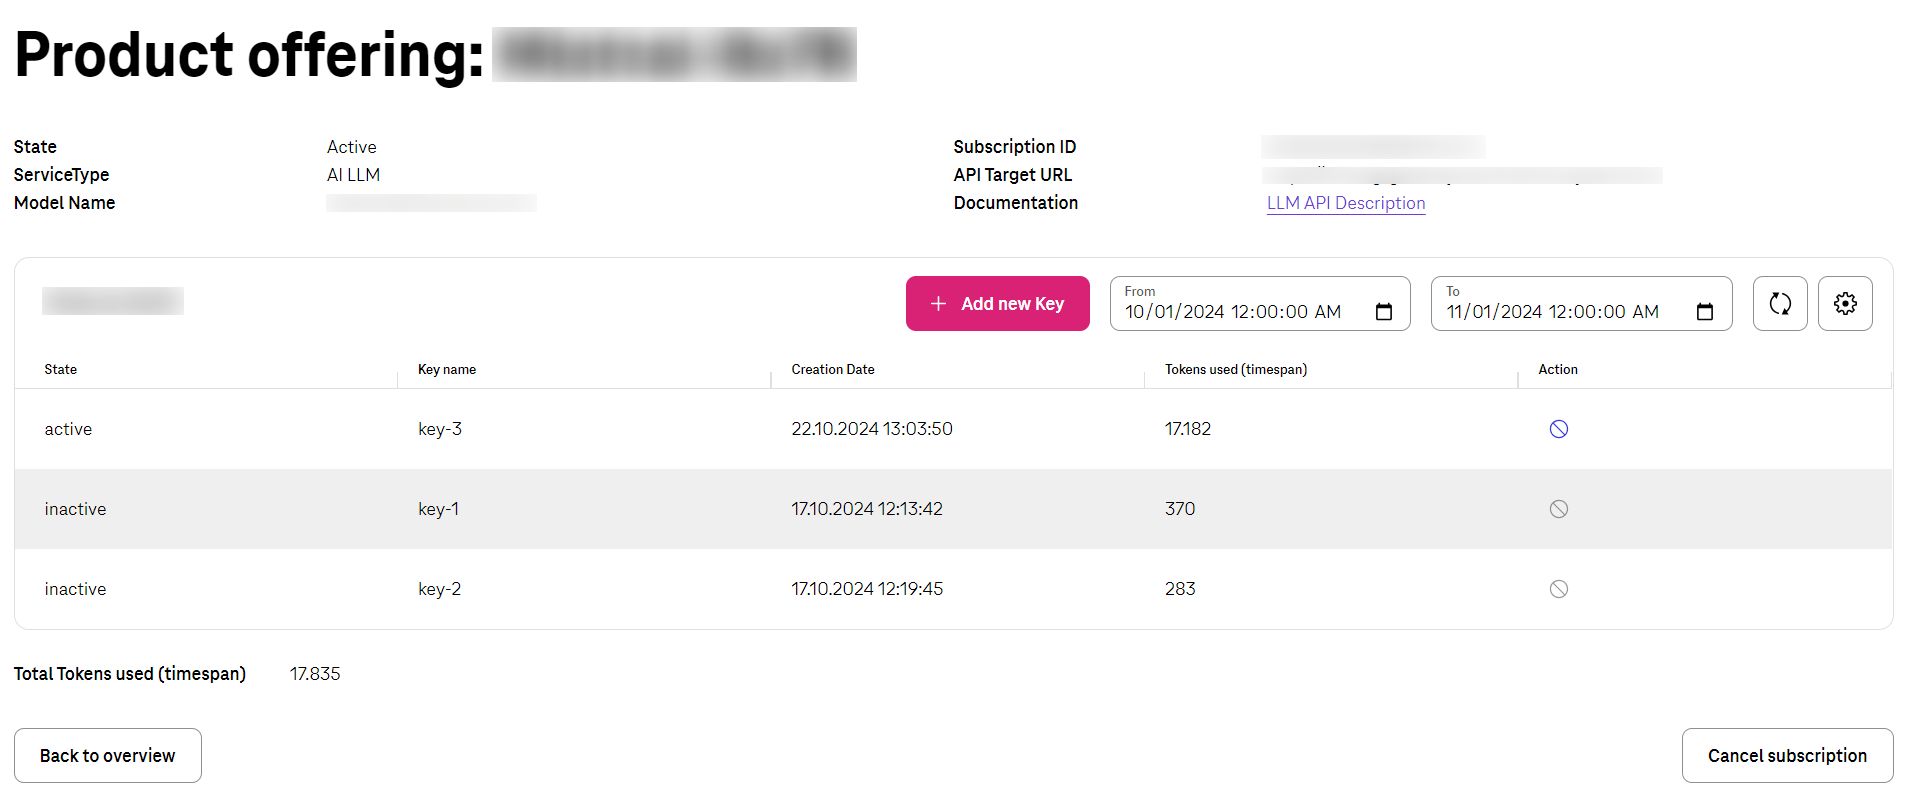
Token Consumption
Customer can see the Total Consumption of each key and Total Consumption of all of the keys in the dashboard which has been filtered to current month by default.
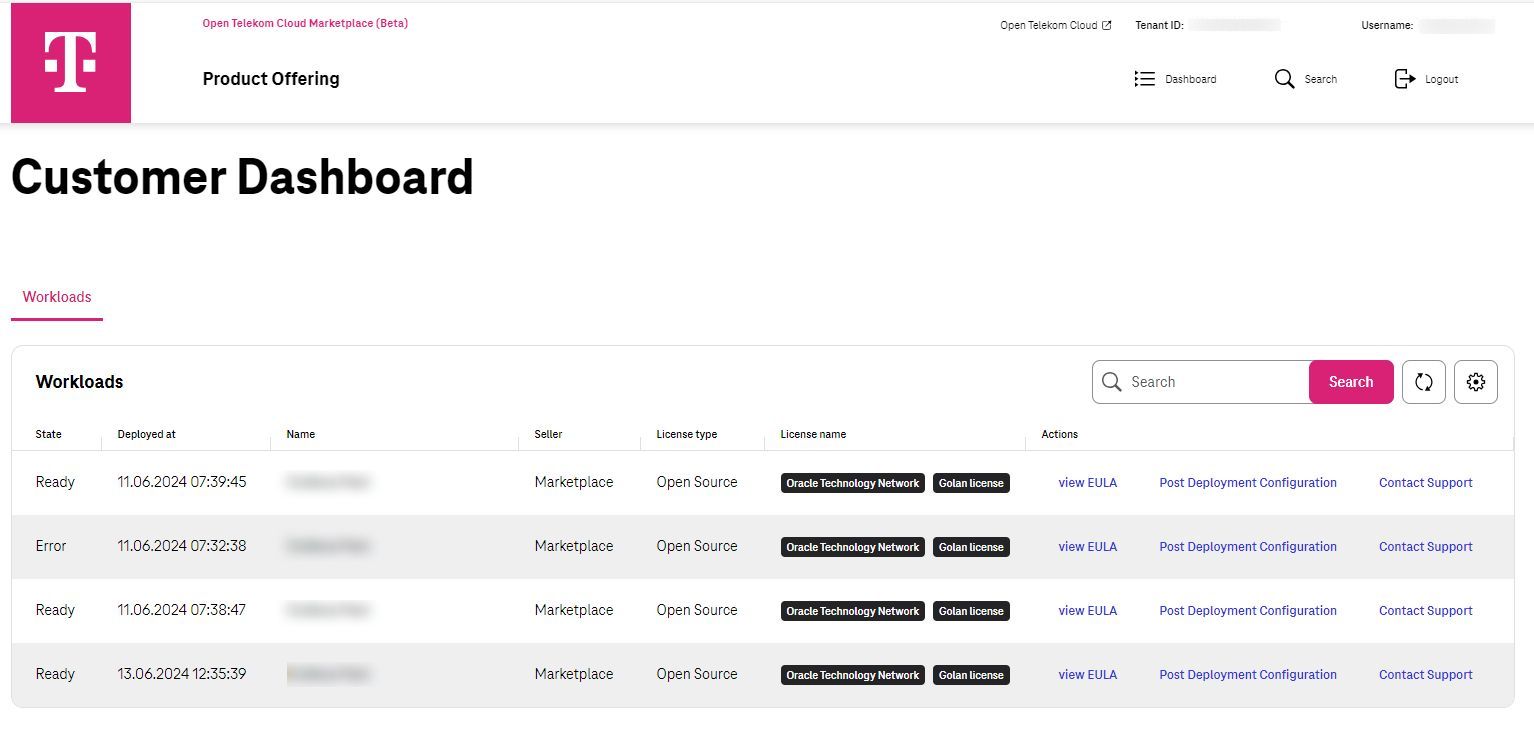
Customer Dashboard
After a successful login, Customers would use the dashboard to see any deployed product with the information of it. This page is available to click on the top right corner of the page.

Workloads
Every time a deployment has been happened by customer, the status of that including the State, time and the name of the product would be recorded here so customer can see if the deployment has been successful or not.
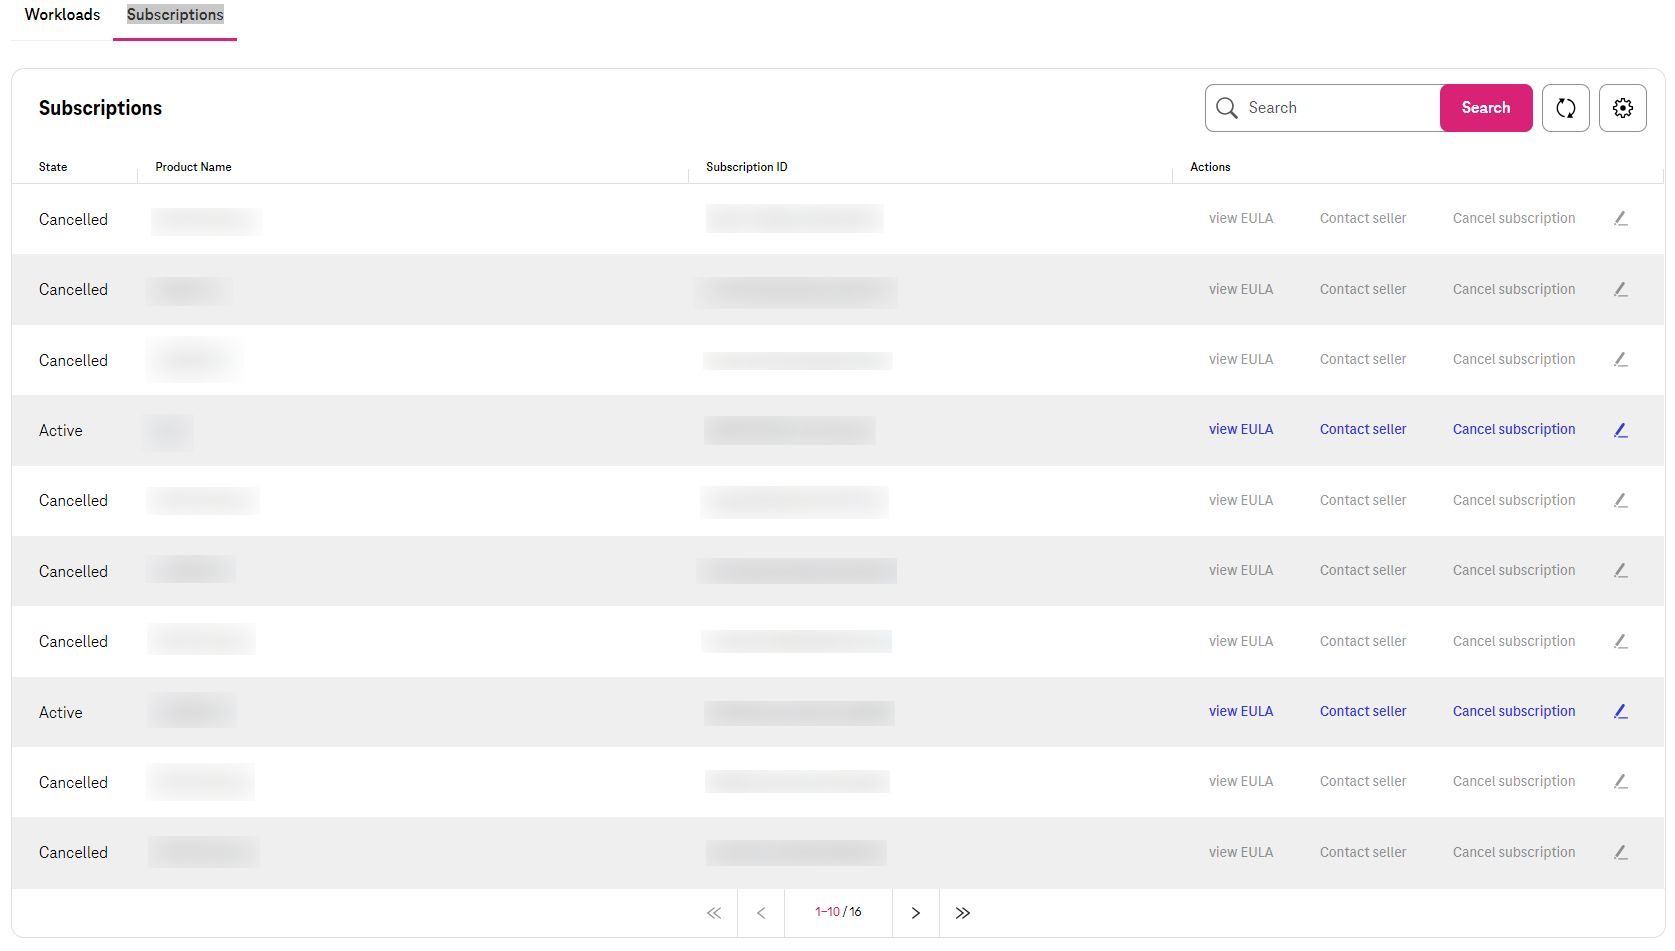
Subscriptions
Every time a subscription has been activated or deactivated then the information can be seen. Customers can Cancel the subscription or get directly to the management panel of that product from here.
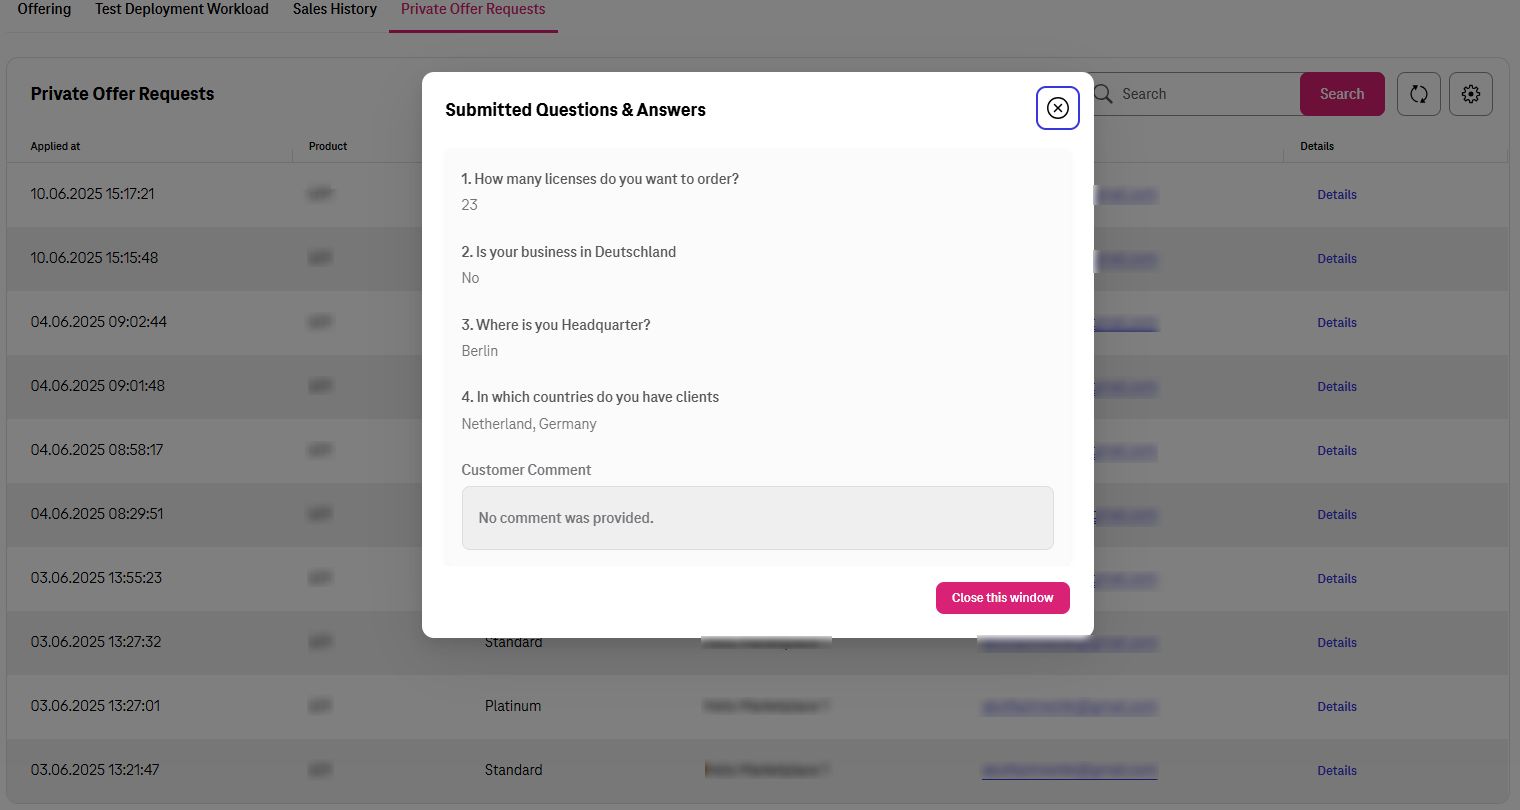
Private Offer Requests
Any Private Offer requests from customer would be shown here. Customer can see on which product and which Plan he has requested.
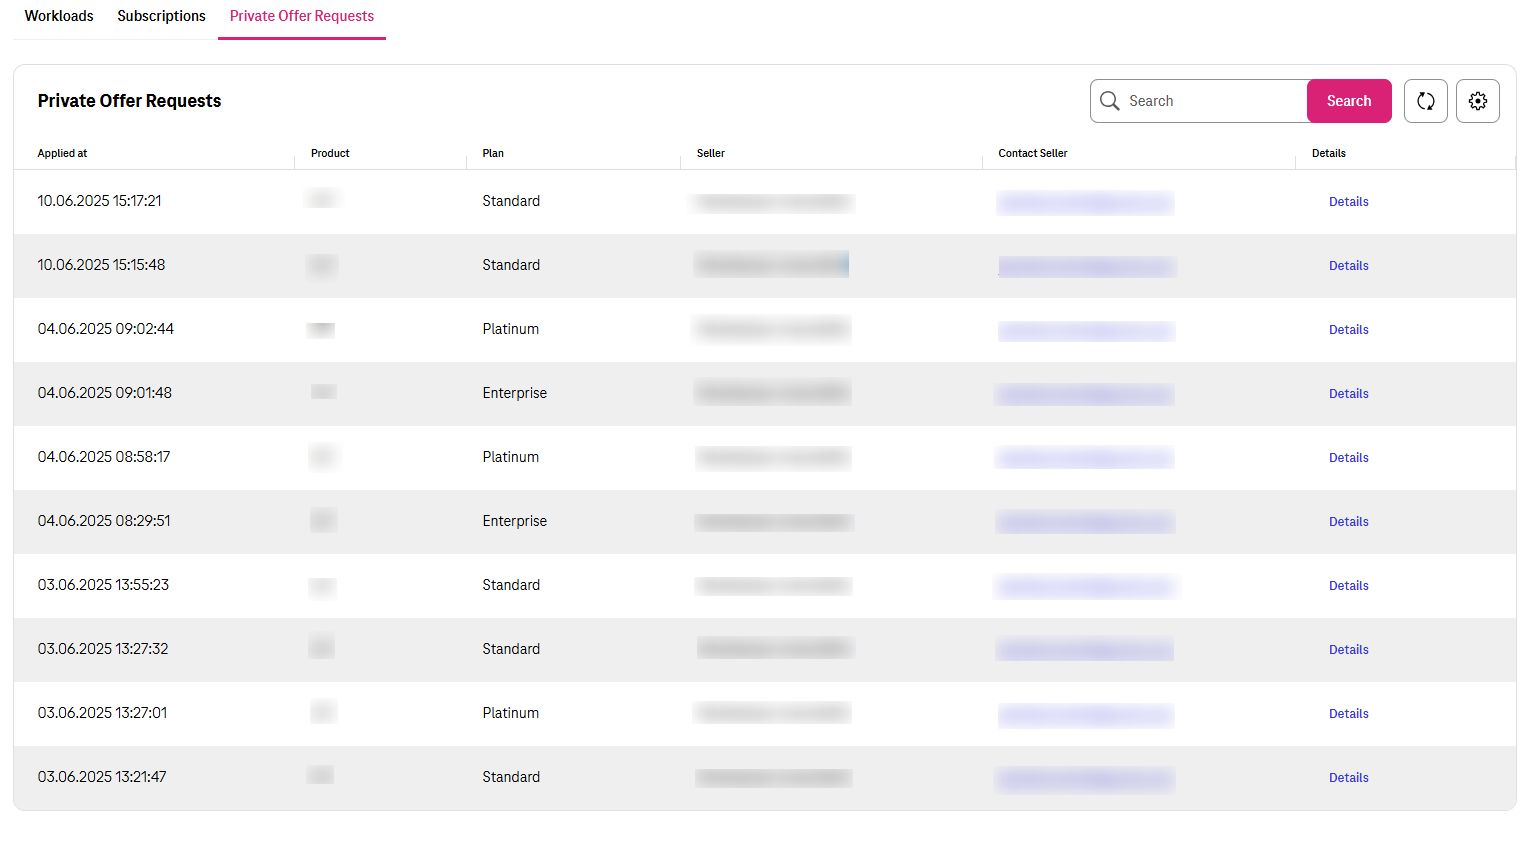
In additions, customer can see the answers and comment that he has added during request.