Using Dedicated Load Balancers (Entry Level)
Scenarios
You have a web application, which often needs to handle heavy traffic and is deployed on two ECSs for load balancing.
You can create a dedicated load balancer to distribute traffic across multiple backend servers based on the forwarding policy you have configured, which eliminates SPOFs and makes your application more available.
Prerequisites
You have added security group rules to allow traffic from the ports used by the two ECSs. (Alternatively, you can enable all ports first and then disable the ports that are no longer used after service deployment.)
You have verified that the security group containing the ECSs allows access traffic from the VPC where the load balancer works and that the health check function is normal.
Note
If IP as a Backend is not enabled for a dedicated load balancer that has a TCP or UDP listener, there is no need to configure security group rules to allow traffic from the VPC where the load balancer backend subnet works to the backend servers.
Creating ECSs
ECSs are used as backend servers to process requests.
Each ECS needs an EIP for accessing the Internet, and the EIP is used for configuring the application on the ECS. You can determine whether to bind an EIP to each ECS based on your requirements.
Log in to the management console.
In the upper left corner of the page, click
 and select the desired region and project.
Click
 in the upper left corner to display Service List and choose Computing > Elastic Cloud Server.
Click Create ECS, configure the parameters, and click Create Now.
The following table lists the specifications of the two ECSs.
Table 1 ECS specifications¶ Item
Example Value
Name
ECS01 and ECS02
OS
CentOS 7.2 64bit
vCPUs
2
Memory
4 GB
System disk
40 GB
Data disk
100 GB
Bandwidth
5 Mbit/s
Submit your request.
Deploying the Application
Deploy Nginx on the two ECSs and edit two HTML pages so that a page with message "Welcome to ELB test page one!" is returned when ECS01 is accessed, and the other page with message "Welcome to ELB test page two!" is returned when ECS02 is accessed.
Log in to the ECSs.
Install and start Nginx.
Run the wget command to download the Nginx installation package for your operating system in use. CentOS 7.6 is used as an example here.
wget http://nginx.org/packages/centos/7/noarch/RPMS/nginx-release-centos-7-0.el7.ngx.noarch.rpm
Run the following command to create the Nginx yum repository: CentOS 7.6 is used as an example here.
rpm -ivh nginx-release-centos-7-0.el7.ngx.noarch.rpm
Run the following command to install Nginx:
yum -y install nginx
Run the following commands to start Nginx and enable auto-start upon ECS startup:
systemctl start nginx
systemctl enable nginx
Enter http://EIP bound to the ECS in the address box of your browser. If the following page is displayed, Nginx has been installed.
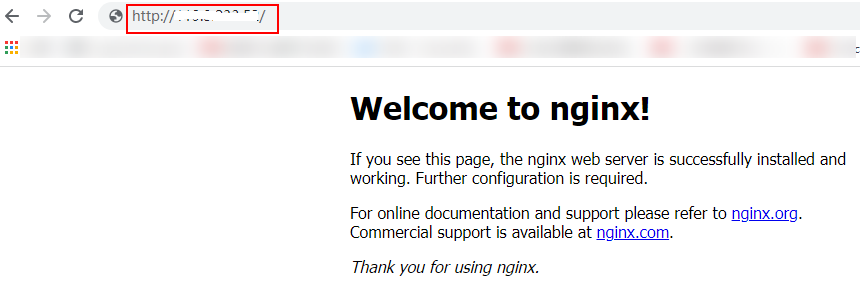
Figure 1 Nginx installed successfully
Modify the HTML page of ECS01.
Modify the index.html file in the default root directory of Nginx /usr/share/nginx/html to identify access to ECS01.
Open the index.html file.
vim /usr/share/nginx/html/index.html
Press i to enter editing mode.
Modify the index.html file.
The following is the content to be modified:
...
   <body>
       <h1>Welcome to <strong>ELB</strong> test page one!</h1>

       <div class="content">
           <p>This page is used to test the <strong>ELB</strong>!</p>

           <div class="alert">
               <h2>ELB01</h2>
               <div class="content">
                   <p><strong>ELB test (page one)!</strong></p>
                   <p><strong>ELB test (page one)!</strong></p>
                   <p><strong>ELB test (page one)!</strong></p>
               </div>
           </div>
       </div>
   </body>
Press Esc to exit editing mode. Then, enter :wq to save the settings and exit the file.
Modify the HTML page of ECS02.
Modify the index.html file in the default root directory of Nginx /usr/share/nginx/html to identify access to ECS02.
Open the index.html file.
vim /usr/share/nginx/html/index.html
Press i to enter editing mode.
Modify the index.html file.
The following is the content to be modified:
...
    <body>
        <h1>Welcome to <strong>ELB</strong> test page two!</h1>

        <div class="content">
            <p>This page is used to test the <strong>ELB</strong>!</p>

            <div class="alert">
                <h2>ELB02</h2>
                <div class="content">
                    <p><strong>ELB test (page two)!</strong></p>
                    <p><strong>ELB test (page two)!</strong></p>
                    <p><strong>ELB test (page two)!</strong></p>
                </div>
             </div>
        </div>
    </body>
Press Esc to exit editing mode. Then, enter :wq to save the settings and exit the file.
Use your browser to access http://ECS01 EIP and http://ECS02 EIP to verify that Nginx has been deployed.
If the modified HTML pages are displayed, Nginx has been deployed.
Creating a Load Balancer
The load balancer needs an EIP to access the application deployed on the ECSs over the Internet. You can determine whether to bind an EIP to the load balancer based on your requirements. For details, see Load Balancing on a Public or Private Network.
In the upper left corner of the page, click
and select the desired region and project.Click
 in the upper left corner to display Service List and choose Network > Elastic Load Balancing.
Click Create Elastic Load Balancer and configure the parameters.
Click Create Now.
Confirm the configuration and submit your request.
View the newly created load balancer in the load balancer list.
Note
After you create a dedicated load balancer, configure the security group that contains the ECSs to allow traffic from the VPC where the load balancer works.
Configuring Security Group Rules
Log in to the management console.
In the upper left corner of the page, click
and select the desired region and project.Click
in the upper left corner to display Service List and choose Computing > Elastic Cloud Server.On the Elastic Cloud Server page, click the name of the ECS that has been added to a backend server group.
The ECS details page is displayed.
Click Security Groups, locate the security group, and view security group rules.
Click the security group rule ID or Modify Security Group Rule. The security group details page is displayed.
On the Inbound Rules tab page, click Add Rule. Configure an inbound rule based on Table 2.
Table 2 Security group rules¶ Backend Protocol
Policy
Protocol & Port
Source IP Address
HTTP or HTTPS
Allow
Protocol: TCP
Port: the port used by the backend server and health check port
Backend subnet of the load balancer
TCP
Allow
Protocol: TCP
Port: health check port
UDP
Allow
Protocol: UDP and ICMP
Port: health check port
Note
After a load balancer is created, do not change the subnet. If the subnet is changed, the IP addresses occupied by the load balancer will not be released, and traffic from the previous backend subnet is still need to be allowed to backend servers.
Traffic from the new backend subnet is also need to be allowed to backend servers.
Click OK.
Configuring Firewall Rules
To control traffic in and out of a subnet, you can associate a firewall with the subnet. Firewall rules control access to subnets and add an additional layer of defense to your subnets. Default firewall rules reject all inbound and outbound traffic. If the subnet of a load balancer or associated backend servers has a firewall associated, the load balancer cannot receive traffic from the Internet or route traffic to backend servers, and backend servers cannot receive traffic from and respond to the load balancer.
Configure an inbound firewall rule to allow traffic from the VPC where the load balancer resides to backend servers.
Log in to the management console.
In the upper left corner of the page, click
and select the desired region and project.Click
 in the upper left corner of the page and choose Network > Virtual Private Cloud.
In the navigation pane on the left, choose Access Control > Firewalls.
In the firewall list, click the name of the firewall to switch to the page showing its details.
On the Inbound Rules or Outbound Rules tab page, click Add Rule to add a rule.
Action: Select Allow.
Protocol: The protocol must be the same as the one you selected for the listener.
Source: Set it to the VPC CIDR block.
Source Port Range: Select a port range based on the service requirements.
Destination: Enter a destination address allowed in this direction. If you keep the default value, 0.0.0.0/0, traffic will be allowed for all destination IP addresses.
Destination Port Range: Select a port range based on the service requirements.
(Optional) Description: Describe the firewall rule if necessary.
Click OK.
Adding a Listener
Add a listener to the created load balancer. When you add the listener, create a backend server group, configure a health check, and add the two ECSs to the created backend server group. If a backend server is detected unhealthy, the load balancer will stop routing traffic to it until the backend server recovers.
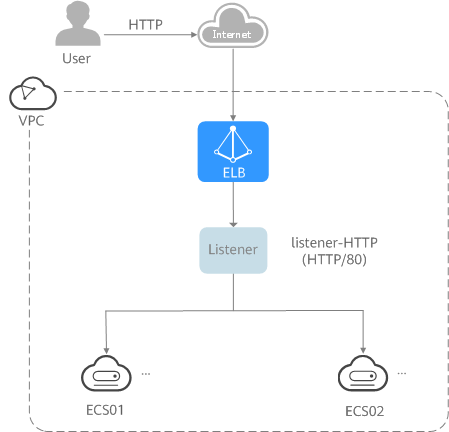
Figure 4 Traffic forwarding
Click
in the upper left corner to display Service List and choose Network > Elastic Load Balancing.Locate the created load balancer (elb-01) and click its name.
Under Listeners, click Add Listener.
Configure the listener and click Next.
Name: Enter a name, for example, listener-HTTP.
Frontend Protocol/Port: Select a protocol and enter a port for the load balancer to receive requests. For example, set it to HTTP and 80.
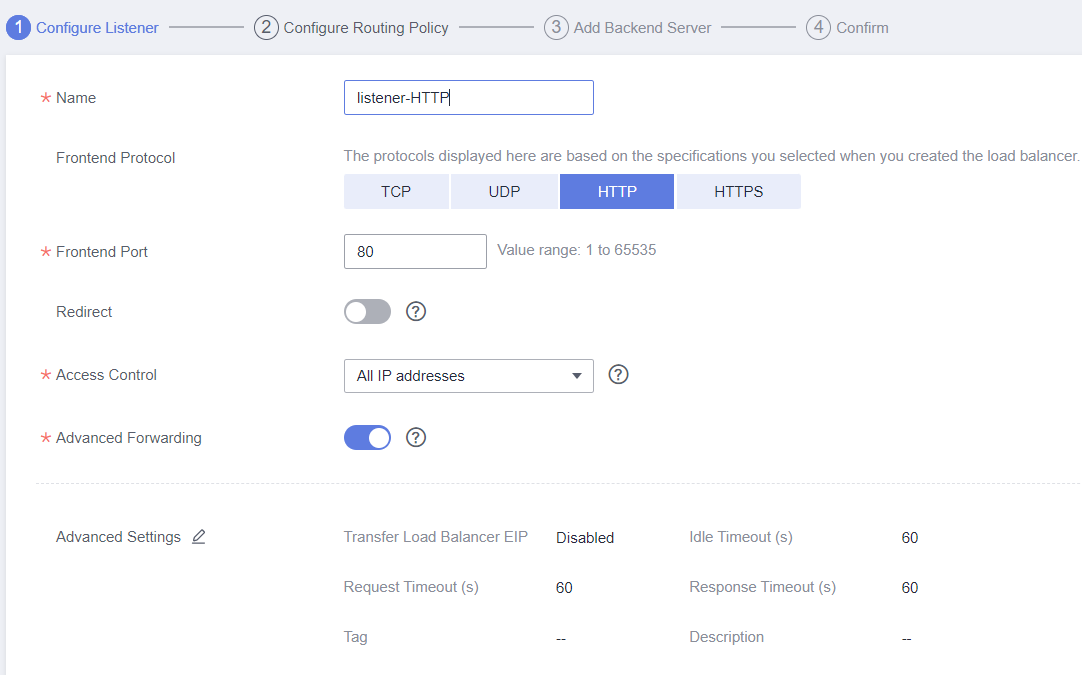
Figure 5 Adding a listener
Create a backend server group and configure a health check.
Backend server group
Name: Enter a name, for example, server_group-ELB.
Load Balancing Algorithm: Select an algorithm that the load balancer will use to route requests, for example, Weighted round robin.
Health check
Health Check Protocol: Select a protocol for the load balancer to perform health checks on backend servers. If the load balancer uses TCP, HTTP, or HTTPS to receive requests, the health check protocol can be TCP or HTTP. Here we use HTTP as an example.
Domain Name: Enter a domain name that will be used for health checks, for example, www.example.com.
Health Check Port: Enter a port for the load balancer to perform health checks on backend servers, for example, 80.
If no health check port is configured, the backend port is used for health checks by default. If you specify a port, it will be used for health checks.
Click the name of the newly added listener. On the Backend Server Groups tab page on the right, click Add.
Select the servers you want to add, set the backend port, and click Finish.
Backend servers: Select ECS01 and ECS02.
Backend port: Set it to 80. Backend servers will use this port to communicate with the load balancer.
Verifying Load Balancing
After the load balancer is configured, you can access the domain name to check whether the two ECSs are accessible.
Modify the C:\Windows\System32\drivers\etc\hosts file on your PC to map the domain name to the load balancer EIP.
View the load balancer EIP on the Summary page of the load balancer.
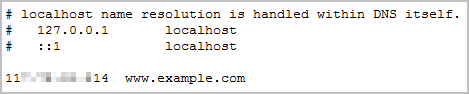
Figure 6 hosts file on your PC
On the CLI of your PC, run the following command to check whether the domain name is mapped to the load balancer EIP:
ping www.example.com
If data packets are returned, the domain name has been mapped to the load balancer EIP.
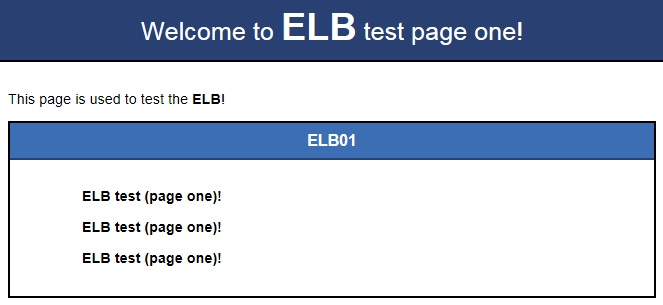
Use your browser to access http://www.example.com. If the following page is displayed, the load balancer has routed the request to ECS01.
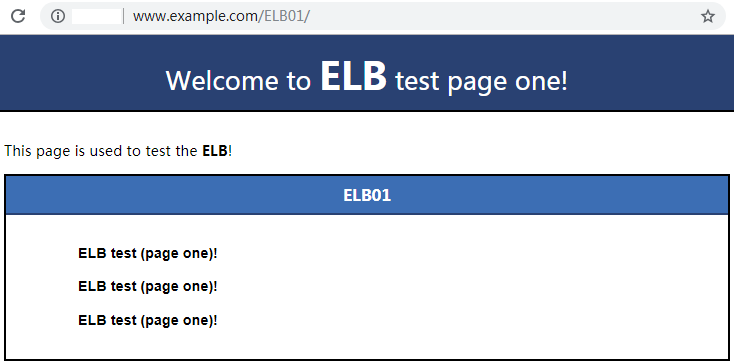
Figure 7 Accessing ECS01
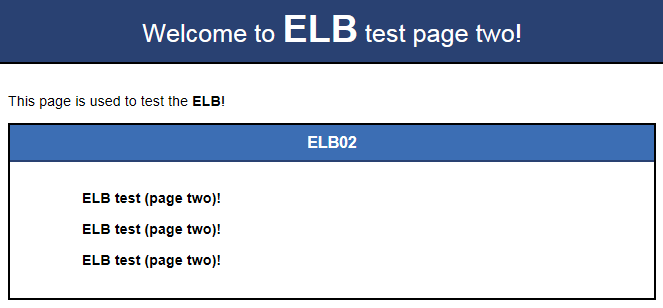
Use your browser to access http://www.example.com. If the following page is displayed, the load balancer has routed the request to ECS02.
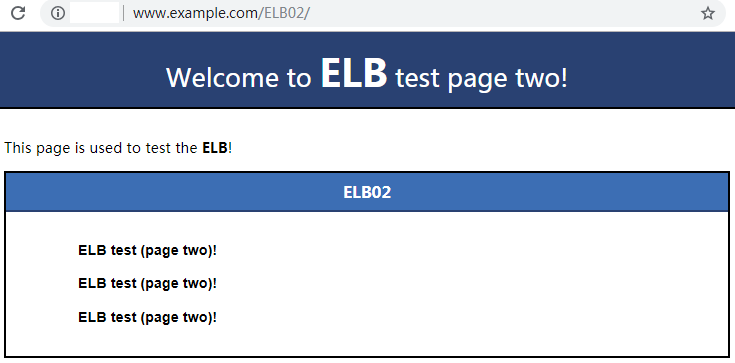
Figure 8 Accessing ECS02