Using an SSH Key Pair
Scenarios
To ensure system security, you are advised to use the key authentication mode to authorize the user who attempts to log in to a BMS. Therefore, you must use an existing key pair or create a new one for remote login authentication.
Creating a Key Pair
If no key pair is available, create one that contains a public and a private key used for login authentication. You can use either of the following methods:
Create a key pair using the management console. After the creation, the public key is automatically stored in the system, and the private key is manually stored in a local directory. For details, see Create a Key Pair on the Management Console.
Use PuTTYgen to create a key pair, and save both the public and private keys to the local host. For details, see Create a Key Pair Using PuTTYgen. After the creation, import the key pair by following the instructions provided in Import a Key Pair. Then, the key pair can be used.
Note
PuTTYgen is a tool for generating public and private keys. You can obtain the tool from https://www.chiark.greenend.org.uk/~sgtatham/putty/latest.html.
Using an existing key pair
If a key pair is available locally, for example, generated using PuTTYgen, you can import the public key on the management console so that the system maintains the public key file. For details, see Import a Key Pair.
Create a Key Pair on the Management Console
Log in to the management console.
Under Computing, click Bare Metal Server.
The BMS console is displayed.
In the navigation tree, choose Key Pair.
On the right side of the page, click Create Key Pair.
Enter the key name and click OK.
An automatically populated key name consists of KeyPair- and a 4-digit random number. Change it to an easy-to-remember one, for example, KeyPair-xxxx_bms.
Download the private key file. The file name is the specified key pair name with a suffix of .pem. Store the private key file securely. In the displayed dialog box, click OK.
Caution
You can save the private key file only once. When you create a BMS, provide the key pair name. Each time you log in to the BMS using SSH, you need to provide the private key.
Create a Key Pair Using PuTTYgen
Obtain the public and private keys.
Double-click puttygen.exe. The PuTTY Key Generator window is displayed.
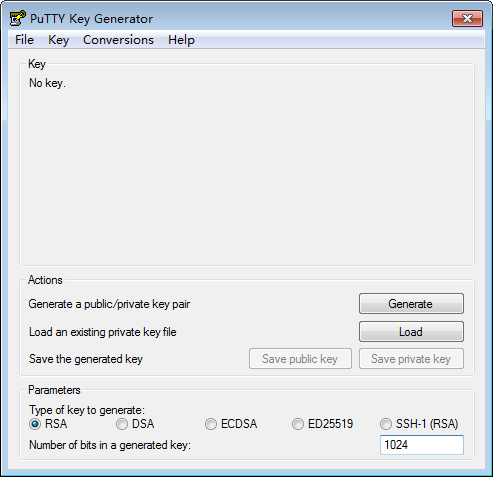
Figure 1 PuTTY Key Generator
Click Generate.
The key generator automatically generates a key pair that consists of a public key and a private key. The public key is that shown in the red box in Figure 2.
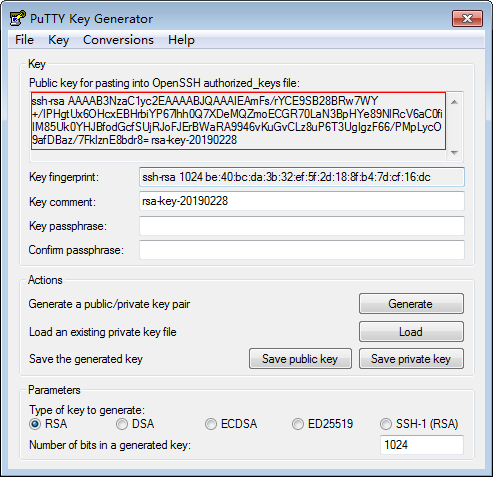
Figure 2 Obtaining the public and private keys
Copy the public key content to a .txt file and save the file in a local directory.
Note
Do not save the public key by clicking Save public key. Storing a public key by clicking Save public key of PuTTYgen will change the format of the public key content. Such a key cannot be imported to the management console.
Save the private key file.
The format in which to save your private key varies depending on application scenarios: To ensure BMS security, you are limited to downloading the private key only once.
Saving the private key in .ppk format
When you are required to log in to a Linux BMS using PuTTY, you must use the .ppk private key. To save the private key in .ppk format, perform the following operations:
On the PuTTY Key Generator page, choose File > Save private key.
Save the private key, for example, kp-123.ppk, to the local PC.
Saving the private key in .pem format
When you are required to log in to a Linux BMS using Xshell or attempt to obtain the password for logging in to a Windows BMS, you must use the .pem private key for authentication. To save the private key in .ppk format, perform the following operations:
On the PuTTY Key Generator page, choose Conversions > Export OpenSSH key.
Caution
If you use this private file to obtain the password for logging in to a Windows BMS, when you choose Export OpenSSH key, do not configure Key passphrase. Otherwise, obtaining the password will fail.
Save the private key, for example, kp-123.pem, in a local directory.
After the public key file and private key file are saved, import the public key to the system by referring to Import a Key Pair.
Import a Key Pair
If you store a public key by clicking Save public key of PuTTYgen, the format of the public key content will change. Such a key cannot be imported to the management console. To resolve this issue, obtain the public key content in correct format and import the content to the management console. For details, see What Do I Do If a Key Pair Created Using PuTTYgen Cannot Be Imported to the Management Console?
Log in to the management console.
Under Computing, click Bare Metal Server.
The BMS console is displayed.
In the navigation tree, choose Key Pair.
On the right side of the page, click Import Key Pair.
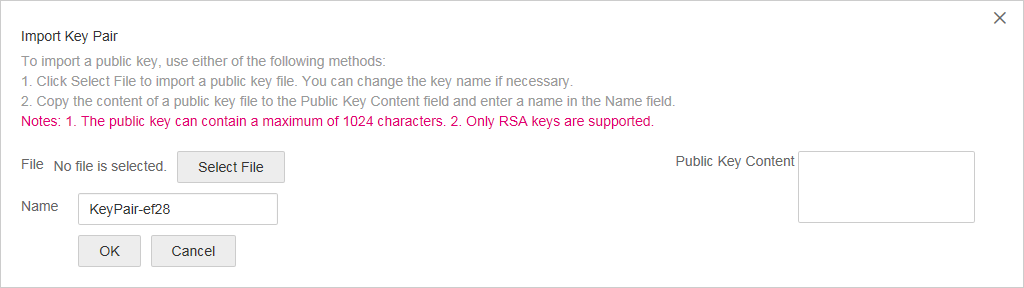
Figure 3 Import Public Key
Use either of the following methods to import the key pair:
Selecting a file
On the Import Key Pair page of the management console, click Select File and select the local public key file, for example, the .txt file saved in 2.
Note
When importing a key pair, ensure that the public key is imported. Otherwise, importing the key pair will fail.
Click OK.
After the public key is imported, you can change its name.
Copying the public key content
Copy the content of the public key in .txt file into the Public Key Content text box.
Click OK.
Delete a Key Pair
If you no longer need a key pair, you can delete it. After a key pair is deleted, it cannot be restored. However, you can still use the private key saved locally to log in to the BMS, and the deleted key pair is still displayed in the BMS details.
Note
If your key pair has been bound to a BMS and you do not unbind the key pair from the BMS before deleting the key pair, you cannot create a key pair of the same name. When you enter this name when creating or importing a key pair, the console displays an error message indicating that the key pair already exists.
If your key pair is not bound to any BMS or has been unbound from the BMS before it is deleted, you can create a key pair of the same name.
Log in to the management console.
Under Computing, click Bare Metal Server.
The BMS console is displayed.
In the navigation tree, choose Key Pair.
Locate the row that contains the target key pair and click Delete in the Operation column.