Configuring the TOA Module
Scenarios
ELB provides customized strategies for managing service access. Before these strategies can be customized, the clients' IP addresses contained in the requests are required. To obtain the IP addresses, you can install the TCP Option Address (TOA) kernel module on backend servers.
This section provides detailed operations for you to compile the module in the OS if you use TCP to distribute incoming traffic.
The operations for Linux OSs with kernel version of 2.6.32 are different from those for Linux OSs with kernel version of 3.0 or later.
Note
TOA does not support listeners using the UDP protocol.
The module can work properly in the following OSs and the methods for installing other kernel versions are similar:
CentOS 6.8 (kernel version 2.6.32)
SUSE 11 SP3 (kernel version 3.0.76)
CentOS 7 and CentOS 7.2 (kernel version 3.10.0)
Ubuntu 16.04.3 (kernel version 4.4.0)
Ubuntu 18.04 (kernel version 4.15.0)
OpenSUSE 42.2 (kernel version 4.4.36)
CoreOS 10.10.5 (kernel version 4.9.16)
Debian 8.2.0 (kernel version 3.16.0)
Prerequisites
The development environment for compiling the module must be the same as that of the current kernel.
Servers can access OS repositories.
Users other than root must have sudo permissions.
Procedure
In the following operations, the Linux kernel version is 3.0 or later.
Prepare the compilation environment.
Note
During the installation, download the required module development package from the Internet if it cannot be found in the source.
The following are operations for compiling the module in different Linux OSs. Perform appropriate operations.
CentOS
Run the following command to install the GCC:
sudo yum install gcc
Run the following command to install the make tool:
sudo yum install make
Run the following command to install the module development package (the package header and module library must have the same version as the kernel):
sudo yum install kernel-devel-`uname -r`
Note
During the installation, download the required module development package from the following address if it cannot be found in the source:
https://mirror.netcologne.de/oracle-linux-repos/ol7_latest/getPackage/
For example, to install 3.10.0-693.11.1.el7.x86_64, run the following command:
rpm -ivh kernel-devel-3.10.0-693.11.1.el7.x86_64.rpm
Ubuntu and Debian
Run the following command to install the GCC:
sudo apt-get install gcc
Run the following command to install the make tool:
sudo apt-get install make
Run the following command to install the module development package (the package header and module library must have the same version as the kernel):
sudo apt-get install linux-headers-`uname -r`
SUSE
Run the following command to install the GCC:
sudo zypper install gcc
Run the following command to install the make tool:
sudo zypper install make
Run the following command to install the module development package (the package header and module library must have the same version as the kernel):
sudo zypper install kernel-default-devel
CoreOS
For CoreOS, the module will be compiled in a container, and it must be started before the module is compiled.
For detailed operations, see the CoreOS documentation. Obtain the documentation from the following link:
Compile the module.
Use the git tool and run the following command to download the module source code:
git clone https://github.com/Huawei/TCP_option_address.git
Note
If the git tool is not installed, download the module source code from the following link:
Run the following commands to enter the source code directory and compile the module:
cd src
make
If no warning or error code is prompted, the compilation was successful. Verify that the toa.ko file was generated in the current directory.
Note
If error message "config_retpoline=y but not supported by the compiler, Compiler update recommended" is displayed, the GCC version is too old. Upgrade the GCC to a later version.
Load the module.
Run the following command to load the module:
sudo insmod toa.ko
Run the following command to check the module loading and to view the kernel output information:
dmesg | grep TOA
If TOA: toa loaded is displayed in the command output, the module has been loaded.
Note
After compiling the CoreOS module in the container, copy it to the host system and then load it. The container for compiling the module shares the /lib/modules directory with the host system, so you can copy the module in the container to this directory, allowing the host system to use it.
Set the script to enable it to automatically load the module.
To make the module take effect when the system starts, add the command for loading the module to your startup script.
You can use either of the following methods to automatically load the module:
Add the command for loading the module to a customized startup script as required.
Perform the following operations to configure a startup script:
Create the toa.modules file in the /etc/sysconfig/modules/ directory. This file contains the module loading script.
The following is an example of the content in the toa.modules file.
#!/bin/sh
/sbin/modinfo -F filename /root/toa/toa.ko > /dev/null 2>&1
if [ $? -eq 0 ]; then
/sbin/insmod /root/toa/toa.ko
fi
/root/toa/toa.ko is the path of the module file. You need to replace it with their actual path.
Run the following command to add execution permissions for the toa.modules startup script:
sudo chmod +x /etc/sysconfig/modules/toa.modules
Note
If the kernel is upgraded, the current module will no longer match. Compile the module again.
Install the module on multiple servers.
To load the module in the same OS, copy the toa.ko file to servers where the module is to be loaded and then perform the operations in 3.
After the module is successfully loaded, applications can obtain the real IP address contained in the request.
Note
The OS of the server must have the same version as the kernel.
Verify the module.
After the module is successfully installed, the source address can be directly obtained. The following provides an example for verification.
Run the following command to start a simple HTTP service on the backend server where Python is installed:
python -m SimpleHTTPServer port
The value of port must be the same as the port configured for the backend server, and the default value is 80.
Access the IP address of the load balancer from a client. Access logs on the server are as follows:
192.168.0.90 - - [06/Aug/2020 14:24:21] "GET / HTTP/1.1" 200 -
Note
192.168.0.90 indicates the client's source IP address that is obtained by the backend server.
In the following operations, the Linux kernel version is 2.6.32.
Note
The TOA plug-in supports the OSs (CentOS 6.8 image) with a kernel of 2.6.32-xx. Perform the following steps to configure the module:
Obtain the kernel source code package Linux-2.6.32-220.23.1.el6.x86_64.rs.src.tar.gz containing the module from the following link:
http://kb.linuxvirtualserver.org/images/3/34/Linux-2.6.32-220.23.1.el6.x86_64.rs.src.tar.gz
Decompress the kernel source code package.
Modify compilation parameters.
Open the linux-2.6.32-220.23.1.el6.x86_64.rs folder.
Edit the net/toa/toa.h file.
Change the value of #define TCPOPT_TOA200 to #define TCPOPT_TOA254.
On the shell page, run the following commands:
sed -i 's/CONFIG_IPV6=m/CONFIG_IPV6=y/g' .config
echo -e '\n# toa\nCONFIG_TOA=m' >> .config
After the configuration, the IPv6 module is compiled into the kernel. TOA is compiled into a separate module and can be independently started and stopped.
Edit Makefile.
You can add a description to the end of EXTRAVERSION =. This description will be displayed in uname -r, for example, -toa.
Run the following command to compile the software package:
make -j n
Note
n indicates the number of vCPUs. For example, if there are four vCPUs, n must be set to 4.
Run the following command to install the module:
make modules_install
The following information is displayed.
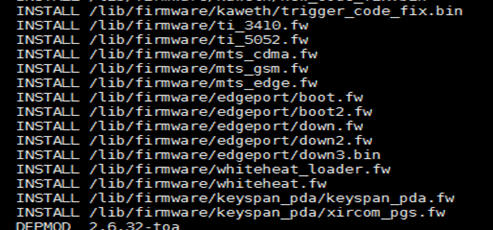
Figure 1 Installing the module
Run the following command to install the kernel:
make install
The following information is displayed.
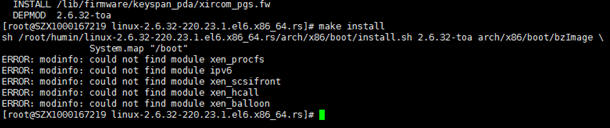
Figure 2 Installing the kernel
Open the /boot/grub/grub.conf file and configure the kernel to start up when the system starts.
Change the default startup kernel from the first kernel to the zeroth kernel by changing default=1 to default=0.
Add the nohz=off parameter to the end of the line containing the vmlinuz-2.6.32-toa kernel. If nohz is not disabled, the CPU0 utilization may be high and overload the kernel.
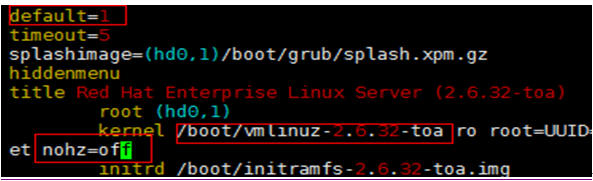
Figure 3 Configuration file
Save the modification and exit. Restart the OS.
During the restart, the system will load the vmlinuz-2.6.32-toa kernel.
After the restart, run the following command to load the module:
modprobe toa
Add the modprobe toa command to both the startup script and the system scheduled monitoring script.

Figure 4 Adding the modprobe toa command
After the module is loaded, query the kernel information.

Figure 5 Querying the kernel
Verify the module.
After the module is successfully installed, the source address can be directly obtained. The following provides an example for verification.
Run the following command to start a simple HTTP service on the backend server where Python is installed:
python -m SimpleHTTPServer port
The value of port must be the same as the port configured for the backend server, and the default value is 80.
Access the IP address of the load balancer from a client. Access logs on the server are as follows:
192.168.0.90 - - [06/Aug/2020 14:24:21] "GET / HTTP/1.1" 200 -
Note
192.168.0.90 indicates the client's source IP address that is obtained by the backend server.