Cross-VPC Access to a Kafka Instance
Context
VPCs are logically isolated from each other. If a Kafka instance and a Kafka client are in different VPCs within a region, they cannot communicate with each other. In this case, you can use one of the following methods to access a Kafka instance across VPCs:
Establish a VPC peering connection to allow two VPCs to communicate with each other. For details, see section "VPC Peering Connection" in Virtual Private Cloud User Guide.
Use VPC Endpoint (VPCEP) to establish a cross-VPC connection.
Scenario
The following describes how to use VPCEP to implement cross-VPC access.
VPCEP provides two types of resources: VPC endpoint services and VPC endpoints.
A VPC endpoint service can be a Kafka instance which is accessed using VPC endpoints.
A VPC endpoint is a secure and private channel for connecting a VPC to a VPC endpoint service.
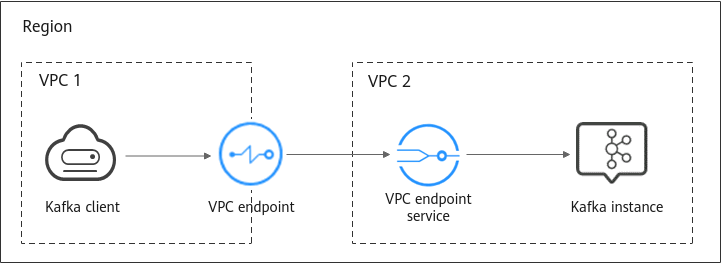
Figure 1 Working principle of accessing a Kafka instance across VPCs
Procedure
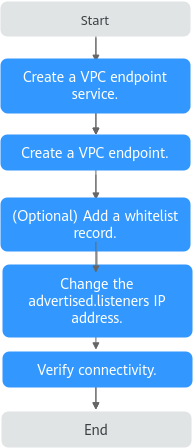
Figure 2 Process for accessing a Kafka instance across VPCs
Creating a VPC Endpoint Service
Log in to the management console.
Click
 in the upper left corner to select a region.
Note
Select the region where your Kafka instance is located.
Click Service List and choose Application > Distributed Message Service. The Kafka instance list is displayed.
Click the desired Kafka instance to view the instance details.
In the Advanced Settings section on the Basic Information tab page, obtain the listeners IP addresses and port IDs of the instance for Cross-VPC Access.

Figure 3 Cross-VPC access-related listeners IP addresses and corresponding port IDs of the Kafka instance
In the Network section on the Basic Information tab page, view the VPC to which the Kafka instance belongs.
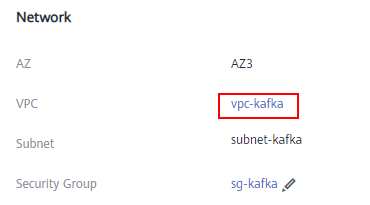
Figure 4 Viewing the VPC to which the Kafka instance belongs
Click the VPC to obtain the VPC ID on the VPC console.

Figure 5 Obtaining the VPC ID
Call the VPC Endpoint API to create a VPC endpoint service. For details, see "Creating a VPC Endpoint Service" in VPC Endpoint API Reference.
curl -i -k -H 'Accept:application/json' -H 'Content-Type:application/json;charset=utf8' -X POST -H "X-Auth-Token:$token" -d '{"port_id":"38axxxeac","vpc_id":"706xxx888","ports":[{"protocol":"TCP","client_port":9011,"server_port":9011 }],"approval_enabled":false,"service_type":"interface","server_type":"VM"}' https://{endpoint}/v1/{project_id}/vpc-endpoint-services
Parameter description:
token: an access credential issued to an IAM user to bear its identity and permissions. For details on how to obtain a token, see Obtaining a User Token.
port_id: one of the port IDs obtained in 5.
vpc_id: VPC ID obtained in 7.
endpoint: VPCEP endpoint obtained from Regions and Endpoints. The region must be the same as that of the Kafka instance.
project_id: project ID obtained from "Obtaining a Project ID". The region must be the same as that of the Kafka instance. For details about how to obtain the value, see section "Common Parameters" > "Obtaining a Project ID" in the VPC Endpoint API Reference.
Record the value of service_name in the response. This parameter indicates the name of the VPC endpoint service.
Repeat 8 to create VPC endpoint services for other port IDs obtained in 5 and record the VPC endpoint service names.
(Optional) Adding a Whitelist Record
If the Kafka client and Kafka instance belong to different accounts, add the ID of the account to which the Kafka client belongs to the whitelist of the endpoint service. For details, see Add a Whitelist Record.
Creating a VPC Endpoint
Click Service List. Then choose Networking > VPC Endpoint.
Click Create VPC Endpoint.
Set the following parameters:
Region: Select the region that the Kafka instance is in.
Service Category: Select Find a service by name.
VPC Endpoint Service Name: Enter the VPC endpoint service name recorded in 8 and click Verify. If Service name found is displayed, proceed with subsequent operations.
VPC: Select the VPC that the Kafka instance is in.
Subnet: Select the subnet that the Kafka instance is in.
Private IP Address: Select Automatic.
Retain the default values for other parameters. For details, see Creating a VPC Endpoint.
Click Create Now.
Confirm the configurations and submit the request.
Go back to the VPC endpoint list and check whether the status of the created VPC endpoint has changed to Accepted. The Accepted state means that the VPC endpoint has been connected to the VPC endpoint service.

Figure 6 Checking the VPC endpoint status
Click the VPC endpoint ID. On the Summary tab page, obtain the private IP address.
You can use the private IP address to access the VPC endpoint service.
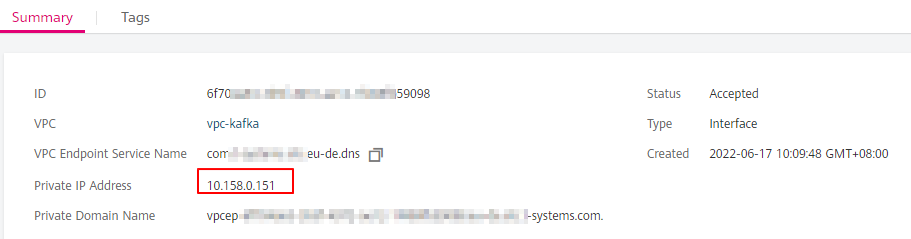
Figure 7 Viewing the private IP address
Repeat 1 to 7 to create a VPC endpoint for each VPC endpoint service created in 9, and view and record the private IP addresses of the VPC endpoint services.
Changing the advertised.listeners IP Address
Click Service List and choose Application > Distributed Message Service. The Kafka instance list is displayed.
Click the desired Kafka instance to view the instance details.
On the Advanced Settings section of the Basic Information tab page, click Modify for Cross-VPC Access to change the value of advertised.listeners IP address to the private IP addresses recorded in 7 and 8. Click Save.
Important
Each IP address must match the corresponding port ID. Otherwise, the network will be disconnected.
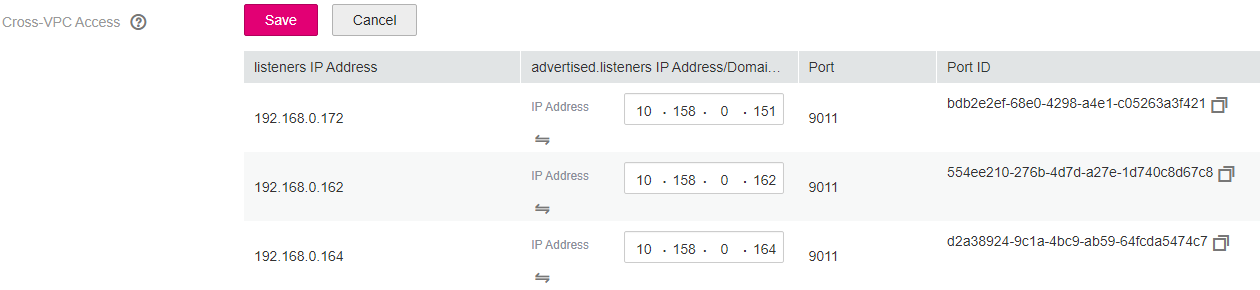
Figure 8 Changing the advertised.listeners IP addresses
Verifying Connectivity
Check whether messages can be created and retrieved by referring to Accessing a Kafka Instance Without SASL or Accessing a Kafka Instance with SASL.
Notes:
The address for connecting to a Kafka instance is in the format of "advertised.listeners IP:9011". For example, the addresses for connecting to the Kafka instance shown in Figure 8 are 10.158.0.151:9011,10.158.0.162:9011,10.158.0.164:9011.
Configure inbound rules for the security group of the Kafka instance to allow access from 198.19.128.0/17 over port 9011.
If a network access control list (ACL) has been configured for the subnet of this instance, configure inbound rules for the network ACL to allow access from 198.19.128.0/17 and from the subnet used by the VPC endpoint.
Note
198.19.128.0/17 is the network segment allocated to the VPCEP service. To use VPCEP, allow access from this network segment.