Managing Namespaces
Using Namespaces
When creating a workload, you can select a namespace to isolate resources or users.
When querying workloads, you can select a namespace to view all workloads in the namespace.
Isolating Namespaces
Isolating namespaces by environment
An application generally goes through the development, joint debugging, and testing stages before it is launched. In this process, the workloads deployed in each environment (stage) are the same, but are logically defined. There are two ways to define them:
Group them in different clusters for different environments.
Resources cannot be shared among different clusters. In addition, services in different environments can access each other only through load balancing.
Group them in different namespaces for different environments.
Workloads in the same namespace can be mutually accessed by using the Service name. Cross-namespace access can be implemented by using the Service name or namespace name.
The following figure shows namespaces created for the development, joint debugging, and testing environments, respectively.
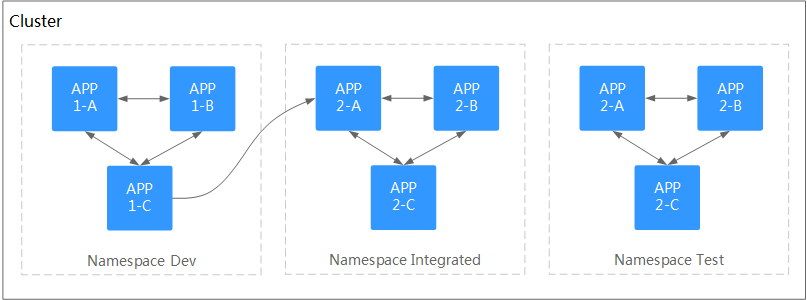
Figure 1 One namespace for one environment
Isolating namespaces by application
You are advised to use this method if a large number of workloads are deployed in the same environment. For example, in the following figure, different namespaces (APP1 and APP2) are created to logically manage workloads as different groups. Workloads in the same namespace access each other using the Service name, and workloads in different namespaces access each other using the Service name or namespace name.
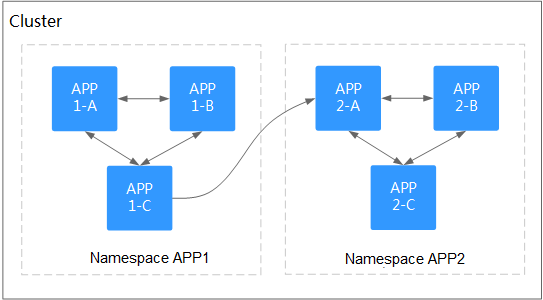
Figure 2 Grouping workloads into different namespaces
Managing Namespace Labels
Log in to the CCE console and click the cluster name to access the cluster console.
In the navigation pane, choose Namespaces. Locate the row containing the target namespace and choose More > Manage Labels in the Operation column.
In the dialog box that is displayed, the existing labels of the namespace are displayed. Modify the labels as needed.
Adding a label: Click the add icon, enter the key and value of the label to be added, and click OK.
For example, the key is project and the value is cicd, indicating that the namespace is used to deploy CI/CD.
Deleting a label: Click Delete next the label to be deleted and then OK.
Switch to the Manage Label dialog box again and check the modified labels.
Enabling Node Affinity in a Namespace
After node affinity is enabled in a namespace, the workloads newly created in the namespace can be scheduled only to nodes with specific labels. For details, see PodNodeSelector.
Log in to the CCE console and click the cluster name to access the cluster console.
In the navigation pane, choose Namespace. Locate the row containing the target namespace and click
 in the Node Affinity column.
In the displayed dialog box, select Enable and click OK.
After node affinity is enabled, new workloads in the current namespace will be scheduled only to nodes with specified labels. For example, in namespace test, the workloads in the namespace can be scheduled only to the node whose label key is kubelet.kubernetes.io/namespace and label value is test.
You can add specified labels to a node in Labels and Taints on the Nodes page. For details, see Managing Node Labels.
Deleting a Namespace
If a namespace is deleted, all resources (such as workloads, jobs, and ConfigMaps) in this namespace will also be deleted. Exercise caution when deleting a namespace.
Log in to the CCE console and click the cluster name to access the cluster console.
Choose Namespaces in the navigation pane. On the displayed page, click More in the row of the target namespace and choose Delete.
Follow the prompts to delete the namespace. The default namespaces cannot be deleted.