Handling False Alarms
This section describes how to mask false alarms and view event details if you find out that an event is misreported.
Prerequisites
Login credentials have been obtained.
The event list contains at least one misreported event.
Procedure
Log in to the management console.
Click
 in the upper left corner of the management console and select a region or project.
Choose Security > Web Application Firewall. In the navigation pane on the left, choose Events.
Click the Search tab. In the domain name drop-down list, select a domain name or All domain names to view target event logs. The query time can be Yesterday, Today, Past 3 days, Past 7 days, Past 30 days, or a user-defined time. Figure 1 shows an example. For details about parameters, see Table 1 and Table 2.
In the upper right corner of the event list, click Search by ID to search a target event by ID.

Figure 1 Search tab page
Table 1 Event parameters¶ Parameter
Description
Event Type
Type of an attack
By default, All is selected. You can view logs of all attack types or select an attack type to view target attack logs.
Source IP Address
Public IP address of the web visitor/attacker
By default, All is selected. You can view logs of all attack source IP addresses, select an attack source IP address, or enter an attack source IP address to view target attack logs.
Table 2 Log list parameters¶ Parameter
Description
Time
Time when an attack occurs
Source IP Address
Public IP address of the web visitor/attacker
Domain Name
Attacked domain name
URL
Attacked URL
Malicious load
Location of the malicious load
Event Type
Type of an attack
Protective Action
Protective actions. The options are Block, Log only, Allow, Verification code, Filter, and Mismatch.
Note
To view event details, click Details in the Operation column of the event list.
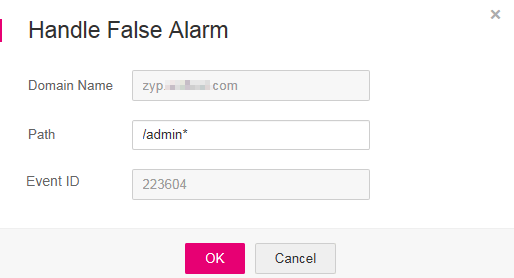
If an event is misreported, add a false alarm masking rule by clicking Handle False Alarm in the row of the event. Figure 2 shows an example. Table 3 lists related parameters.
Note
False alarm masking only applies to events logged by built-in basic web protection rules. If you want to mask events logged by custom rules, delete the rules.

Figure 2 Handling a false alarm
Table 3 Parameter description¶ Parameter
Description
Example Value
Domain Name
Domain name where an attack occurs, which is obtained automatically by the system
--
Path
Misreported URL excluding a domain name
Prefix match: The path ending with * indicates that the path is used as a prefix. For example, if the path to be protected is /admin/test.php or /adminabc, set Path to /admin*.
Exact match: The path to be entered must match the path to be protected. If the path to be protected is /admin, set Path to /admin.
Note
The path supports prefix and exact matches only and does not support regular expressions.
The path cannot contain two or more consecutive slashes. For example, ///admin. If you enter ///admin, the WAF engine converts /// to /.
/admin*
Event ID
ID of a built-in rule, which is automatically read. The value consists of six digits.
223604
Click OK. The event is no longer displayed in the event list.
Note
You can switch to the Domains page, locate the row containing the target domain name, click Configure Policy in the Operation column. In the False Alarm Masking area, and click Customize Rule to view the added false alarm rule.