Handling False Alarms
If you are sure that a protection event is a false alarm (no malicious link or character was detected), you can handle it as a false alarm, add the client IP address to an address group that is allowed by the policy, add the client IP address to a blacklist/whitelist rule, or disable or delete the hit protection rule. Events that have been handled as false alarms will not be displayed in the event list.
Scenarios
If legitimate service requests are blocked by WAF, the website may be inaccessible to some visitors. For example, after you connect a web service deployed on ECSs to WAF over its public domain name and enable basic web protection for it, if its normal traffic hits a protection rule, the access requests will be blocked. The web service becomes inaccessible over the domain name or returns errors to visitors, but it is still accessible over server IP addresses. It is more likely that the requests were blocked mistakenly, and the event is a false alarm. In this case, you need to handle the event as a false alarm.
You can handle false alarms in the following ways based on how they were generated:
For a protection event triggered by a WAF built-in rule, you can ignore the corresponding WAF protection in the global protection whitelist rule. For details, see Handling False Alarms Triggered by Protection Rules.
WAF built-in rules include basic web protection rules, and feature-based anti-crawler rules.
For a protection event triggered by a custom rule, you can disable or delete the corresponding protection rule. For details, see Handling False Alarms Triggered by Protection Rules.
WAF custom rules include CC attack protection rules, precise protection rules, blacklist and whitelist rules, and geolocation access control rules you create.
For a client IP address mistakenly blocked, you can add it to an address group or add it to a blacklist/whitelist rule to allow it. For details, see Handling False Positives Based on Client IP Addresses.
Prerequisites
A protection event has been reported and displayed on the Events page.
Constraints
A protection event can only be handled as a false alarm once.
Dedicated WAF instances earlier than June 2022 do not support All protection for Ignore WAF Protection. Only Basic web protection can be selected.
Handling False Alarms Triggered by Protection Rules
If you are sure that an event is a false alarm generated based on a WAF built-in rule or custom protection rule, you can handle the event as a false alarm.
WAF built-in rules include basic web protection rules, and feature-based anti-crawler rules.
WAF custom rules include CC attack protection rules, precise protection rules, blacklist and whitelist rules, and geolocation access control rules you create.
Log in to the management console.
Click
 in the upper left corner and select a region or project.
Click
 in the upper left corner and choose Web Application Firewall (Dedicated) under Security.
In the navigation pane on the left, click Events.
View protection details of a specified domain name, instance, and time range.
Locate the target protection event and choose More > Handle as False Alarm in the Operation column.
In the Handle False Alarm dialog box, handle the event.
Ignore the corresponding WAF protection based on the request features hit the rule.
If a protection event is triggered by a rule in Basic Web Protection or Feature-based Anti-Crawler, the associated request features will be displayed in the Handle False Alarm dialog box by default. You need to ignore the corresponding WAF protection type and click OK. For details about the parameters of the global whitelist rule, see Table 1.
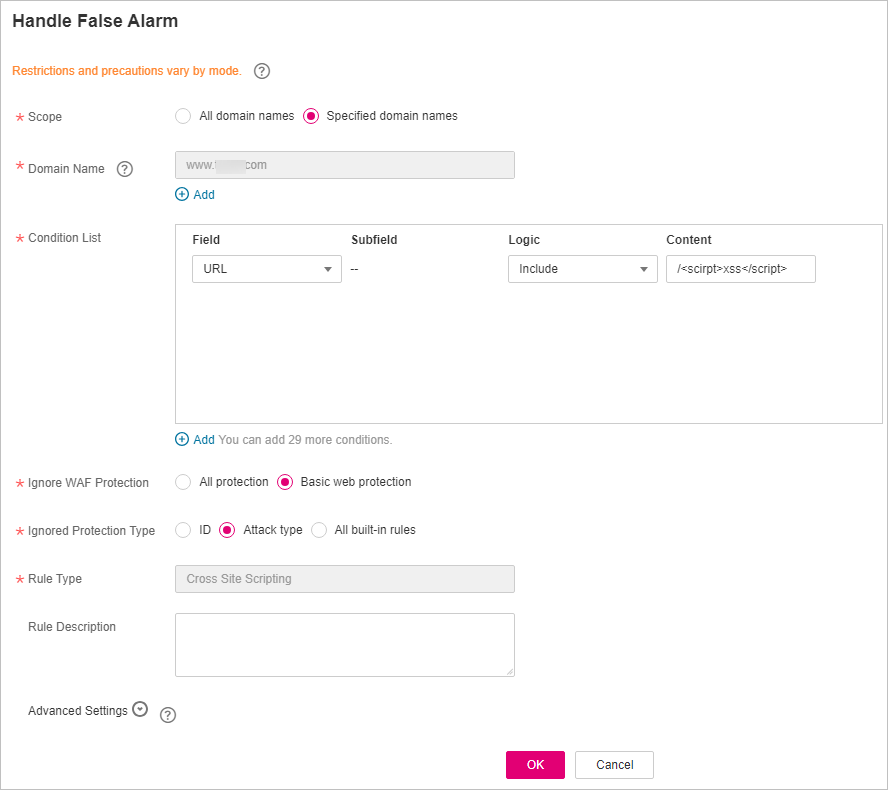
Figure 1 Handle False Alarm
Table 1 Parameters¶ Parameter
Description
Example Value
Scope
All domain names: By default, this rule will be applied to all domain names that are protected by the current policy.
Specified domain names: Specify a domain name range this rule applies to.
Specified domain names
Domain Name
This parameter is mandatory when you select Specified domain names for Scope.
Enter a single domain name that matches the wildcard domain name being protected by the current policy.
www.example.com
Condition List
Click Add to add conditions. At least one condition needs to be added. You can add up to 30 conditions to a protection rule. If more than one condition is added, all of the conditions must be met for the rule to be applied. A condition includes the following parameters:
Condition parameter description:
Field
Subfield: Configure this field only when Params, Cookie, or Header is selected for Field.
Important
NOTICE: The length of a subfield cannot exceed 2,048 characters. Only digits, letters, underscores (_), and hyphens (-) are allowed.
Logic: Select a logical relationship from the drop-down list.
Content: Enter or select the content that matches the condition.
Field is set to Path.
Logic is set to Include.
Content is set to /product.
Ignore WAF Protection
All protection: All WAF rules do not take effect, and WAF allows all request traffic to the domain names in the rule.
Basic web protection: You can ignore basic web protection by rule ID, attack type, or all built-in rules. For example, if XSS check is not required for a URL, you can whitelist XSS rule.
Basic web protection
Ignored Protection Type
If you select Basic web protection for Ignored WAF Protection, select one of the following for Ignored Protection Type:
ID: Configure the rule by event ID.
Attack type: Configure the rule by attack type, such as XSS and SQL injection. One type contains one or more rule IDs.
All built-in rules: all checks enabled in Basic Web Protection.
Attack type
Rule ID
This parameter is mandatory when you select ID for Ignored Protection Type.
Rule ID of a misreported event in Events whose type is not Custom. You are advised to handle false alarms on the Events page.
041046
Rule Type
This parameter is mandatory when you select Attack type for Ignored Protection Type.
Select an attack type from the drop-down list box.
WAF can defend against XSS attacks, web shells, SQL injection attacks, malicious crawlers, remote file inclusions, local file inclusions, command injection attacks, and other attacks.
SQL injection
Rule Description
A brief description of the rule. This parameter is optional.
SQL injection attacks are not intercepted.
Ignore Field
To ignore attacks of a specific field, specify the field in the Advanced Settings area. After you add the rule, WAF will stop blocking attacks matching the specified field.
Select a target field from the first drop-down list box on the left. The following fields are supported: Params, Cookie, Header, Body, and Multipart.
If you select Params, Cookie, or Header, you can select All or Field to configure a subfield.
If you select Body or Multipart, you can select All.
If you select Cookie, the Domain Name box for the rule can be empty.
Note
If All is selected, WAF will not block all attack events of the selected field.
Params
All
Disabling or deleting a custom protection rule
For a protection event triggered by a custom protection rule (such as a CC attack protection rule or precise protection rule), the custom protection rule is displayed in the Handle False Alarm dialog box. You can click Handle Now to go to the custom protection rule page. Then, click Disable or Delete in the Operation column of the target rule.
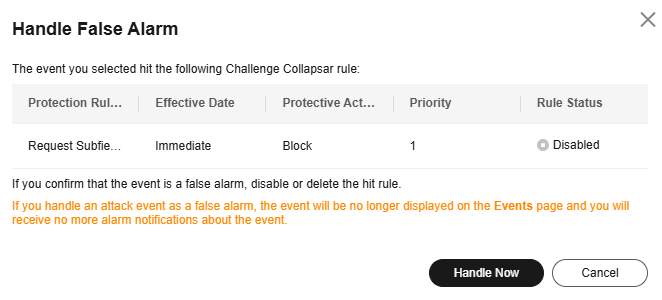
Figure 2 Disabling or deleting a custom protection rule
Handling False Positives Based on Client IP Addresses
If you are sure a client IP address is blocked mistakenly, you can add the IP address to an address group and add the IP address to a blacklist/whitelist rule to allow it.
Log in to the management console.
Click
in the upper left corner and select a region or project.Click
in the upper left corner and choose Web Application Firewall (Dedicated) under Security.In the navigation pane on the left, click Events.
View protection details of a specified domain name, instance, and time range.
Locate the target client IP address and click Add to Address Group or Add to Blacklist/Whitelist.
Adding a client IP address to an address group
In the Operation column of the target client IP address, choose More > Add to Address Group.
In the Add to Address Group dialog box, add the client IP address to an existing address group or a new address group.
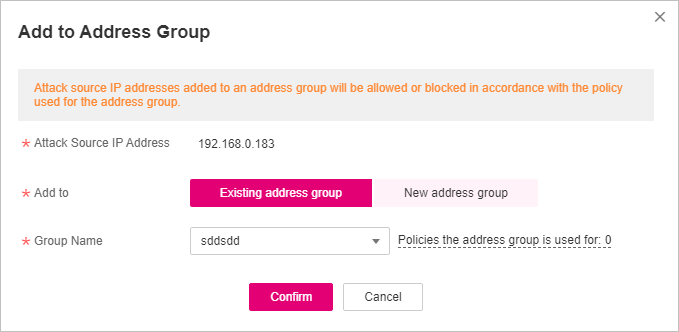
Figure 3 Add to Address Group
Associate the address group with a protection policy. If the address group has been associated with a protection policy, skip this step.
After the preceding configurations are complete, WAF blocks or allows the client IP addresses based on the protection policy associated with the address group.
Adding a client IP address to a blacklist or whitelist
In the Operation column of the target client IP address, choose More > Add to Blacklist/Whitelist.
In the Add to Blacklist/Whitelist dialog box, add the client IP address to an existing rule or a new rule. For more details about a blacklist/whitelist rule, see Table 2.
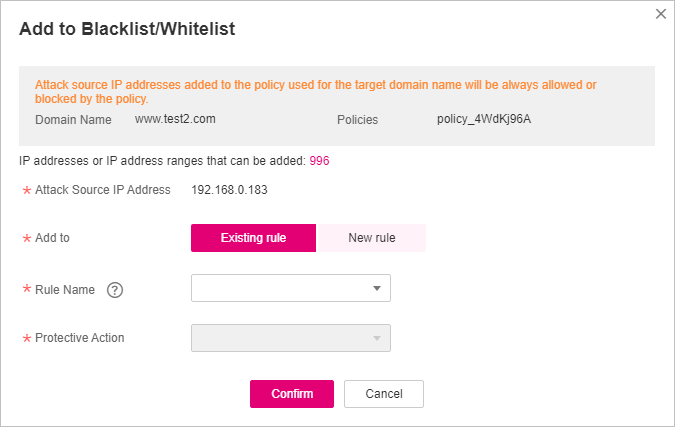
Figure 4 Add to Blacklist/Whitelist
Table 2 Parameter descriptions¶ Parameter
Description
Add to
Existing rule: Add the client IP address to an existing blacklist or whitelist rule used for the protected domain name.
New rule: Create a blacklist or whitelist rule for the protected domain name and add the client IP address to the rule.
Rule Name
If you select Existing rule for Add to, select a rule name from the drop-down list.
If you select New rule for Add to, customize a blacklist or whitelist rule.
IP Address/Range/Group
Add an IP address, IP address range, or address group. This parameter is mandatory only when you select New rule for Add to.
IP address/range: Add the client IP address to the blacklist or whitelist.
Address group: Add the client IP address to the address group associated with the blacklist or whitelist rule.
If you select Address Group, you need to select an existing address group or create a new address group.
Protective Action
Select the protective action for the rule. This parameter is mandatory only when you select New rule for Add to.
Block: Select Block if you want to black the IP address or IP address range you configure previously.
Allow: Select Allow if you want to allow the IP address or IP address range you configure previously.
Log only: Select Log only if you want to observe the traffic from the IP address or IP address range you configure previously.
Known Attack Source
If you select Block for Protective Action, you can configure a known attack source rule. Then, WAF blocks the requests matching the configured IP, Cookie, or Params for a period configured by the known attack source rule. For details about know attack source rules, see Configuring a Known Attack Source Rule to Block Specific Visitors for a Specified Duration.
Rule Description
Description of the rule.
After the preceding configurations are complete, WAF blocks or allows client IP addresses based on the blacklist and whitelist rule you configure.
Operation Result Verification
It takes about one minute for the operation works. Handled false alarms will no longer be displayed in the event list. You can refresh the browser cache, access the page for which the global whitelist rule is configured, and check whether the configuration is successful.