Binding a Virtual IP Address to an EIP or ECS
Scenarios
You can bind a virtual IP address to an EIP so that you can access the ECSs bound with the same virtual IP address from the Internet. These ECSs can work in the active/standby mode to improve fault tolerance.
Procedure
Log in to the management console.
Click
 in the upper left corner and select the desired region and project.
On the console homepage, under Network, click Virtual Private Cloud.
In the navigation pane on the left, click Virtual Private Cloud.
On the Virtual Private Cloud page, locate the VPC containing the virtual IP address and click the VPC name.
On the Subnets tab, click the name of the subnet that the virtual IP address belongs to.
Click the IP Addresses tab, locate the row that contains the virtual IP address to be bound to an EIP or ECS, and choose Bind to EIP or Bind to Server in the Operation column.
Select the desired EIP, or ECS and its NIC.
Note
If the ECS has multiple NICs, bind the virtual IP address to the primary NIC.
Multiple virtual IP addresses can be bound to an ECS NIC.
Click OK.
Manually configure the virtual IP address bound to an ECS.
After a virtual IP address is bound to an ECS NIC, you need to manually configure the virtual IP address on the ECS.
Linux OS (CentOS 7.2 64bit is used as an example.)
Run the following command to obtain the NIC to which the virtual IP address is to be bound and the connection of the NIC:
nmcli connection
Information similar to the following is displayed:

The command output in this example is described as follows:
eth0 in the DEVICE column indicates the NIC to which the virtual IP address is to be bound.
Wired connection 1 in the NAME column indicates the connection of the NIC.
Run the following command to add the virtual IP address for the target connection:
nmcli connection modify "CONNECTION" ipv4.addresses VIP
Configure the parameters as follows:
CONNECTION: connection of the NIC obtained in 10.a.
VIP: virtual IP address to be added.
If you add multiple virtual IP addresses at a time, separate them with commas (,).
If a virtual IP address already exists and you need to add a new one, the command must contain both the new and original virtual IP addresses.
Example commands:
Adding a single virtual IP address: nmcli connection modify "Wired connection 1" ipv4.addresses 172.16.0.125
Adding multiple virtual IP addresses: nmcli connection modify "Wired connection 1" ipv4.addresses 172.16.0.125,172.16.0.126
Run the following command to make the configuration take effect:
nmcli connection up "CONNECTION"
In this example, run the following command:
nmcli connection up "Wired connection 1"
Information similar to the following is displayed:

Run the following command to check whether the virtual IP address has been bound:
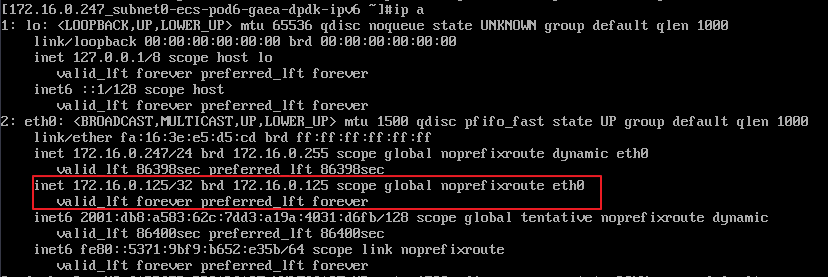
ip a
Information similar to the following is displayed. In the command output, the virtual IP address 172.16.0.125 is bound to NIC eth0.
Windows OS (Windows Server is used as an example here.)
In Control Panel, click Network and Sharing Center, and click the corresponding local connection.
On the displayed page, click Properties.
On the Network tab page, select Internet Protocol Version 4 (TCP/IPv4).
Click Properties.
Select Use the following IP address and set IP address to the private IP address of the ECS, for example, 10.0.0.101.
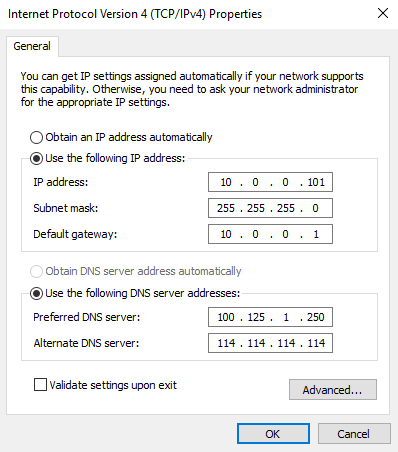
Figure 1 Configuring private IP address
Click Advanced.
On the IP Settings tab, click Add in the IP addresses area.
Add the virtual IP address. For example, 10.0.0.154.
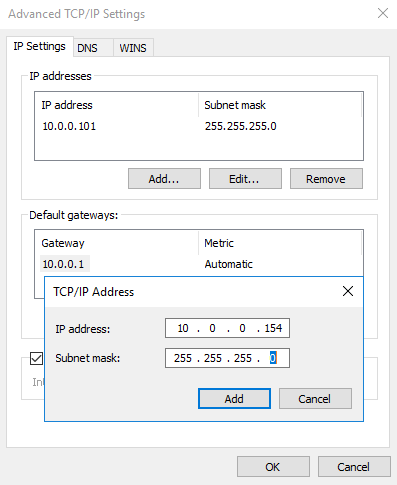
Figure 2 Configuring virtual IP address
Click OK.
In the Start menu, open the Windows command line window and run the following command to check whether the virtual IP address has been configured:
ipconfig /all
In the command output, IPv4 Address is the virtual IP address 10.0.0.154, indicating that the virtual IP address of the ECS NIC has been correctly configured.