Step 2: Create a Protected Instance
Scenarios
You can create protected instances using the servers that you want to perform DR protection. If the current production site encounters an unexpected large-scale server failure, you can call the related protection group API to perform a failover, ensuring that services running on protected instances are not affected.
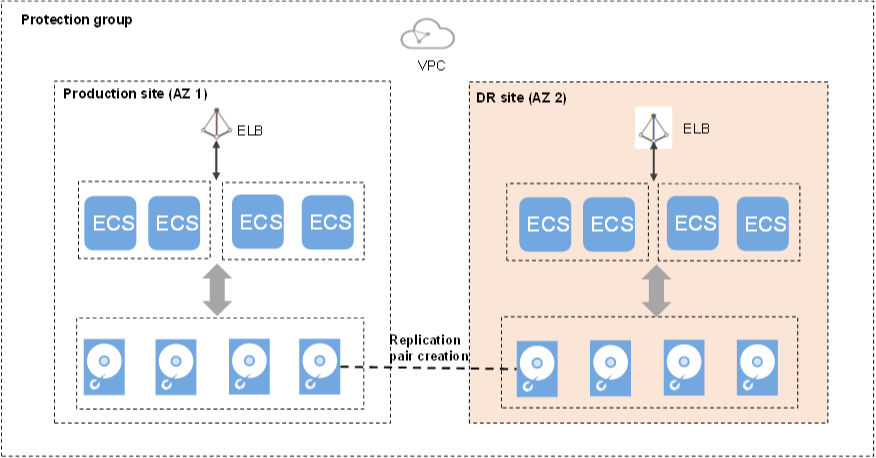
Select a protection group for each server to be replicated and create a protected instance using the server. When you create a protected instance, the server and disk will be created at the DR site for the production site server and disk. The server specifications can be configured as required. Specifically, the specifications of the DR site server can be different from those of the production site server. The disks of the production site and DR site are of the same specifications and can automatically form a replication pair.
The server at the DR site is in the Stopped state after the protected instance created. These automatically created resources, including the DR site servers and disks, cannot be used before a planned failover or failover.

Figure 1 Creating a protected instance
Notes
If a production site server has been added to an ECS group, you are not allowed to specify a DeH to create the DR site server for the production site server.
When a protected instance is created, the default name of the server at the DR site is the same as that of the server at the production site, but their IDs are different.
To modify a server name, switch to the protected instance details page and click the server name to switch to the server details page.
After you create a protected instance and enable protection for the protection group, modifications to the Hostname, Name, Agency, ECS Group, Security Group, Tags, and Auto Recovery configurations of the production site server will not synchronize to the DR site server. You can log in to the management console and manually add the configuration items to the servers at the DR site.
If protection is enabled for servers created during capacity expansion of an Auto Scaling (AS) group, these servers cannot be deleted when the capacity of the AS group is reduced.
If the server at the production site runs Windows and you choose the key login mode, ensure that the key pair of the server exists when you create a protected instance. Otherwise, the server at the DR site may fail to create, causing the protected instance creation failure.
Note
If the key pair of the server at the production site has been deleted, create a key pair with the same name.
When you create a protected instance, if the production site server runs Linux and uses the key login mode, the key pair information will not be displayed on the details page of the DR site server after the DR site server is created. You can use the key pair of the production site server to log in to the DR site server.
Prerequisites
The protection group is in the Available or Protecting state.
No shared disk is attached to the production site server.
If some services need to use shared disks, perform steps in Creating a Replication Pair to create a replication pair for the shared disks. Then, perform steps in Attaching a Replication Pair to attach the replication pair to the protected instance.
No protected instances have been created for the production site server.
Resources of the target specifications for the server to be protected are not sold out at the DR site.
The server that you use to create a protected instance and the protection group are in the same VPC.
Procedure
Log in to the management console.
Click Service List and choose Storage > Storage Disaster Recovery Service.
The Storage Disaster Recovery Service page is displayed.
In the pane of the protection group for which protected instances are to be added, click Protected Instances.
The operation page for the protection group is displayed.
On the Protected Instances tab, click Create Protected Instance.
The Create Protected Instance page is displayed.

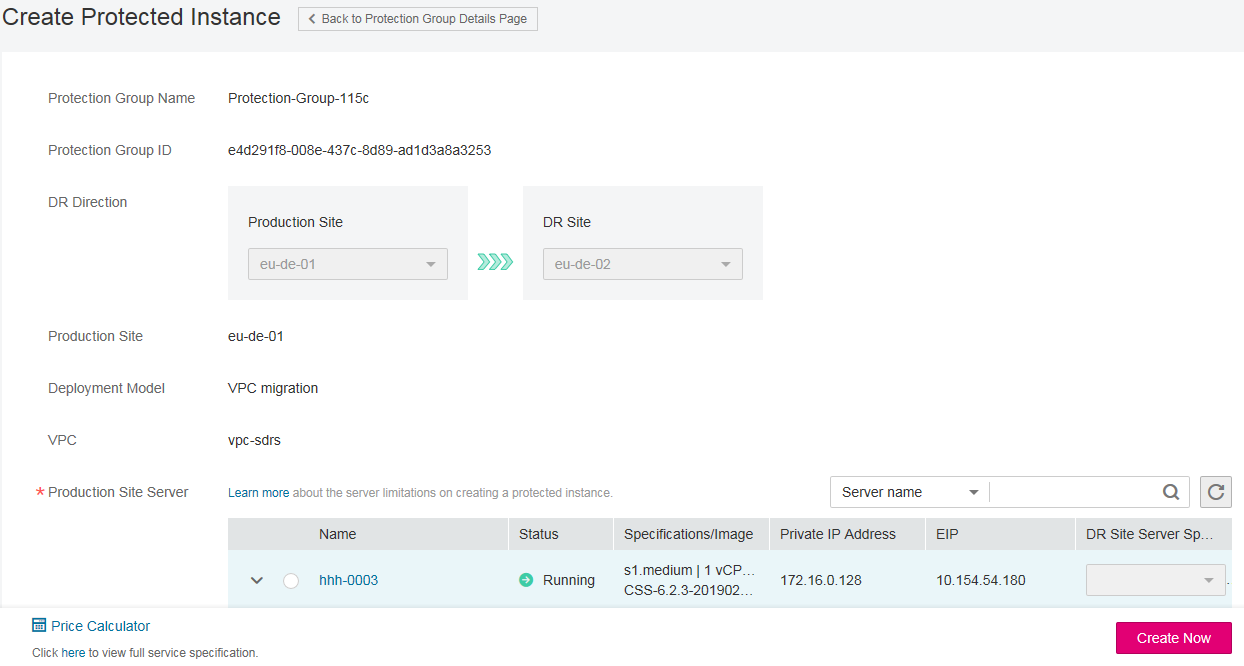
Figure 2 Creating a protected instance
Configure the basic information about the protected instance, as described in Table 1.
Table 1 Parameter description¶ Parameter
Description
Example Value
Protection Group Name
Indicates the name of the protection group to which the protected instance to be created belongs. You do not need to configure it.
protection_group_001
Protection Group ID
Indicates the ID of the protection group to which the protected instance to be created belongs.
2a663c5c-4774-4775-a321-562a1ea163e3
DR Direction
Indicates the replication direction of the protection group to which the protected instance to be created belongs. You do not need to configure it.
eu-de-01 -> eu-de-02
Production Site
Indicates the AZ of the production site server. You do not need to configure it.
az-01
Deployment Model
Indicates the deployment model of the protection group to which the protected instance to be created belongs. You do not need to configure it.
VPC migration
VPC
Indicates the VPC of the protection group to which the protected instance to be created belongs. You do not need to configure it.
vpc1
Production Site Server
This parameter is mandatory.
In the server list, select the server and specifications to be used to create the protected instance.
Note
If Server Type of the protection group is ECS, select the DR site server specifications. The specifications of the production site server and DR site server can be different. Select the specifications from the DR Site Server Specifications drop-down list.
ecs-test > s3.small.1
DR Site VPC
Indicates the VPC of the DR site server.
Its value is the same as the VPC value and do not need to be configured.
vpc1
Protected Instance Name
This parameter is mandatory.
Enter the protected instance name. It is used for protected instance classification and search.
Protected-Instance-test
Tag
This parameter is optional.
Tags are identifiers of protected instances. You can add tags for protected instances, and classify and search for the protected instances based on these tags. You can add up to 10 tags for each server.
For details, see Managing Protected Instance Tags.
Organization/Marketing
Click Create Now.
On the Confirm page, you can confirm the protected instance information.
If you do not need to modify the information, click Submit.
If you need to modify the information, click Previous.
Click Back to Protection Group Details Page and view the protected instances of the protection group.
If the protected instance status changes to Available or Protecting, the protected instance has been created successfully.
Note
After a protected instance is created, the system automatically creates replication pairs for the disks of the protected instance and backs up all the disks.
Query the replication pairs.
Switch to the operation page for the protection group.
Click the Replication Pairs tab.
On this tab, you can query the statuses of the replication pairs, target protected instance, and production site disk.