Configuring Image Permissions
Scenario
To manage SWR permissions, you can use Identity and Access Management (IAM). If you have the SWR Administrator or Tenant Administrator permission, you become an admin user of SWR accounts. You can grant permissions to other IAM users in SWR.
To push an image, you must have the edit or manage permission. To pull a private image, you must have the read, edit, or manage permission. To pull a public image, no permission is required.
Note
An SWR account admin user is granted image management permission of all organizations by default, even if the user is not in the authorized user list of the organizations.
SWR is deployed and accessed in specific physical regions. To assign permissions to a user group, specify the scope as region-specific projects and select projects for the permissions to take effect.
If you are not an SWR admin user, you can request an SWR admin user to grant you permissions to read, edit, or manage a specific image or images in a specific organization.
Examples
Example 1: An IAM user with the ServiceStage Developer permission (SWR read-only permission) wants to pull the nginx image created by the SWR administrator in the group organization.
Solution: On the details page of the nginx image, the SWR administrator grants the read permission to the IAM user.
Example 2: An SWR administrator wants to grant an external user the permission to push images to the organization, but the user is not allowed to log in to the console and can only push images through the container engine client.
Solution: On the Users tab of the details page of the organization, the SWR administrator grants the edit permission to the user. In IAM, the administrator sets Access Type to Programmatic access.
Authorization Method
You can grant permissions to users in SWR by using either of the following methods:
Grant permissions on the image details page to allow users to read, write, and manage a specific image.
Grant permissions on the organization details page to allow users to read, write, and manage all the images in an organization.
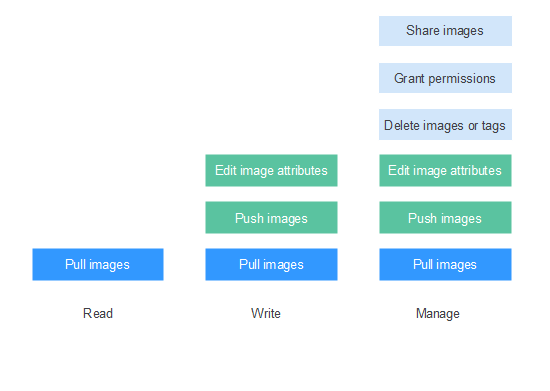
Figure 1 User permissions
You can grant the following three types of permissions to users:
Read: Users can only pull images.
Write: Users can pull and push images and edit image attributes.
Manage: Users can pull and push images, delete images or tags, edit image attributes, grant permissions, and share images with other users.
Granting Permissions for a Specific Image
To allow users to read, write, and manage a specific image, grant corresponding permissions to them on the details page of this image.
Log in to the SWR console.
In the navigation pane, choose My Images. Then click the name of the target image.
On the image details page, click the Permissions tab.
Click Grant Permission. Select Read/Edit/Manage next to the user name to grant corresponding permissions.
Modifying or Deleting Permissions for a Specific Image
You can also modify or delete user permissions on the image details page.
Modifying permissions: On the Permissions, click Edit in the row of the desired username. Select a permission from the Permission drop-down list and click Save in the Operation column.
Deleting permissions: On the Permissions tab, click Delete in the row of the desired username and then click OK.
Granting Permissions for an Organization
To allow users to read, write, and manage all the images in an organization, grant corresponding permissions to them on the details page of this organization.
Only users with the Manage permission can grant permissions for other users.
Log in to the SWR console.
In the navigation pane, choose Organizations. On the Organizations page, click under the organization to be authorized.
On the Users tab, click Grant Permission. In the dialog box displayed, select permissions for users and click OK.
Modifying or Deleting Permissions for an Organization
You can also modify or delete user permissions of an organization.
Modifying permissions: On the Users tab, click Edit in the row of the desired username. Select a permission from the Permission drop-down list and click Save in the Operation column.
Deleting permissions: On the Users tab, click Delete in the row of the desired username and then click OK.