Mounting a File System Automatically
File system mounting information may be lost after a server is restarted. You can configure automatic mounting for the server to avoid the mounting information loss.
Restrictions
Because the service startup sequences in different operating systems vary, some servers running CentOS may not support the following automatic mounting schemes. In this case, manually mount the file system.
Procedure (Linux)
Log in to the management console using a cloud account.
Log in to the management console and select a region and a project.
Under Computing, click Elastic Cloud Server to switch to the ECS console.
Log in to the ECS as user root.
Run the vi /etc/fstab command to edit the /etc/fstab file.
At the end of the file, add the file system information, for example:
Mount point /local_path nfs vers=3,timeo=600,nolock 0 0
Replace Mount point and /local_path with actual values. You can obtain the mount point from the Mount Address column of the file system. Each record in the /etc/fstab file corresponds to a mount. Each record has six fields, as described in Field Description.
Important
For optimal system performance, configure file system information based on the previous example configuration. If needed, you can customize part of mount parameters. However, the customization may affect system performance.
Press Esc, input :wq, and press Enter to save and exit.
After the preceding configurations are complete, the system reads mounting information from the /etc/fstab file to automatically mount the file system when the ECS restarts.
(Optional) Run the following command to view the updated content of the /etc/fstab file:
cat /etc/fstab
Figure 1 shows the updated file content.

Figure 1 Updated file content
If auto mount fails due to a network issue, add the sleep option and a time in front of the mount command in the rc.local file, and mount the file system after the NFS service is started.
sleep 10s && sudo mount -t nfs -o vers=3,timeo=600,noresvport,nolock,tcp Mount point/local_path
Field Description
Table 1 describes the mount fields.
Field | Description |
|---|---|
Mount point | Mount object, that is, the mount point of the file system to be mounted. Set this parameter to the mount point in the mount command that is used in Mounting an NFS File System to ECSs (Linux). |
/local_path | Mount point, that is, the directory created on the ECS for mounting the file system. Set this parameter to the local path in the mount command that is used in Mounting an NFS File System to ECSs (Linux). |
nfs | Mount type, that is, file system or partition type. Set it to nfs. |
vers=3,timeo=600,nolock | Mount options, used to set mount parameters. Use commas (,) to separate between multiple options.
|
0 | Choose whether to back up file systems using the dump command.
|
0 | Choose whether to check file systems using the fsck command when the ECS is starting and specify the sequence for checking file systems.
|
Procedure (Windows)
Ensure that an NFS client has been installed on the target server before mounting. This section uses Windows Server 2012 as an example to describe how to mount a file system.
Log in to the management console using a cloud account.
Log in to the management console and select a region and a project.
Under Computing, click Elastic Cloud Server to switch to the ECS console.
Log in to the ECS.
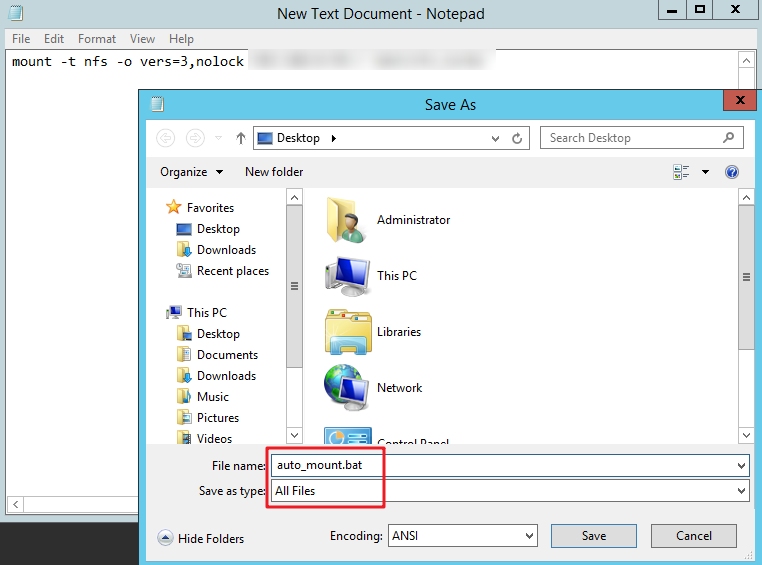
Before mounting the file system, create a script named auto_mount.bat, save the script to a local host, and record the save path. The script contains the following content:
mount -o nolock mount point corresponding drive letter

Figure 2 Saving the script
For example, the auto_mount.bat script of a file system contains the following content:
For SFS Capacity-Oriented file systems: mount -o nolock mount point X:
Note
You can copy the mount command of the file system from the console.
After the script is created, manually run the script in the Command Prompt to ensure that the script can be executed successfully. If you can view the file system in This PC after the script execution, the script can be executed properly.
This .bat script cannot be stored in the same path in 4 that stores the .vbs file. In this example, the .bat script is stored in C:\test\.
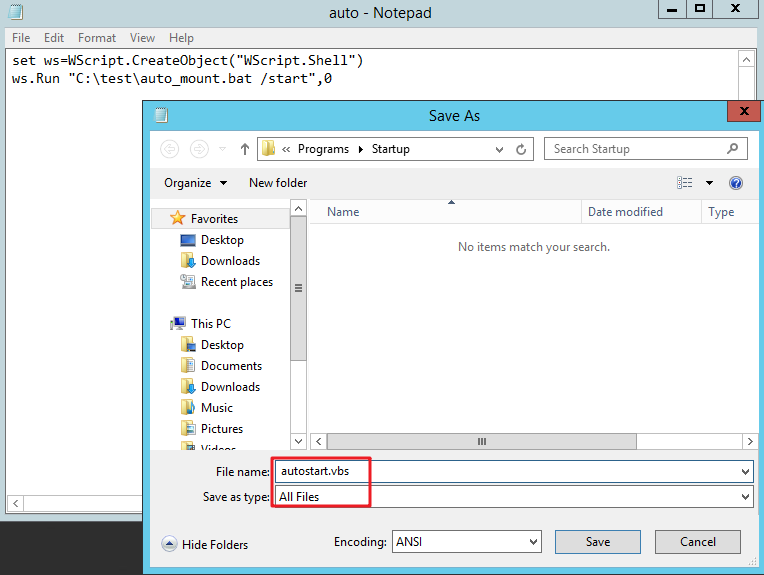
Create a .txt file whose name is XXX.vbs and save the file to the directory C:\Users\Administrator\AppData\Roaming\Microsoft\Windows\Start Menu\Programs\Startup. The file contains the following content:
set ws=WScript.CreateObject("WScript.Shell")
ws.Run "Local path and script name of the auto_mount.bat script /start", 0

Figure 3 Creating .vbs file
Note
In this example, the local path of the auto_mount.bat script is C:\test\. Therefore, the content in the .vbs file is as follows:
set ws=WScript.CreateObject("WScript.Shell")
ws.Run "C:\test\auto_mount.bat /start",0
After the task is created, you can restart the ECS and check whether the configuration is successful. After the configuration is successful, the file system automatically appears in This PC.