Creating a PLAS (VPN) Connector
Prerequisites
You have subscribed to the IPLS network of Deutsche Telekom.
You have subscribed to a Direct Connect service.
Process
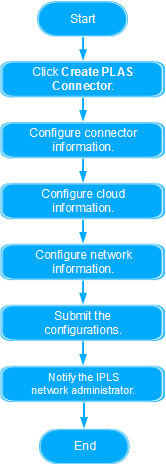
Figure 1 Creating a PLAS connector
Procedure
Log in to the management console.
Choose Service List > Network > Private Link Access Service from the main menu.
Choose Connector from the navigation pane.
Click Create PLAS Connector.
Set the PLAS connector parameters.
Table 1 PLAS connector parameters¶ Category
Parameter
Description
Example
Connector Information
Region
Indicates the PLAS connector region.
eu-de
Name
Indicates the PLAS connector name, which must meet the following requirements:
Be unique.
Contain 1 to 64 characters.
Consist of letters, digits, underscores (_), and hyphens (-).
Connector1
Description
Indicates the PLAS connector description.
Length: 0-255 characters
This is the first PLAS connector.
Bandwidth (Mbit/s)
Indicates the bandwidth available for the PLAS connector.
Setting method: Drag the slider or click
 or
or or to set Bandwidth.
The bandwidth of the PLAS Connector cannot be greater than that of the DC connection in the primary location.
Value range: 10-1000 Mbit/s. Options are as follows: 10, 50, 100, 150, 200, 300, 400, 500, 600, 1000.
1000 Mbit/s
Cloud Information
Provider
Indicates the cloud provider.
Only Open Telekom Cloud is currently supported.
Open Telekom Cloud
Primary Location (AZ)
Indicates the location and availability zone of the primary physical connection.
Only Biere (eu-de-01) is currently supported.
Biere (eu-de-01)
DC Connection Name
Indicates the connection name (under Direct Connect) available for the primary location.
Select the Direct Connect name of the Biere location from the drop-down list.
Only DC Connections with related DC Virtual Interface can be selected.
If a DC connection has not been created, click Create a connection first.
Direct Connect 1
Secondary Location (AZ)
Indicates the location and availability zone of the Secondary physical connection.
Only Magdeburg (eu-de-02) is currently supported.
Magdeburg (eu-de-02)
DC Connection Name
Indicates the connection name (under Direct Connect) available for the secondary location.
Select the Direct Connect name of the Magdeburg location from the drop-down list.
Only DC Connections with related DC Virtual Interface can be selected.
If a DC connection has not been created, click Create a connection first.
Direct Connect 2
Network Information
Type
Indicates the network type.
Only IntraSelect is currently supported.
IntraSelect
Access Location (AZ)
Indicates the IntraSelect access location.
Only Biere (eu-de-01) is currently supported.
Biere (eu-de-01)
Network PoP
Indicates the IntraSelect network PoP.
Only Berlin and Frankfurt are currently supported.
Berlin
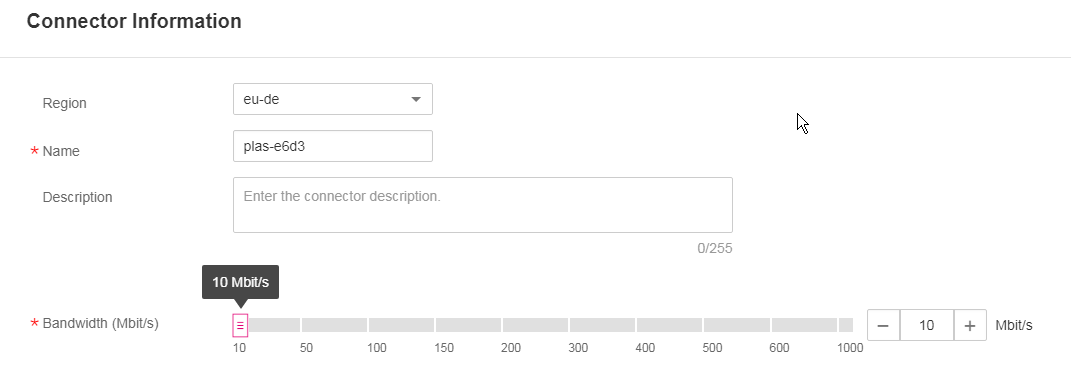
Figure 2 PLAS connector parameters (Connector Information)
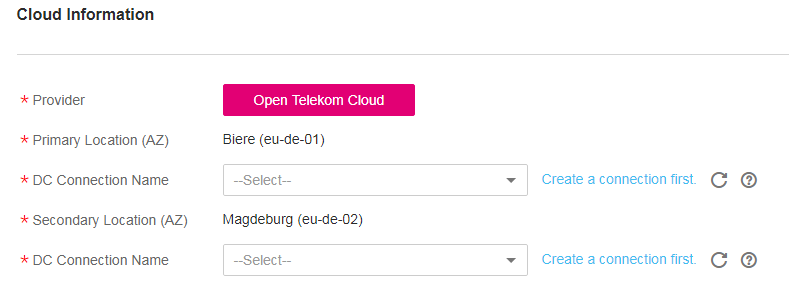
Figure 3 PLAS connector parameters (Cloud Information)
Note
After you configure the bandwidth (as shown in Figure 2), the system filters two DC connection names. That is, only when the bandwidth of a DC connection is greater than or equal to the configured bandwidth, you can select the corresponding DC Connection.
As Figure 3, only DC connections with a DC interface bound to the same virtual gateway are available for selection. Only the primary and secondary DC connections related to the same DC Virtual Gateway can be selected at the same time.
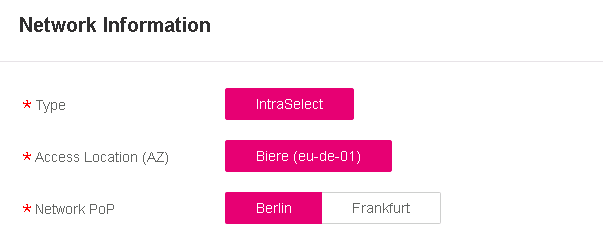
Figure 4 PLAS connector parameters (Network Information)
Click Create Now.
Click Submit.
The created PLAS connector is displayed in the PLAS connector list.
In the beginning, this connector is in the Processing state, indicating that the system is processing the connector.
After the creation is complete, the state changes to Available.
Note
Charging begins after the PLAS connector is successfully created.
Send the PLAS connector ID (as the PLAS service key) to the IP VPN administrator for further configuration.
Note
Users will be informed by mail from the IP VPN administrator, when PLAS is enabled.
After PLAS is enabled, check whether the hosts at both ends of the connection can communicate with each other. You are advised to test whether your local PC and ECSs in Open Telekom Cloud can be pinged.