Granting an IAM User the Permissions Required to Perform Specific Operations on a Specific Bucket
Scenario
This topic describes how to grant an IAM user the permissions required to perform specific operations on an OBS bucket. Below describes how to grant the bucket deletion permission.
If you need to configure other permissions, select the corresponding actions from the Action Name drop-down list in the bucket policy. For details about the actions supported by OBS, see Action/NotAction.
Recommended Configuration
You are advised to use bucket policies to grant resource-level permissions to an IAM user.
Configuration Precautions
After the configuration is complete, you can delete buckets using APIs. However, if you log in to OBS Console or OBS Browser+ to delete buckets, an error is reported indicating that you do not have required permissions.
This is because when you log in to OBS Console or OBS Browser+, more APIs (such as ListAllMyBuckets and ListBucketVersions) are called to load the list of buckets and versioned objects, but your permissions do not cover those APIs. In such case, your access is denied or your operation is not allowed.
If you want an IAM user to delete buckets on OBS Console or OBS Browser+, allow the ListBucketVersions permission in the bucket policy and configure a custom IAM policy to grant the ListAllMyBuckets permission by referring to Follow-up Procedure.
Procedure
In the navigation pane of OBS Console, choose Object Storage.
In the bucket list, click the bucket name you want to go to the Overview page.
In the navigation pane, choose Permissions.
On the Bucket Policies page, click Create Bucket Policy under Custom Bucket Policies.
Configure parameters for a bucket policy.
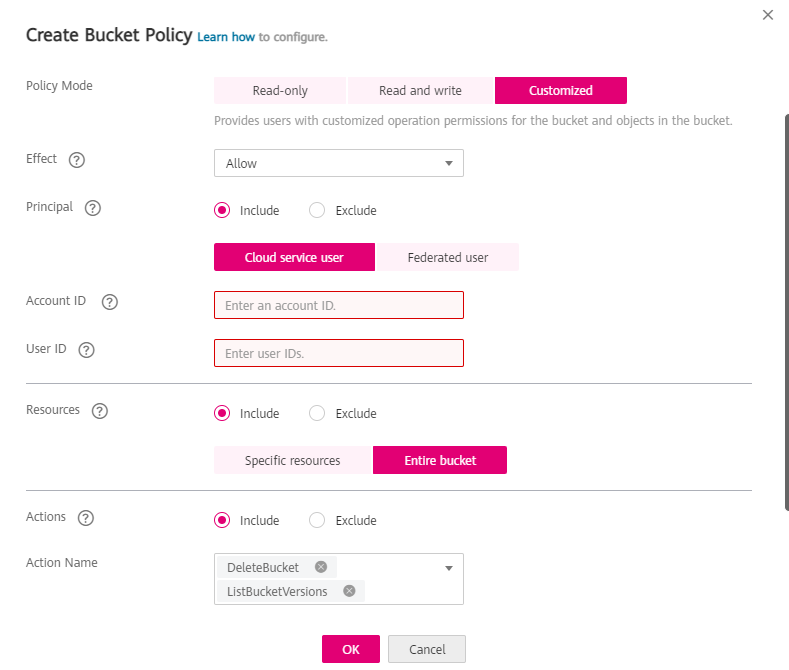
Figure 1 Configuring parameters for a bucket policy
Table 1 Parameters for creating a bucket policy¶ Parameter
Description
Policy Mode
Select Customized.
Effect
Select Allow.
Principal
Choose Include > Cloud service user.
Account ID: Enter one account ID only, or enter an asterisk (*) to indicate that the policy takes effect on all users (including both registered and anonymous users).
User ID: Enter one or more user IDs separated by a comma (,).
Resources
Select Include > Entire bucket.
Actions
Include
Action Name:
DeleteBucket
ListBucketVersions (required when the authorized user needs to access OBS on OBS Console or OBS Browser+)
To configure other permissions, select the corresponding actions. For details about the actions supported by OBS, see Action/NotAction.
Click OK. The bucket policy is created.
Follow-up Procedure
To successfully delete buckets on OBS Console or OBS Browser+, you need to allow the obs:bucket:ListAllMyBuckets (for listing buckets) permission in the IAM policy.
Log in to the management console using a cloud service account.
On the top menu bar, choose Service List > Management & Deployment > Identity and Access Management. The IAM console is displayed.
In the navigation pane, choose Permissions.
Click Create Custom Policy in the upper right corner.
Configure parameters for a custom policy.
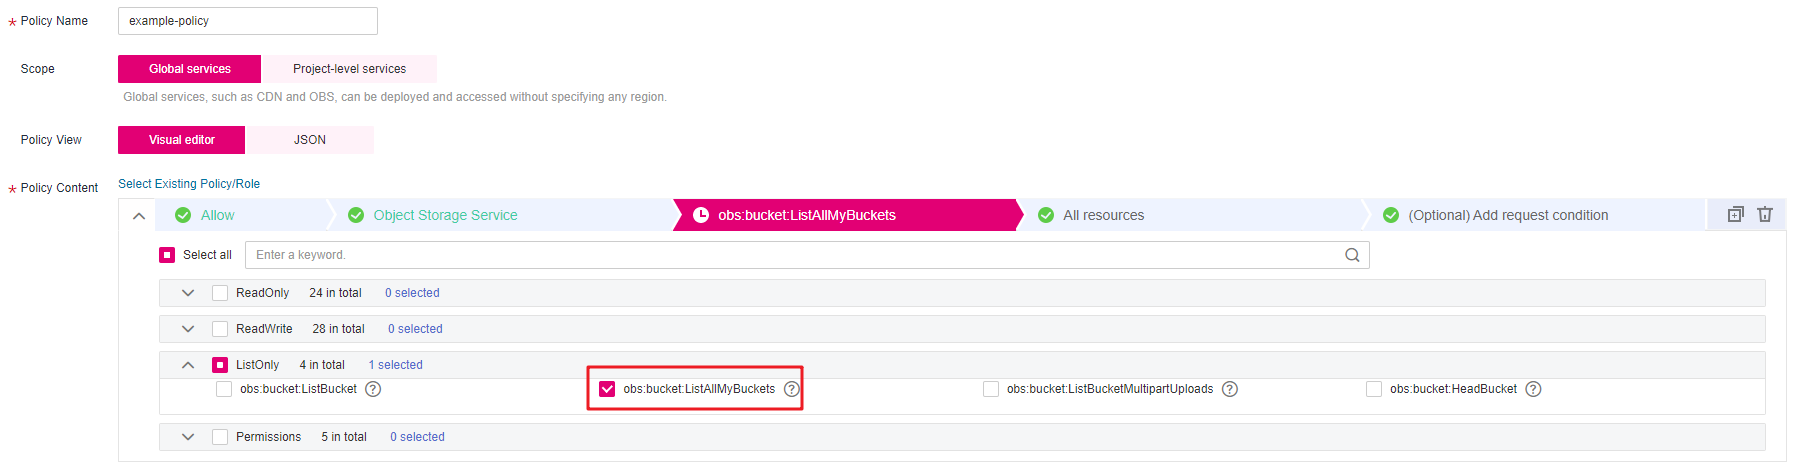
Figure 2 Configuring a custom policy
Table 2 Parameters for configuring a custom policy¶ Parameter
Description
Policy Name
Name of the custom policy
Policy View
Set this parameter based on your own habits. Visual editor is used here.
Policy Content
Select Allow.
Select Object Storage Service (OBS).
Select obs:bucket:ListAllMyBuckets from the actions.
Select All for resources.
Scope
The default value is Global services.
Click OK. The custom policy is created.
Create a user group and assign permissions.
Add the created custom policy to the user group by following the instructions in the IAM document.
Add the IAM user you want to authorize to the created user group by referring to Creating a User and Adding the User to a User Group.
Note
Due to data caching, it takes about 10 to 15 minutes for a custom policy to take effect after the authorization.