Importing a Meta Model from a Training Job
You can create a training job on ModelArts and perform training to obtain a satisfactory model. Then import the model to Model Management for unified management. In addition, you can quickly deploy the model as a service.
Background
If a model generated by the ModelArts training job is used, ensure that the training job has been successfully executed and the model has been stored in the corresponding OBS directory.
If a model is generated from a training job that uses a frequently-used framework or custom image, upload the inference code and configuration file to the storage directory of the model by referring to Model Package Specifications.
The OBS directory you use and ModelArts are in the same region.
Procedure
Log in to the ModelArts management console, and choose Model Management > Models in the left navigation pane. The Models page is displayed.
Click Import in the upper left corner. The Import page is displayed.
On the Import page, set related parameters.
Set basic information about the model. For details about the parameters, see Table 1.
Table 1 Parameters of basic model information¶ Parameter
Description
Name
Model name. The value can contain 1 to 64 visible characters, including characters. Only letters, digits, hyphens (-), and underscores (_) are allowed.
Version
Version of the model to be created. For the first import, the default value is 0.0.1.
Label
Model label. A maximum of five model labels are supported.
Description
Brief description of the model
Select the meta model source and set related parameters. If Meta Model Source is set to Training job, set other parameters by referring to Table 2.
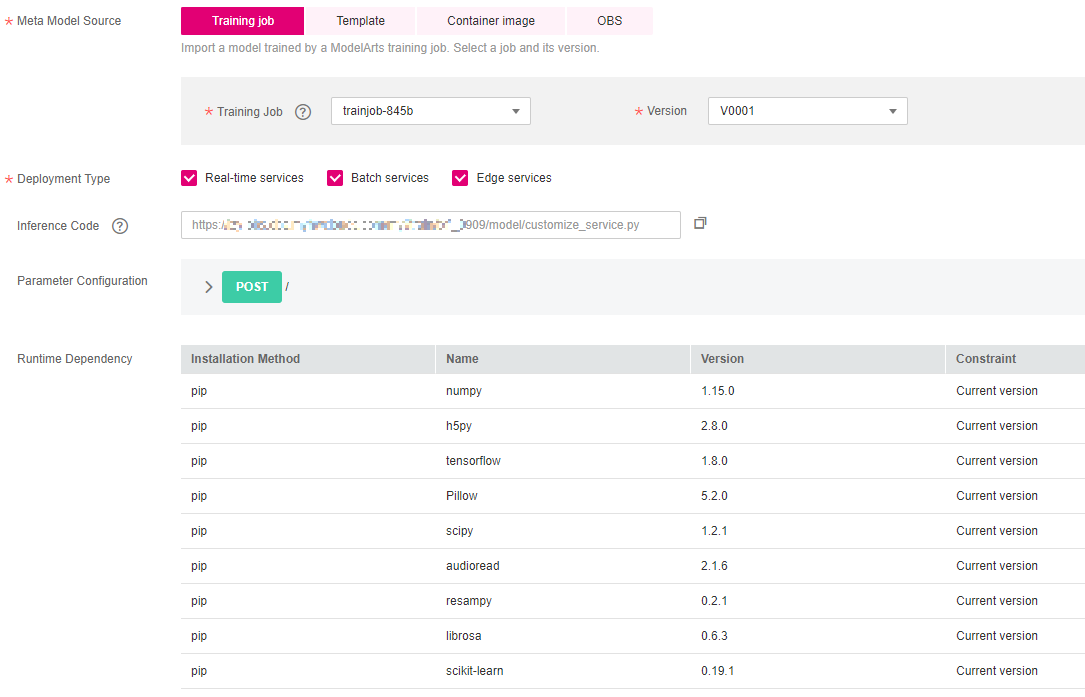
Figure 1 Setting Meta Model Source to Training job
Table 2 Parameters of the meta model source¶ Parameter
Description
Meta Model Source
Select Training job, and select a specified training job that has completed training under the current account and its version from the drop-down lists on the right of Training Job and Version respectively.
Deployment Type
After the model is imported, select the service type that the model is deployed. When deploying a service, you can only deploy the service type selected here. For example, if you only select Real-time services here, you can only deploy real-time services after importing the model.
Inference Code
Display the model inference code URL. You can copy this URL directly.
Parameter Configuration
Click
 on the right to view the input and output parameters of the model.
Runtime Dependency
List the dependencies of the selected model on the environment. For example, if tensorflow is used and the installation method is pip, the version must be 1.8.0 or later.
Set the inference specifications and model description.
Min. Inference Specs: If your model requires certain resources to complete inference, you can configure this parameter to set the minimum specifications required for normal inference after the model is deployed as a service. In later versions, the system will allocate resources based on the inference specifications in service deployment. You can also modify the specifications as required during deployment. Note that the specifications configured here are valid only when real-time services are deployed and the dedicated resource pool is used.
Model Description: To help other model developers better understand and use your models, provide model descriptions. Click Add Model Description and then set the document name and URL. A maximum of three model descriptions are supported.

Figure 2 Setting the inference specifications and model description
Check the information and click Create Now. The model is imported.
In the model list, you can view the imported model and its version. When the model status changes to Normal, the model is successfully imported. On this page, you can create new versions, quickly deploy models, publish models to the market, and perform other operations.
Follow-Up Procedure
Model Deployment: On the Models page, click the triangle next to a model name to view all versions of the model. Locate the row that contains the target version, click Deploy in the Operation column, and select the deployment type configured when importing the model from the drop-down list. On the Deploy page, set parameters by referring to Introduction to Model Deployment.