Creating a Dataset
Before using ModelArts to manage data, create a dataset. Then, you can perform operations on the dataset, such as labeling data, importing data, and publishing the dataset. This section describes how to create a dataset of the non-table type (image, audio, text, video, and free format) and table type.
Prerequisites
You have been authorized to access OBS. To do so, go to the ModelArts management console. In the navigation pane on the left, choose Settings, and add access authorization using an agency.
OBS buckets and folders for storing data are available. In addition, the OBS buckets and ModelArts are in the same region. OBS parallel file systems are not supported. Select object storage.
OBS buckets are not encrypted. ModelArts does not support encrypted OBS buckets. When creating an OBS bucket, do not enable bucket encryption.
Image, Audio, Text, Video, and Free Format
Log in to the ModelArts management console. In the navigation pane on the left, choose Data Management > Datasets.
Note
The number of datasets that can be created under an account in a region is limited. For details, see the number displayed on the Dataset page.
Click Create. On the Create Dataset page, create a dataset based on the data type and data labeling requirements. Enter the basic information about the dataset.
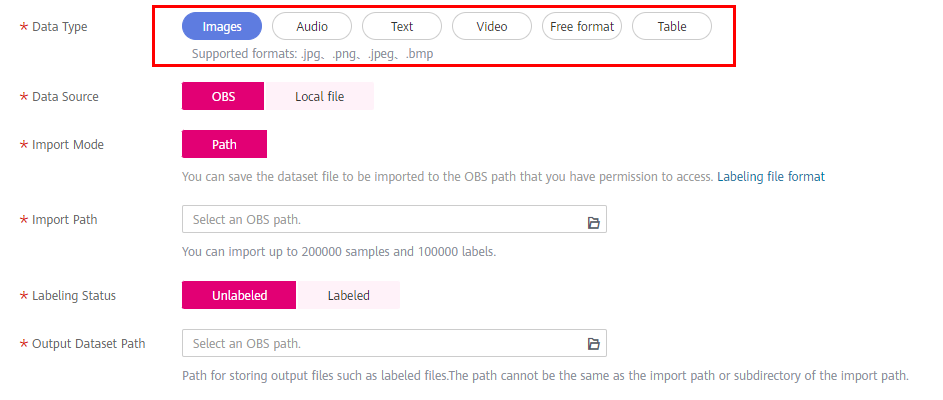
Figure 1 Parameters
Name: Enter a custom dataset name.
Description: Enter the details about the dataset.
Data Type: Select a data type based on your needs.
Data Source
Importing data from OBS
If data is available in OBS, select OBS for Data Source, and configure other mandatory parameters. The labeling formats of the input data vary depending on the dataset type. For details about the labeling formats supported by ModelArts, see Introduction to Data Importing.
Importing data from a local path
If data is not stored in OBS and the required data cannot be downloaded from AI Hub, ModelArts enables you to upload the data from a local path. Before uploading data, configure Storage Path and Labeling Status. Click Upload data to select the local file for uploading. Select a labeling format when the labeling status is Labeled. The labeling formats of the input data vary depending on the dataset type. For details about the labeling formats supported by ModelArts, see Introduction to Data Importing.
For more details about parameters, see Table 1.
Table 1 Dataset parameters¶ Parameter
Description
Import Path
OBS path from which your data is to be imported. This path is used as the data storage path of the dataset.
Note
OBS parallel file systems are not supported. Select an OBS bucket.
When you create a dataset, data in the OBS path will be imported to the dataset. If you modify data in OBS, the data in the dataset will be inconsistent with that in OBS. As a result, certain data may be unavailable. If you need to modify data in a dataset, see Import Mode or Importing Data from an OBS Path.
If the numbers of samples and labels of the dataset exceed quotas, importing the samples and labels will fail.
Labeling Status
Labeling status of the selected data, which can be Unlabeled or Labeled.
If you select Labeled, specify a labeling format and ensure the data file complies with format specifications. Otherwise, the import may fail.
Only image (object detection, image classification, and image segmentation), audio (sound classification), and text (text classification) labeling tasks support the import of labeled data.
Output Dataset Path
OBS path where your labeled data is stored.
Note
The dataset output path cannot be the same as the data input path or subdirectory of the data input path.
It is a good practice to select an empty directory as the dataset output path.
OBS parallel file systems are not supported. Select an OBS bucket.
After setting the parameters, click Submit.
Tables
Log in to the ModelArts management console. In the navigation pane on the left, choose Data Management > Datasets.
Note
The number of datasets that can be created under an account in a region is limited. For details, see the number displayed on the Dataset page.
Click Create. On the Create Dataset page, create a dataset based on the data type and data labeling requirements. Enter the basic information about the dataset.
Name: Enter a custom dataset name.
Description: Enter the details about the dataset
Data Type: Select a data type based on your needs.
For more details about parameters, see Table 2.
Table 2 Dataset parameters¶ Parameter
Description
Import Operation
Storage Path: Select an OBS path.
Schema
Names and types of table columns, which must be the same as those of the imported data. Set the column name based on the imported data and select the column type. For details about the supported types, see Table 3.
Click Add Schema to add a new record. When creating a dataset, you must specify a schema. Once created, the schema cannot be modified.
When data is imported from OBS, the schema of the CSV file in the file path is automatically obtained. If the schemas of multiple CSV files are inconsistent, an error will be reported.
Output Dataset Path
OBS path for storing table data. The data imported from the data source is stored in this path. The path cannot be the same as the file path in the OBS data source or subdirectories of the file path.
After a table dataset is created, the following four directories are automatically generated in the storage path:
annotation: version publishing directory. Each time a version is published, a subdirectory with the same name as the version is generated in this directory.
data: data storage directory. Imported data is stored in this directory.
logs: directory for storing logs.
temp: temporary working directory.
Table 3 Schema data types¶ Type
Description
Storage Space
Range
String
String type
--Short
Signed integer
2 bytes
-32768-32767
Int
Signed integer
4 bytes
-2147483648 to 2147483647
Long
Signed integer
8 bytes
-9223372036854775808 to 9223372036854775807
Double
Double-precision floating point
8 bytes
-Float
Single-precision floating point
4 bytes
-Byte
Signed integer
1 byte
-128-127
Date
Date type in the format of "yyyy-MM-dd", for example, 2014-05-29
--Timestamp
Timestamp that represents date and time in the format of "yyyy-MM-dd HH:mm:ss"
--Boolean
Boolean type
1 byte
TRUE/FALSE
Note
When using a CSV file, pay attention to the following:
When the data type is set to String, the data in the double quotation marks is regarded as one record by default. Ensure the double quotation marks in the same row are closed. Otherwise, the data will be too large to display.
If the number of columns in a row of the CSV file is different from that defined in the schema, the row will be ignored.
After setting the parameters, click Submit.