HFile and WAL Encryption
HFile and WAL Encryption
Important
Setting the HFile and WAL encryption mode to SMS4 or AES has a great impact on the system and will cause data loss in case of any misoperation. Therefore, this operation is not recommended.
Batch data import using Bulkload does not support data encryption.
HFile and Write ahead log (WAL) in HBase are not encrypted by default. To encrypt them, perform the following operations.
On any HBase node, run the following commands to create a key file as user omm:
sh ${BIGDATA_HOME}/FusionInsight_HD_8.1.0.1/install/FusionInsight-HBase-2.2.3/hbase/bin/hbase-encrypt.sh <path>/hbase.jks <type> <length> <alias>
/<path>/hbase.jks indicates the path for storing the generated JKS file.
<type> indicates the encryption type, which can be SMS4 or AES.
<length> indicates the key length. SMS4 supports 16-bit and AES supports 128-bit.
<alias> indicate the alias of the key file. When you create the key file for the first time, retain the default value omm.
For example, to generate an SMS4 encryption key, run the following command:
sh ${BIGDATA_HOME}/FusionInsight_HD_8.1.0.1/install/FusionInsight-HBase-2.2.3/hbase/bin/hbase-encrypt.sh /home/hbase/conf/hbase.jks SMS4 16 omm
To generate an AES encryption key, run the following command:
sh ${BIGDATA_HOME}/FusionInsight_HD_8.1.0.1/install/FusionInsight-HBase-2.2.3/hbase/bin/hbase-encrypt.sh /home/hbase/conf/hbase.jks AES 128 omm
Note
To ensure operations can be successfully performed, the <path>/hbase.jks directory needs to be created in advance, and the cluster operation user must have the rw permission of this directory.
After running the command, enter the same <password> four times. The password encrypted in 3 is the same as the password in this step.
Distribute the generated key files to the same directory on all nodes in the cluster and assign read and write permission to user omm.
Note
Administrators need to select a safe procedure to distribute keys based on the enterprise security requirements.
If the key files of some nodes are lost, repeat the step to copy the key files from other nodes.
On FusionInsight Manager, set hbase.crypto.keyprovider.parameters.encryptedtext to the encrypted password. Set hbase.crypto.keyprovider.parameters.uri to the path and name of the key file.
The format of hbase.crypto.keyprovider.parameters.uri is jceks://<key_Path_Name>.
<key_Path_Name> indicates the path of the key file. For example, if the path of the key file is /home/hbase/conf/hbase.jks, set this parameter to jceks:///home/hbase/conf/hbase.jks.
The format of hbase.crypto.keyprovider.parameters.encryptedtext is <encrypted_password>.
<encrypted_password> indicates the encrypted password generated during the key file creation. The parameter value is displayed in ciphertext. Run the following command as user omm to obtain the related encrypted password on the nodes where HBase service is installed:
sh ${BIGDATA_HOME}/FusionInsight_HD_8.1.0.1/install/FusionInsight-HBase-2.2.3/hbase/bin/hbase-encrypt.sh
Note
After running the command, you need to enter <password>. The password is the same as that entered in 1.
On FusionInsight Manager, set hbase.crypto.key.algorithm to SMS4 or AES to use SMS4 or AES for HFile encryption.
On FusionInsight Manager, set hbase.crypto.wal.algorithm to SMS4 or AES to use SMS4 or AES for WAL encryption.
On FusionInsight Manager, set hbase.regionserver.wal.encryption to true.
Save the settings and restart the HBase service for the settings to take effect.
Create an HBase table through CLI or code and configure the encryption mode to enable encryption. <type> indicates the encryption type, and d indicates the column family.
When you create an HBase table through CLI, set the encryption mode to SMS4 or AES for the column family.
create '<table name>', {NAME => 'd', ENCRYPTION => '<type>'}
When you create an HBase table using code, set the encryption mode to SMS4 or AES by adding the following information to the code:
public void testCreateTable()
{
    String tableName = "user";
    Configuration conf = getConfiguration();
    HTableDescriptor htd = new HTableDescriptor(TableName.valueOf(tableName));

    HColumnDescriptor hcd = new HColumnDescriptor("d");
    //Set the encryption mode to SMS4 or AES.
    hcd.setEncryptionType("<type>");
    htd.addFamily(hcd);

    HBaseAdmin admin = null;
    try
    {
        admin = new HBaseAdmin(conf);

        if(!admin.tableExists(tableName))
        {
            admin.createTable(htd);
        }
    }
    catch (IOException e)
    {
        e.printStackTrace();
    }
    finally
    {
        if(admin != null)
        {
            try
            {
                admin.close();
            }
            catch (IOException e)
            {
                e.printStackTrace();
            }
        }
    }
}
If you have configured SMS4 or AES encryption by performing 1 to 7, but do not set the related encryption parameter when creating the table in 8, the inserted data is not encrypted.
In this case, you can perform the following steps to encrypt the inserted data:
Run the flush command for the table to import the data in the memory to the HFile.
flush'<table_name>'
Run the following commands to modify the table properties:
disable'<table_name>'
alter'<table_name>',NAME=>'<column_name>',ENCRYPTION => '<type>'
enable'<table_name>'
Insert a new data record and flush the table.
Note
A new data record must be inserted so that the HFile will generate a new HFile and the unencrypted data inserted previously will be rewritten and encrypted.
put'<table_name>','id2','f1:c1','value222222222222222222222222222222222'
flush'<table_name>'
Perform the following step to rewrite the HFile:
major_compact'<table_name>'
Important
During this step, the HBase table is disabled and cannot provide services. Exercise caution when you perform this step.
Modifying a Key File
Important
Modifying a key file has a great impact on the system and will cause data loss in case of any misoperation. Therefore, this operation is not recommended.
During the HFile and WAL Encryption operation, the related key file must be generated and its password must be set to ensure system security. After a period of running, you can replace the key file with a new one to encrypt HFile and WAL.
Run the following command to generate a new key file as user omm:
sh ${BIGDATA_HOME}/FusionInsight_HD_8.1.0.1/install/FusionInsight-HBase-2.2.3/hbase/bin/hbase-encrypt.sh <path>/hbase.jks <type> <length> <alias-new>
<path>/hbase.jks: indicates the path for storing the generated hbase.jks file. The path and file name must be consistent with those of the key file generated in HFile and WAL Encryption.
<alias-new>: indicates the alias of the key file. The alias must be different with that of the old key file.
<type>: indicates the encryption type, which can be SMS4 or AES.
<length> indicates the key length. SMS4 supports 16-bit and AES supports 128-bit.
For example, to generate an SMS4 encryption key, run the following command:
sh ${BIGDATA_HOME}/FusionInsight_HD_8.1.0.1/install/FusionInsight-HBase-2.2.3/hbase/bin/hbase-encrypt.sh /home/hbase/conf/hbase.jks SMS4 16 omm_new
To generate an AES encryption key, run the following command:
sh ${BIGDATA_HOME}/FusionInsight_HD_8.1.0.1/install/FusionInsight-HBase-2.2.3/hbase/bin/hbase-encrypt.sh /home/hbase/conf/hbase.jks AES 128 omm_new
Note
To ensure operations can be successfully performed, the <path>/hbase.jks directory needs to be created in advance, and the cluster operation user must have the rw permission of this directory.
After running the command, you need to enter the same <password> for three times. This password is the password of the key file. You can use the password of the old file without any security risk.
Distribute the generated key files to the same directory on all nodes in the cluster and assign read and write permission to user omm.
Note
Administrators need to select a safe procedure to distribute keys based on the enterprise security requirements.
On the HBase service configuration page of FusionInsight Manager, add custom configuration items, set hbase.crypto.master.key.name to omm_new, set hbase.crypto.master.alternate.key.name to omm, and save the settings.
Restart the HBase service for the configuration to take effect.
In HBase shell, run the major compact command to generate the HFile file based on the new encryption algorithm.
major_compact '<table_name>'
You can view the major compact progress from the HMaster web page.
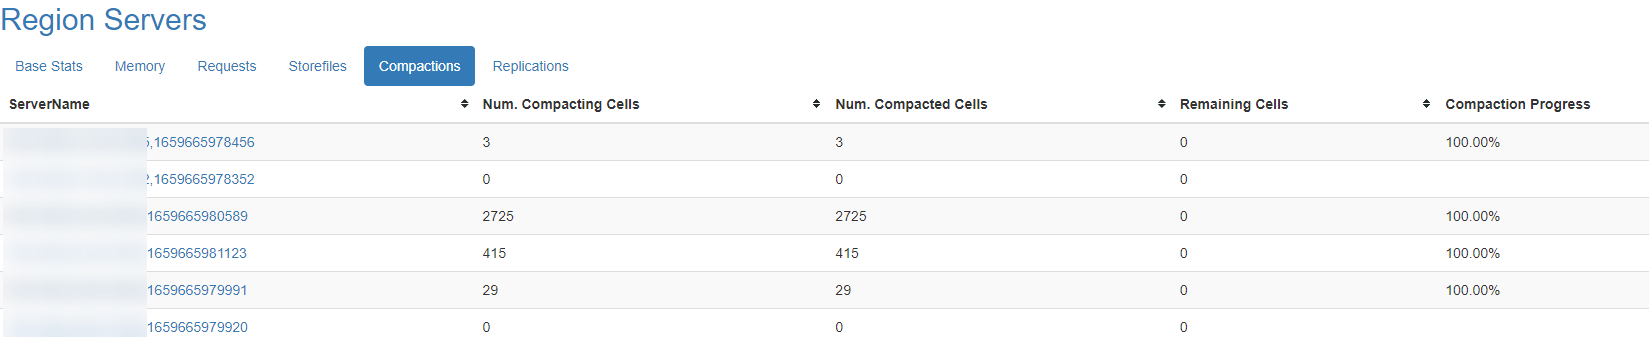
When all items in Compaction Progress reach 100% and those in Remaining KVs are 0, run the following command as user omm to destroy the old key file:
sh ${BIGDATA_HOME}/FusionInsight_HD_8.1.0.1/install/FusionInsight-HBase-2.2.3/hbase/bin/hbase-encrypt.sh <path>/hbase.jks <alias-old>
<path>/hbase.jks: indicates the path for storing the generated hbase.jks file. The path and file name must be consistent with those of the key file generated in HFile and WAL Encryption.
<alias-old>: indicates the alias of the old key file to be deleted.
For example:
sh ${BIGDATA_HOME}/FusionInsight_HD_8.1.0.1/install/FusionInsight-HBase-2.2.3/hbase/bin/hbase-encrypt.sh /home/hbase/conf/hbase.jks omm
Note
To ensure operations can be successfully performed, the <path>/hbase.jks directory needs to be created in advance, and the cluster operation user must have the rw permission of this directory.
Repeat 2 and distribute the updated key files again.
Delete the HBase self-defined configuration item hbase.crypto.master.alternate.key.name added in 3 from FusionInsight Manager.
Repeat 4 for the configuration take effect.