ALM-12033 Slow Disk Fault
Description
For HDDs, the alarm is triggered when any of the following conditions is met:
The system runs the iostat command every 3 seconds, and detects that the svctm value exceeds 1000 ms for 7 consecutive periods within 30 seconds.
The system runs the iostat command every 3 seconds, and detects that more than 50% of I/Os take more than 150 ms within 300s.
For SSDs, the alarm is triggered when any of the following conditions is met:
The system runs the iostat command every 3 seconds, and detects that the svctm value exceeds 1000 ms for 10 consecutive periods within 30 seconds.
The system runs the iostat command every 3 seconds, and detects that more than 60% of I/Os take more than 20 ms within 300 seconds.
This alarm is automatically cleared when the preceding conditions have not been met for 15 minutes.
Note
The svctm value can be obtained as follows:
MRS 3.1.0:
Run the iostat -x -t command in the OS.

Versions later than MRS 3.1.0:
svctm = (tot_ticks_new - tot_ticks_old)/(rd_ios_new + wr_ios_new - rd_ios_old - wr_ios_old)
If rd_ios_new + wr_ios_new - rd_ios_old - wr_ios_old is 0, then svctm is 0.
The parameters can be obtained as follows:
The system runs the cat /proc/diskstats command every 3 seconds to collect data. For example:
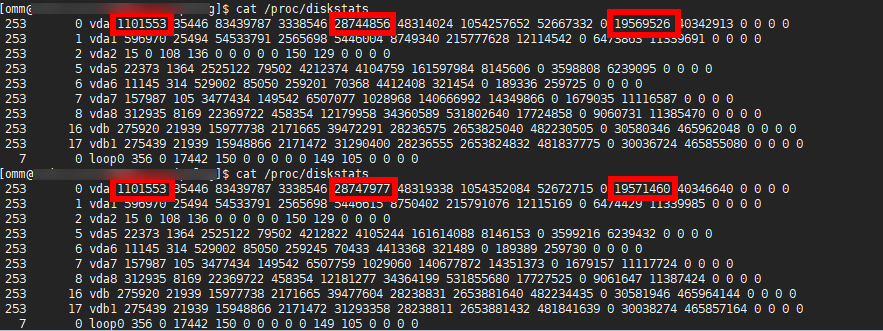
In these two commands:
In the data collected for the first time, the number in the fourth column is the rd_ios_old value, the number in the eighth column is the wr_ios_old value, and the number in the thirteenth column is the tot_ticks_old value.
In the data collected for the second time, the number in the fourth column is the rd_ios_new value, the number in the eighth column is the wr_ios_new value, and the number in the thirteenth column is the tot_ticks_new value.
In this case, the value of svctm is as follows:
(19571460 - 19569526)/(1101553 + 28747977 - 1101553 - 28744856) = 0.6197
Attribute
Alarm ID | Alarm Severity | Auto Clear |
|---|---|---|
12033 | Minor | Yes |
Parameters
Name | Meaning |
|---|---|
Source | Specifies the cluster or system for which the alarm is generated. |
ServiceName | Specifies the service for which the alarm is generated. |
RoleName | Specifies the role for which the alarm is generated. |
HostName | Specifies the host for which the alarm is generated. |
DiskName | Specifies the disk for which the alarm is generated. |
Impact on the System
Service performance deteriorates, service processing capabilities become poor, and services may be unavailable.
Possible Causes
The disk is aged or has bad sectors.
Procedure
Check the disk status.
On FusionInsight Manager, choose O&M. In the navigation pane on the left, choose Alarm > Alarms.
View the detailed information about the alarm. Check the values of HostName and DiskName in the location information to obtain the information about the faulty disk for which the alarm is generated.
Check whether the node for which the alarm is generated is in a virtualization environment.
Check whether the storage performance provided by the virtualization environment meets the hardware requirements. Then, go to 5.
Log in to the alarm node as user root, run the df -h command, and check whether the command output contains the value of the DiskName field.
Run the lsblk command to check whether the mapping between the value of DiskName and the disk has been created.
Log in to the alarm node as user root, run the lsscsi | grep "/dev/sd[x]" command to view the disk information, and check whether RAID has been set up.
Note
In the command, /dev/sd[x] indicates the disk name obtained in 2.
Example:
lsscsi | grep "/dev/sda"
In the command output, if ATA, SATA, or SAS is displayed in the third line, the disk has not been organized into a RAID group. If other information is displayed, RAID has been set up.
Run the smartctl -i /dev/sd[x] command to check whether the hardware supports the SMART tool.
Example:
smartctl -i /dev/sda
In the command output, if "SMART support is: Enabled" is displayed, the hardware supports SMART. If "Device does not support SMART" or other information is displayed, the hardware does not support SMART.
Run the smartctl -H --all /dev/sd[x] command to check basic SMART information and determine whether the disk is working properly.
Example:
smartctl -H --all /dev/sda
Check the value of SMART overall-health self-assessment test result in the command output. If the value is FAILED, the disk is faulty and needs to be replaced. If the value is PASSED, check the value of Reallocated_Sector_Ct or Elements in grown defect list. If the value is greater than 100, the disk is faulty and needs to be replaced.
Run the smartctl -l error -H /dev/sd[x] command to check the Glist of the disk and determine whether the disk is normal.
Example:
smartctl -l error -H /dev/sda
Check the Command/Feature_name column in the command output. If READ SECTOR(S) or WRITE SECTOR(S) is displayed, the disk has bad sectors. If other errors occur, the disk circuit board is faulty. Both errors indicate that the disk is abnormal and needs to be replaced.
If "No Errors Logged" is displayed, no error log exists. You can trigger the disk SMART self-check.
Run the smartctl -t long /dev/sd[x] command to trigger the disk SMART self-check. After the command is executed, the time when the self-check is to be completed is displayed. After the self-check is completed, repeat 9 and 10 to check whether the disk is working properly.
Example:
smartctl -t long /dev/sda
Run the smartctl -d [sat|scsi]+megaraid,[DID] -H --all /dev/sd[x] command to check whether the hardware supports SMART.
Note
In the command, [sat|scsi] indicates the disk type. Both types need to be used.
[DID] indicates the slot information. Slots 0 to 15 need to be used.
For example, run the following commands in sequence:
smartctl -d sat+megaraid,0 -H --all /dev/sda
smartctl -d sat+megaraid,1 -H --all /dev/sda
smartctl -d sat+megaraid,2 -H --all /dev/sda
...
Try the command combinations of different disk types and slot information. If "SMART support is: Enabled" is displayed in the command output, the disk supports SMART. Record the parameters of the disk type and slot information when a command is successfully executed. If "SMART support is: Enabled" is not displayed in the command output, the disk does not support SMART.
Run the smartctl -d [sat|scsi]+megaraid,[DID] -H --all /dev/sd[x] command recorded in 12 to check basic SMART information and determine whether the disk is normal.
Example:
smartctl -d sat+megaraid,2 -H --all /dev/sda
Check the value of SMART overall-health self-assessment test result in the command output. If the value is FAILED, the disk is faulty and needs to be replaced. If the value is PASSED, check the value of Reallocated_Sector_Ct or Elements in grown defect list. If the value is greater than 100, the disk is faulty and needs to be replaced.
Run the smartctl -d [sat|scsi]+megaraid,[DID] -l error -H /dev/sd[x] command to check the Glist of the disk and determine whether the hard disk is working properly.
Example:
smartctl -d sat+megaraid,2 -l error -H /dev/sda
Check the Command/Feature_name column in the command output. If READ SECTOR(S) or WRITE SECTOR(S) is displayed, the disk has bad sectors. If other errors occur, the disk circuit board is faulty. Both errors indicate that the disk is abnormal and needs to be replaced.
If "No Errors Logged" is displayed, no error log exists. You can trigger the disk SMART self-check.
Run the smartctl -d [sat|scsi]+megaraid,[DID] -t long /dev/sd[x] command to trigger the disk SMART self-check. After the command is executed, the time when the self-check is to be completed is displayed. After the self-check is completed, repeat 13 and 14 to check whether the disk is working properly.
Example:
smartctl -d sat+megaraid,2 -t long /dev/sda
If the configured RAID controller card does not support SMART, the disk does not support SMART. In this case, use the check tool provided by the corresponding RAID controller card vendor to rectify the fault. Then go to 17.
For example, LSI is a MegaCLI tool.
On FusionInsight Manager, choose O&M > Alarm > Alarms, click Clear in the Operation column of the alarm, and check whether the alarm is reported on the same disk again.
If the alarm is reported for three times, replace the disk.
If yes, go to 18.
If no, no further action is required.
Replace the disk.
On FusionInsight Manager, choose O&M. In the navigation pane on the left, choose Alarm > Alarms.
View the detailed information about the alarm. Check the values of HostName and DiskName in the location information to obtain the information about the faulty disk for which the alarm is reported.
Replace the disk.
Check whether the alarm is cleared.
If yes, no further action is required.
If no, go to 22.
Collect the fault information.
On FusionInsight Manager, choose O&M. In the navigation pane on the left, choose Log > Download.
Select OMS for Service and click OK.
Click
 in the upper right corner, and set Start Date and End Date for log collection to 10 minutes ahead of and after the alarm generation time, respectively. Then, click Download.
Contact O&M personnel and provide the collected logs.
Alarm Clearing
This alarm is automatically cleared after the fault is rectified.