Interconnecting Spark2x with OBS
The OBS file system can be interconnected with Spark2x after an MRS cluster is installed.
Before performing the following operations, ensure that you have configured a storage-compute decoupled cluster by referring to Configuring a Storage-Compute Decoupled Cluster (Agency) or Configuring a Storage-Compute Decoupled Cluster (AK/SK).
Using Spark Beeline After Cluster Installation
Log in to MRS Manager and choose Cluster > Services > Spark2x > Configurations > All Configurations.
In the left navigation tree, choose JDBCServer2x > Customization. Add dfs.namenode.acls.enabled to the spark.hdfs-site.customized.configs parameter and set its value to false.
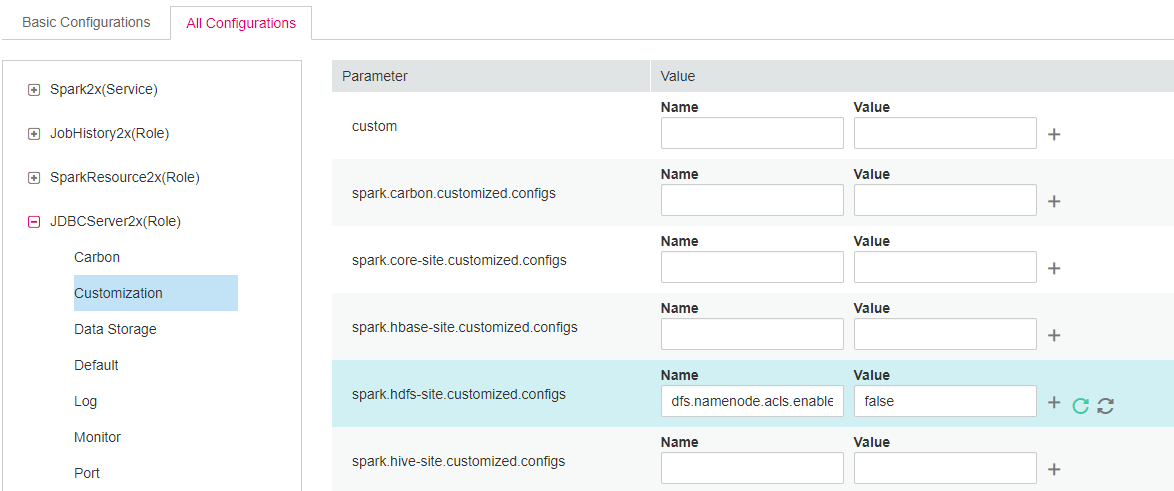
Search for the spark.sql.statistics.fallBackToHdfs parameter and set its value to false.

Save the configurations and restart the JDBCServer2x instance.
Log in to the client installation node as the client installation user.
Run the following command to configure environment variables:
source ${client_home}/bigdata_env
For a security cluster, run the following command to perform user authentication. If Kerberos authentication is not enabled for the current cluster, you do not need to run this command.
kinit Username
Access OBS in spark-beeline. For example, create a table named test in the obs://mrs-word001/table/ directory.
create table test(id int) location 'obs://mrs-word001/table/';
Run the following command to query all tables. If table test is displayed in the command output, OBS access is successful.
show tables;
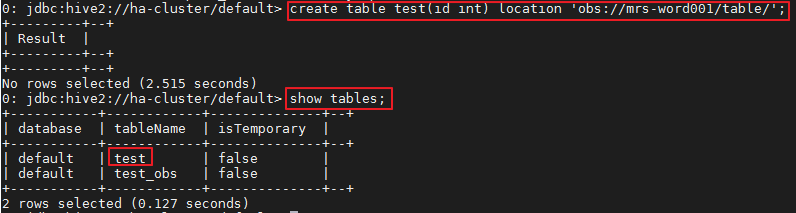
Figure 1 Verifying the created table name returned using Spark2x
Press Ctrl+C to exit the Spark Beeline.
Using Spark SQL After Cluster Installation
Log in to the client installation node as the client installation user.
Run the following command to configure environment variables:
source ${client_home}/bigdata_env
Modify the configuration file:
vim ${client_home}/Spark2x/spark/conf/hdfs-site.xml
<property>
<name>dfs.namenode.acls.enabled</name>
<value>false</value>
</property>
For a security cluster, run the following command to perform user authentication. If Kerberos authentication is not enabled for the current cluster, you do not need to run this command.
kinit Username
Access OBS in spark-sql. For example, create a table named test in the obs://mrs-word001/table/ directory.
Run the cd ${client_home}/Spark2x/spark/bin command to access the spark bin directory and run ./spark-sql to log in to spark-sql CLI.
Run the following command in the spark-sql CLI:
create table test(id int) location 'obs://mrs-word001/table/';
Run the show tables; command to confirm that the table is created successfully.
Run exit; to exit the spark-sql CLI.
Note
If a large number of logs are printed in the OBS file system, the read and write performance may be affected. You can adjust the log level of the OBS client as follows:
cd ${client_home}/Spark2x/spark/conf
vi log4j.properties
Add the OBS log level configuration to the file as follows:
log4j.logger.org.apache.hadoop.fs.obs=WARN
log4j.logger.com.obs=WARN
