Getting Started
This section describes how to use Spark2x to submit Spark applications, including Spark Core and Spark SQL. Spark Core is the kernel module of Spark. It executes tasks and is used to compile Spark applications. Spark SQL is a module that executes SQL statements.
Scenario Description
Develop a Spark application to perform the following operations on logs about netizens' dwell time for online shopping on a weekend.
Collect statistics on female netizens who dwell on online shopping for more than 2 hours on the weekend.
The first column in the log file records names, the second column records genders, and the third column records the dwell durations in the unit of minute. Three columns are separated by comma (,).
log1.txt: logs collected on Saturday
LiuYang,female,20
YuanJing,male,10
GuoYijun,male,5
CaiXuyu,female,50
Liyuan,male,20
FangBo,female,50
LiuYang,female,20
YuanJing,male,10
GuoYijun,male,50
CaiXuyu,female,50
FangBo,female,60
log2.txt: logs collected on Sunday
LiuYang,female,20
YuanJing,male,10
CaiXuyu,female,50
FangBo,female,50
GuoYijun,male,5
CaiXuyu,female,50
Liyuan,male,20
CaiXuyu,female,50
FangBo,female,50
LiuYang,female,20
YuanJing,male,10
FangBo,female,50
GuoYijun,male,50
CaiXuyu,female,50
FangBo,female,60
Prerequisites
On Manager, you have created a user and granted the HDFS, Yarn, Kafka, and Hive permissions to the user.
You have installed and configured tools such as IntelliJ IDEA and JDK based on the development language.
You have installed the Spark2x client and configured the client network connection.
For Spark SQL programs, you have started Spark SQL or Beeline on the client to enter SQL statements.
Procedure
Obtain the sample project and import it to IDEA. Import the JAR package on which the sample project depends. Use IDEA to configure and generate JAR packages.
Prepare the data required by the sample project.
Save the original log files in the scenario description to the HDFS system.
Create two text files (input_data1.txt and input_data2.txt) on the local host and copy the content in the log1.txt and log2.txt files to the input_data1.txt and input_data2.txt files, respectively.
Create the /tmp/input directory in HDFS, and upload input_data1.txt and input_data2.txt to the /tmp/input directory:
Upload the generated JAR package to the Spark2x running environment (Spark2x client), for example, /opt/female.
Go the client directory, configure the environment variables, and log in to the system. When you use a client to connect to a specific instance in a scenario where multiple Spark2x instances are installed or Spark and Spark2x instances are installed, run the following commands to load the environment variables of the instance.
source bigdata_env
source Spark2x/component_env
kinit <service user for authentication>
Run the following script in the bin directory to submit the Spark application:
spark-submit --class com.xxxx.bigdata.spark.examples.FemaleInfoCollection --master yarn-client /opt/female/FemaleInfoCollection.jar <inputPath>
(Optional) After calling the spark-sql or spark-beeline script in the bin directory, directly enter SQL statements to perform operations such as query.
For example, create a table, insert a piece of data, and then query the table.
spark-sql> CREATE TABLE TEST(NAME STRING, AGE INT);
Time taken: 0.348 seconds
spark-sql>INSERT INTO TEST VALUES('Jack', 20);
Time taken: 1.13 seconds
spark-sql> SELECT * FROM TEST;
Jack      20
Time taken: 0.18 seconds, Fetched 1 row(s)
View the running result of the Spark application.
View the running result data in a specified file.
The storage path and format of the result data are specified by the Spark application.
Check the running status on the web page.
Log in to Manager. Select Spark2x from the Service drop-down list.
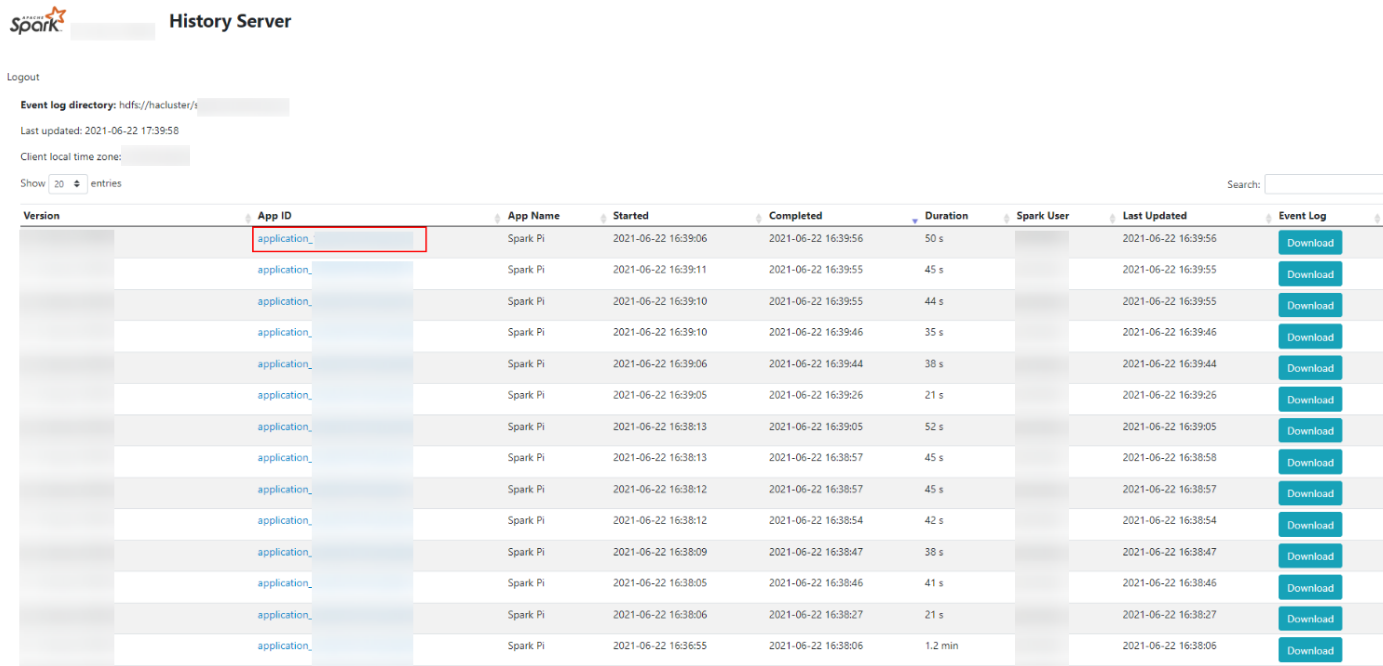
Go to the Spark2x overview page and click an instance in the Spark web UI, for example, JobHistory2x(host2).
The History Server UI is displayed.
The History Server UI is used to display the status of Spark applications that are complete or incomplete.

Figure 1 History Server UI
Select an application ID and click this page to go to the Spark UI of the application.
Spark UI: used to display the status of running applications.

Figure 2 Spark UI
View Spark logs to learn application runtime conditions.
View Spark2x Logs to learn application running status, and adjust applications based on log information.