Adding a Ranger Access Permission Policy for HDFS
Scenario
The Ranger administrator can use Ranger to configure the read, write, and execution permissions on HDFS directories or files for HDFS users.
Prerequisites
The Ranger service has been installed and is running properly.
You have created users, user groups, or roles for which you want to configure permissions.
Procedure
Log in to the Ranger management page.
On the homepage, click the component plug-in name in the HDFS area, for example, hacluster.
Click Add New Policy to add an HDFS permission control policy.
Configure the parameters listed in the table below based on the service demands.
Table 1 HDFS permission parameters¶ Parameter
Description
Policy Name
Policy name, which can be customized and must be unique in the service.
Policy Conditions
IP address filtering policy, which can be customized. You can enter one or more IP addresses or IP address segments. The IP address can contain the wildcard character (
*), for example, 192.168.1.10,192.168.1.20, or 192.168.1.*.Policy Label
A label specified for the current policy. You can search for reports and filter policies based on labels.
Resource Path
Resource path, which is the HDFS path folder or file to which the current policy applies. You can enter multiple values and use the wildcard (
*), for example, /test/*.To enable a subdirectory to inherit the permission of its upper-level directory, enable the recursion function.
If recursion is enabled for the parent directory and a policy is configured for the subdirectory, the policy configured for the subdirectory is used.
non-recursive: recursion disabled
recursive: recursion enabled
Description
Policy description.
Audit Logging
Whether to audit the policy.
Allow Conditions
Permission and exception conditions allowed by a policy. The priority of an exception condition is higher than that of a normal condition.
In the Select Role, Select Group, and Select User columns, select the role, user group, or user to which the permission is to be granted, click Add Conditions, add the IP address range to which the policy applies, and click Add Permissions to add the corresponding permission.
Read: permission to read data
Write: permission to write data
Execute: execution permission
Select/Deselect All: Select or deselect all.
If users or user groups in the current condition need to manage this policy, select Delegate Admin. These users or user groups will become the agent administrators. The agent administrators can update and delete this policy and create sub-policies based on the original policy.
To add multiple permission control rules, click
 . To delete a permission control rule, click
  .
.Exclude from Allow Conditions: exception rules excluded from the allowed conditions
Deny All Other Accesses
Whether to reject all other access requests.
True: All other access requests are rejected.
False: Deny Conditions can be configured.
Deny Conditions
Policy rejection condition, which is used to configure the permissions and exceptions to be denied in the policy. The configuration method is the same as that of Allow Conditions. The priority of the rejection condition is higher than that of the allowed conditions configured in Allow Conditions.
Exclude from Deny Conditions: exception rules excluded from the denied conditions
For example, to add the write permission for the /user/test directory of user testuser, the configuration is as follows:
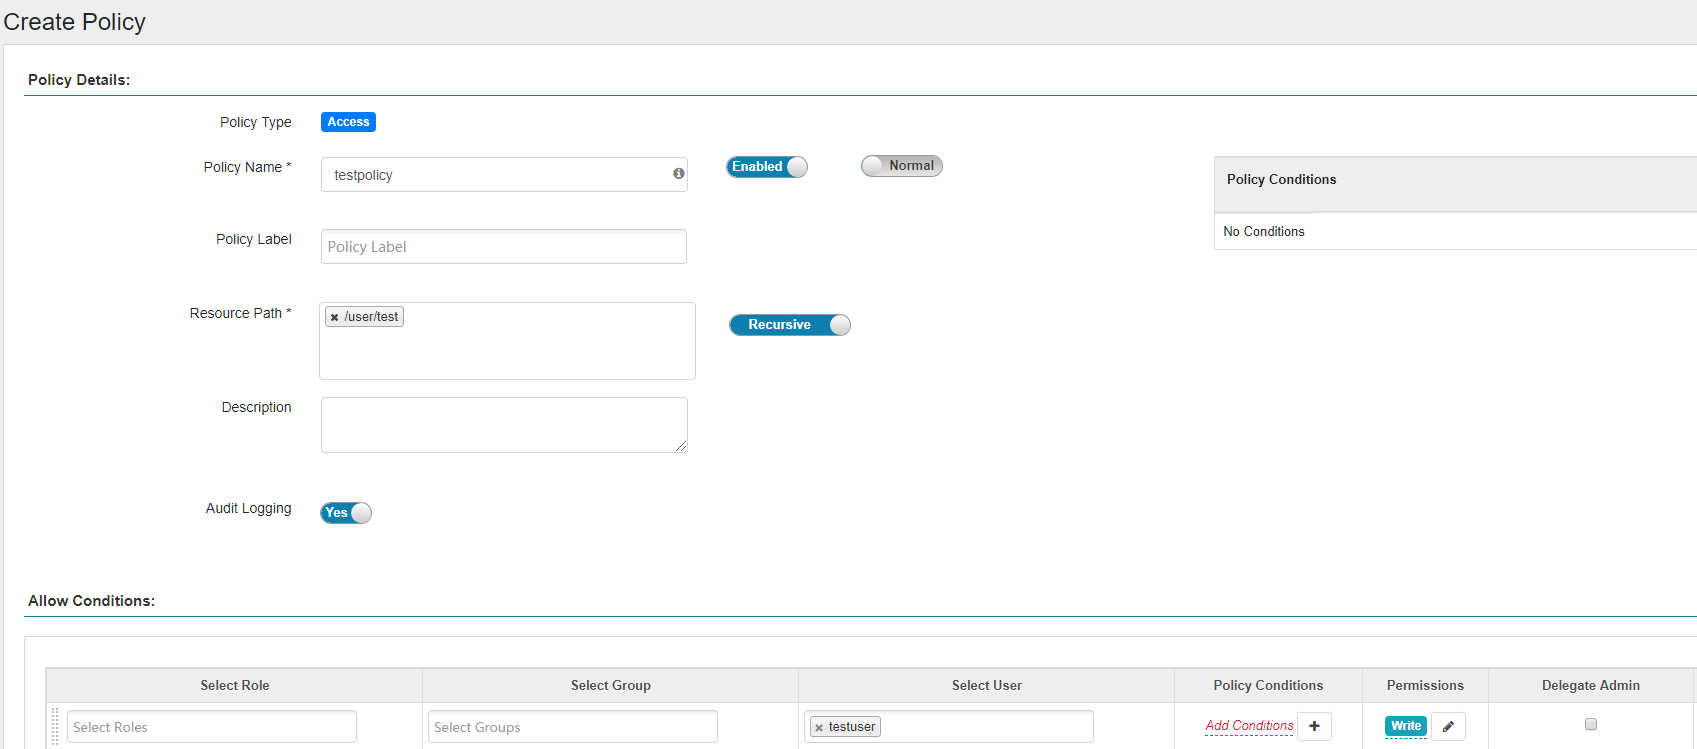
Table 2 Setting permissions¶ Task
Role Authorization
Setting the HDFS administrator permission
On the homepage, click the component plug-in name in the HDFS area, for example, hacluster.
Select the policy whose Policy Name is all - path and click
 to edit the policy.
In the Allow Conditions area, select a user from the Select User drop-down list.
Setting the permission for users to check and recover HDFS
Add a folder or a file path in Resource Path.
In the Allow Conditions area, select a user from the Select User drop-down list.
Click Add Permissions and select Read and Execute.
Setting the permission for users to read directories or files of other users
Add a folder or a file path in Resource Path.
In the Allow Conditions area, select a user from the Select User drop-down list.
Click Add Permissions and select Read and Execute.
Setting the permission for users to write data to files of other users
Add a folder or a file path in Resource Path.
In the Allow Conditions area, select a user from the Select User drop-down list.
Click Add Permissions and select Write and Execute.
Setting the permission for users to create or delete sub-files or sub-directories in the directory of other users
Add a folder or a file path in Resource Path.
In the Allow Conditions area, select a user from the Select User drop-down list.
Click Add Permissions and select Write and Execute.
Setting the permission for users to execute directories or files of other users
Add a folder or a file path in Resource Path.
In the Allow Conditions area, select a user from the Select User drop-down list.
Click Add Permissions and select Execute.
Setting the permission for allowing subdirectories to inherit all permissions of their parent directories
Add a folder or a file path in Resource Path.
Enable the recursion function. Recursive indicates that recursion is enabled.
(Optional) Add the validity period of the policy. Click Add Validity period in the upper right corner of the page, set Start Time and End Time, and select Time Zone. Click Save. To add multiple policy validity periods, click
 . To delete a policy validity period, click
  .
.Click Add to view the basic information about the policy in the policy list. After the policy takes effect, check whether the related permissions are normal.
To disable a policy, click
 to edit the policy and set the policy to Disabled.
If a policy is no longer used, click
 to delete it.