Accessing Alluxio Using a Data Application
The port number used for accessing the Alluxio file system is 19998, and the access address is alluxio://<Master node IP address of Alluxio>:19998/<PATH>. This section uses examples to describe how to access the Alluxio file system using data applications (Spark, Hive, Hadoop MapReduce, and Presto).
Using Alluxio as the Input and Output of a Spark Application
Log in to the Master node in a cluster as user root using the password set during cluster creation.
Run the following command to configure environment variables:
source /opt/client/bigdata_env
If Kerberos authentication is enabled for the current cluster, run the following command to authenticate the user. If Kerberos authentication is disabled for the current cluster, skip this step:
kinit MRS cluster user
Example: kinit admin
Prepare an input file and copy local data to the Alluxio file system.
For example, prepare the input file test_input.txt in the local /home directory, and run the following command to save the test_input.txt file to Alluxio:
alluxio fs copyFromLocal /home/test_input.txt /input
Run the following commands to start spark-shell:
spark-shell
Run the following commands in spark-shell:
val s = sc.textFile("alluxio://<Name of the Alluxio node>:19998/input")
val double = s.map(line => line + line)
double.saveAsTextFile("alluxio://<Name of the Alluxio node>:19998/output")
Note
Replace Name of the Alluxio node>:19998 with the actual node name and port numbers of all nodes where the AlluxioMaster instance is deployed. Use commas (,) to separate the node name and port number, for example, node-ana-coremspb.mrs-m0va.com:19998,node-master2kiww.mrs-m0va.com:19998,node-master1cqwv.mrs-m0va.com:19998.
Press Ctrl+C to exit spark-shell.
Run the alluxio fs ls / command to check whether the output directory /output containing double content of the input file exists in the root directory of Alluxio.
Creating a Hive Table on Alluxio
Log in to the Master node in a cluster as user root using the password set during cluster creation.
Run the following command to configure environment variables:
source /opt/client/bigdata_env
If Kerberos authentication is enabled for the current cluster, run the following command to authenticate the user. If Kerberos authentication is disabled for the current cluster, skip this step:
kinit MRS cluster user
Example: kinit admin
Prepare an input file. For example, prepare the hive_load.txt input file in the local /home directory. The file content is as follows:
1, Alice, company A
2, Bob, company B
Run the following command to import the hive_load.txt file to Alluxio:
alluxio fs copyFromLocal /home/hive_load.txt /hive_input
Run the following command to start the Hive beeline:
beeline
Run the following commands in beeline to create a table based on the input file in Alluxio:
CREATE TABLE u_user(id INT, name STRING, company STRING) ROW FORMAT DELIMITED FIELDS TERMINATED BY ',' STORED AS TEXTFILE;
LOAD DATA INPATH 'alluxio://<Name of the Alluxio node>:19998/hive_input' INTO TABLE u_user;
Note
Replace Name of the Alluxio node>:19998 with the actual node name and port numbers of all nodes where the AlluxioMaster instance is deployed. Use commas (,) to separate the node name and port number, for example, node-ana-coremspb.mrs-m0va.com:19998,node-master2kiww.mrs-m0va.com:19998,node-master1cqwv.mrs-m0va.com:19998.
Run the following command to view the created table:
select * from u_user;
Running Hadoop Wordcount in Alluxio
Log in to the Master node in a cluster as user root using the password set during cluster creation.
Run the following command to configure environment variables:
source /opt/client/bigdata_env
If Kerberos authentication is enabled for the current cluster, run the following command to authenticate the user. If Kerberos authentication is disabled for the current cluster, skip this step:
kinit MRS cluster user
Example: kinit admin
Prepare an input file and copy local data to the Alluxio file system.
For example, prepare the input file test_input.txt in the local /home directory, and run the following command to save the test_input.txt file to Alluxio:
alluxio fs copyFromLocal /home/test_input.txt /input
Run the following command to execute the wordcount job:
yarn jar /opt/share/hadoop-mapreduce-examples-<Hadoop version>-mrs-<MRS cluster version>/hadoop-mapreduce-examples-<Hadoop version>-mrs-<MRS cluster version>.jar wordcount alluxio://<Name of the Alluxio node>:19998/input alluxio://<Name of the Alluxio node>:19998/output
Note
Replace <Hadoop version> with the actual one.
Replace <MRS cluster version> with the major version of MRS. For example, for a cluster of MRS 1.9.2, mrs-1.9.0 is used.
Replace Name of the Alluxio node>:19998 with the actual node name and port numbers of all nodes where the AlluxioMaster instance is deployed. Use commas (,) to separate the node name and port number, for example, node-ana-coremspb.mrs-m0va.com:19998,node-master2kiww.mrs-m0va.com:19998,node-master1cqwv.mrs-m0va.com:19998.
Run the alluxio fs ls / command to check whether the output directory /output containing the wordcount result exists in the root directory of Alluxio.
Using Presto to Query Tables in Alluxio
Log in to the Master node in a cluster as user root using the password set during cluster creation.
Run the following command to configure environment variables:
source /opt/client/bigdata_env
If Kerberos authentication is enabled for the current cluster, run the following command to authenticate the user. If Kerberos authentication is disabled for the current cluster, skip this step:
kinit MRS cluster user
Example: kinit admin
Run the following commands to start Hive Beeline to create a table on Alluxio.
beeline
CREATE TABLE u_user (id int, name string, company string) ROW FORMAT DELIMITED FIELDS TERMINATED BY ',' LOCATION 'alluxio://<Name of the Alluxio node>:19998/u_user';
insert into u_user values(1,'Alice','Company A'),(2, 'Bob', 'Company B');
Note
Replace Name of the Alluxio node>:19998 with the actual node name and port numbers of all nodes where the AlluxioMaster instance is deployed. Use commas (,) to separate the node name and port number, for example, node-ana-coremspb.mrs-m0va.com:19998,node-master2kiww.mrs-m0va.com:19998,node-master1cqwv.mrs-m0va.com:19998.
Start the Presto client. For details, see 2 to 8 in Using a Client to Execute Query Statements.
On the Presto client, run the select * from hive.default.u_user; statement to query the table created in Alluxio:
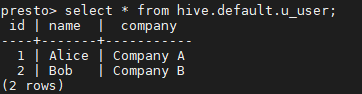
Figure 1 Using Presto to query the table created in Alluxio