Using DBeaver to Access HetuEngine
Use DBeaver 7.2.0 as an example to describe how to access HetuEngine.
Prerequisites
The DBeaver has been installed properly. Download the DBeaver software from https://dbeaver.io/files/7.2.0/.
A human-machine user, for example, hetu_user, has been created in the cluster. For details, see Creating a HetuEngine User. For clusters with Ranger authentication enabled, the Ranger permission must be added to user hetu_user based on service requirements. For details, see Adding a Ranger Access Permission Policy for HetuEngine.
A compute instance has been created and is running properly. For details, see Creating HetuEngine Compute Instances.
Procedure
Download the HetuEngine client to obtain the JDBC JAR package.
Log in to FusionInsight Manager.
Choose Cluster > Services > HetuEngine > Dashboard.
In the upper right corner of the page, choose More > Download Client and download the Complete Client to the local PC as prompted.
Decompress the HetuEngine client package FusionInsight_Cluster_Cluster ID_ HetuEngine_Client.tar to obtain the JDBC file and save it to a local directory, for example, D:\test.
Note
Obtaining the JDBC file:
Decompress the package in the FusionInsight_Cluster_Cluster ID_HetuEngine_ClientConfig\HetuEngine\xxx\ directory to obtain the hetu-jdbc-*.jar file.
Note: xxx can be arm or x86.
Add the host mapping to the local hosts file.
Add the mapping of the host where the instance is located in the HSFabric or HSBroker mode. The format is Host IP address Host name.
Example: 192.168.42.90 server-2110081635-0001
Note
The local hosts file in a Windows environment is stored in, for example, C:\Windows\System32\drivers\etc.
Open DBeaver, choose Database > New Database Connection, search for PrestoSQL in ALL, and open PrestoSQL.
Click Edit Driver Settings and set parameters by referring to the following table.
Table 1 Driver settings¶ Parameter
Value
Class Name
io.prestosql.jdbc.PrestoDriver
URL Template
Accessing HetuEngine using HSFabric
jdbc:presto://<HSFabricIP1:port1>,<HSFabricIP2:port2>,<HSFabricIP3:port3>/hive/default?serviceDiscoveryMode=hsfabric
Example:
Accessing HetuEngine using HSBroker
jdbc:presto://<HSBrokerIP1:port1>,<HSBrokerIP2:port2>,<HSBrokerIP3:port3>/hive/default?serviceDiscoveryMode=hsbroker
Example:
Note
To obtain the IP addresses and port numbers of the HSFabric and HSBroker nodes, perform the following operations:
Log in to FusionInsight Manager.
Choose Cluster > Services > HetuEngine. Click the Instance tab to obtain the service IP addresses of all HSFabric or HSBroker instances. You can select one or more normal instances for connection.
To obtain the port numbers, choose Cluster > Services > HetuEngine. Click Configurations then All Configurations.
Search for gateway.port to obtain the HSFabric port number. The default port number is 29902 in security mode and 29903 in normal mode.
Search for server.port to obtain the HSBroker port number. The default port number is 29860 in security mode and 29861 in normal mode.
If the connection fails, disable the proxy and try again.
Click Add File and upload the JDBC driver package obtained in 1.
Click Find Class. The driver class is automatically obtained. Click OK to complete the driver setting. If io.prestosql:presto-jdbc:RELEASE exists in Libraries, delete it before clicking Find Class.
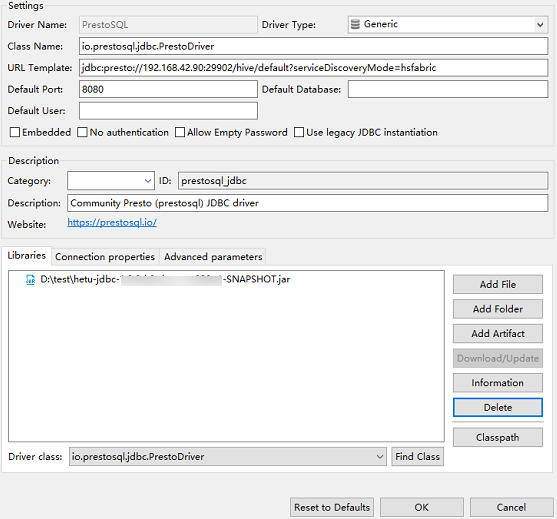
Figure 1 Configuring the driver in security mode
Configure the connection.
Security mode (clusters with Kerberos authentication enabled):
On the Main tab page for creating a connection, enter the user name and password created in Prerequisites, and click Test Connection. After the connection is successful, click OK then Finish. You can click Connection details (name, type, ... ) to change the connection name.
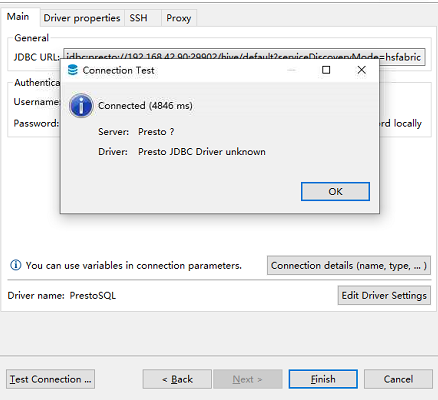
Figure 2 Configuring parameters on the Main tab in security mode
Normal mode (clusters with Kerberos authentication disabled):
On the Main tab page for creating a connection, set JDBC URL and leave Password blank.
On the page for creating a connection, configure the parameters on the Driver properties tab. Set user to the user created in Prerequisites. Click Test Connection. After the connection is successful, click OK then Finish. You can click Connection details (name, type, ... ) to change the connection name.
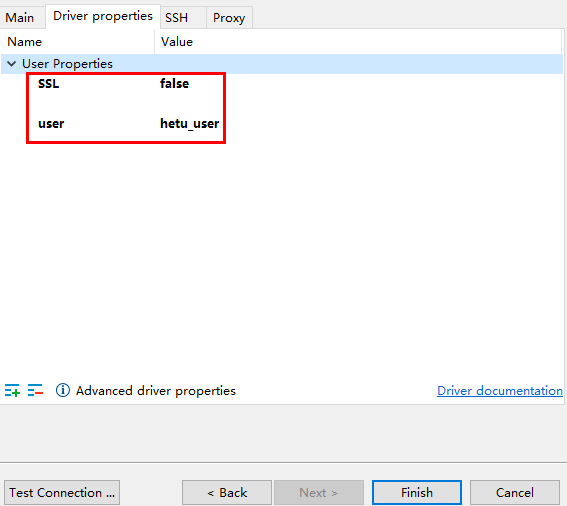
Figure 3 Configuring parameters on the Driver properties tab in normal mode
After the connection is successful, the page shown in Figure 4 is displayed.

Figure 4 Successful connection