Creating a Key
Scenario
This section describes how to create a CMK on the KMS management console. You can create up to 100 CMKs, excluding Default Master Keys.
The CMK is perfectly suited for but not limited to the following scenarios:
Server-side encryption on OBS
Encryption of data on EVS disks
Encryption of private images on IMS
File system encryption on SFS
Disk encryption for database instances in RDS
DEK encryption and decryption for user applications
Note
Aliases of Default Master Keys end with /default. It is not allowed to use aliases ending with /default for your CMKs.
Procedure
Log in to the management console.
Click
 in the upper left corner of the management console and select a region or project.
Choose Security > Key Management Service . The key management page is displayed.
Click Create Key in the upper right corner of the page. In the dialog box that is displayed, enter the alias and description of the key.
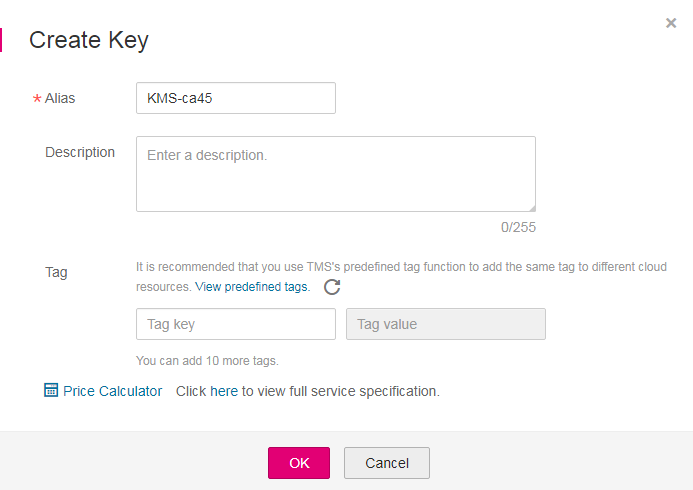
Figure 1 Create Key dialog box
Alias is the alias of the CMK to be created.
(Optional) Description is the description of the CMK.
(Optional) Add tags as needed, and enter the tag key and tag value.
Note
When a CMK has been created without any tag, you can add a tag to the CMK later as necessary. Click the alias of the CMK. The page with key details is displayed. Then you can add tags to the CMK.
The same tag (including tag key and tag value) can be used for different CMKs. However, under the same CMK, one tag key can have only one tag value.
A maximum of 10 tags can be added for one CMK.
If you want to delete a tag to be added when adding multiple tags, you can click Delete in the row where the tag to be added is located to delete the tag.
Click OK.
In the CMK list, you can view created CMKs. The default status of a CMK is Enabled.