Configuring Policies
After HSS is enabled, you can configure HSS policies based on your service requirements.
Constraints
The enterprise, premium, WTP, or container edition is enabled.
For the default policy groups, you are advised to retain their default configurations.
Modifications on a policy take effect only in the group it belongs to.
Accessing the Policies Page
Log in to the management console.
Click
 in the upper left corner of the page, select a region, and choose Security > Host Security Service. The HSS page is displayed.
In the navigation tree on the left, choose Security Operation > Policies. On the displayed page, Policy group parameters describes the fields.
Note
If your servers are managed by enterprise projects, you can select an enterprise project to view or operate the asset and scan information.
Table 1 Policy group parameters¶ Parameter
Description
Policy Group
Name of a policy group The preset policy group names are as follows:
tenant_linux_container_default_policy_group: preset Linux policy of the container edition. You can copy this policy group and create a new one based on it.
tenant_linux_enterprise_default_policy_group is the default Linux policy of the enterprise edition. This policy group can only be viewed, and cannot be copied or deleted.
tenant_windows_enterprise_default_policy_group: preset Windows policy of the enterprise edition. This policy group can only be viewed, and cannot be copied or deleted.
tenant_linux_premium_default_policy_group: preset Linux policy of the premium edition. You can create a policy group by copying this default group and modify the copy.
tenant_windows_premium_default_policy_group: preset Windows policy of the premium edition. You can create a policy group by copying this default group and modify the copy.
wtp_ServerName is a WTP edition policy group. It is generated by default when WTP is enabled for a server.
ID
Unique ID of a policy group
Description
Description of a policy group
Supported Version
HSS edition supported by a policy group.
Supported OS
OS supported by the policy.
Associated Servers
To view details about the servers associated with a policy group, click the number in the Servers column of the group.
Click the name of the policy group to access the policy detail list.
Note
You can click Enable or Disable in the Operation column of a policy. After a policy is disabled, the detection of the policy is not performed.
Click the name of a policy to modify it. The following sections describe the policies.
Asset Discovery
Click Asset Discovery.
On the displayed page, modify the settings as required. For more information, see Table 2.
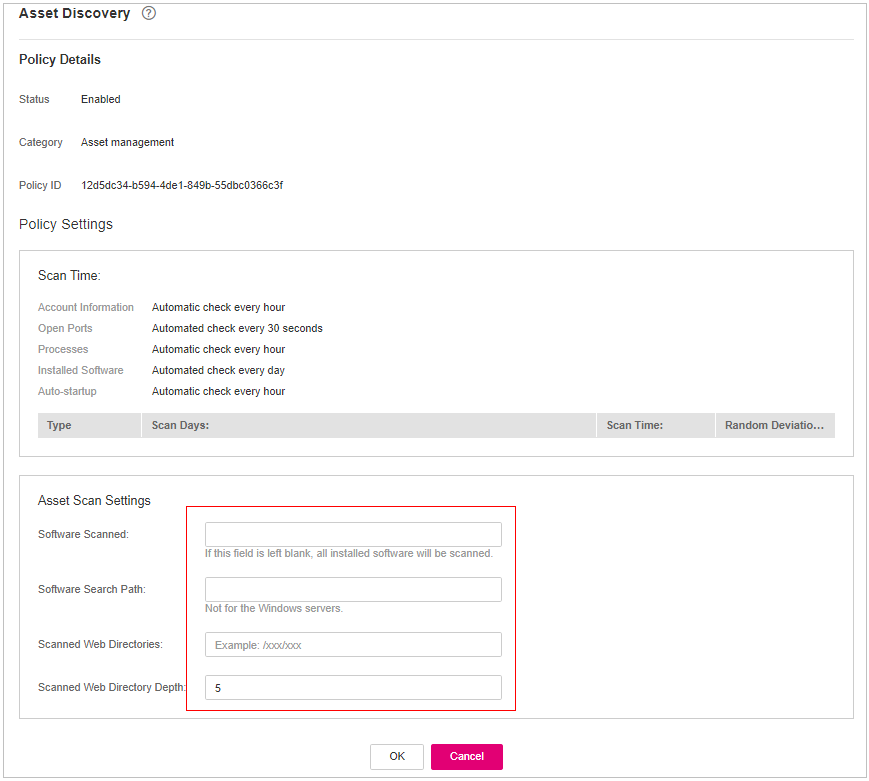
Figure 1 Modifying the asset discovery policy
Table 2 Parameter description¶ Parameter
Description
Scan Time
Fixed time for automatic assets scan.
Accounts: Linux accounts are automatically checked every hour, and Windows accounts are checked in real time.
Open ports are automatically checked every 30 seconds.
Processes are automatically checked every hour.
Installed software is automatically checked once a day.
Auto-startup items are automatically checked every hour.
Scanned Web Directories
Specifies a web directory to be scanned.
Confirm the information and click OK.
Weak Password Scan
Weak passwords are not attributed to a certain type of vulnerabilities, but they bring no less security risks than any type of vulnerabilities. Data and programs will become insecure if their passwords are cracked.
HSS proactively detects the accounts using weak passwords and generates alarms for the accounts. You can also add a password that may have been leaked to the weak password list to prevent server accounts from using the password.
Click Weak Password Detection.
In the Policy Settings area, modify the settings as required. For more information, see Table 3.
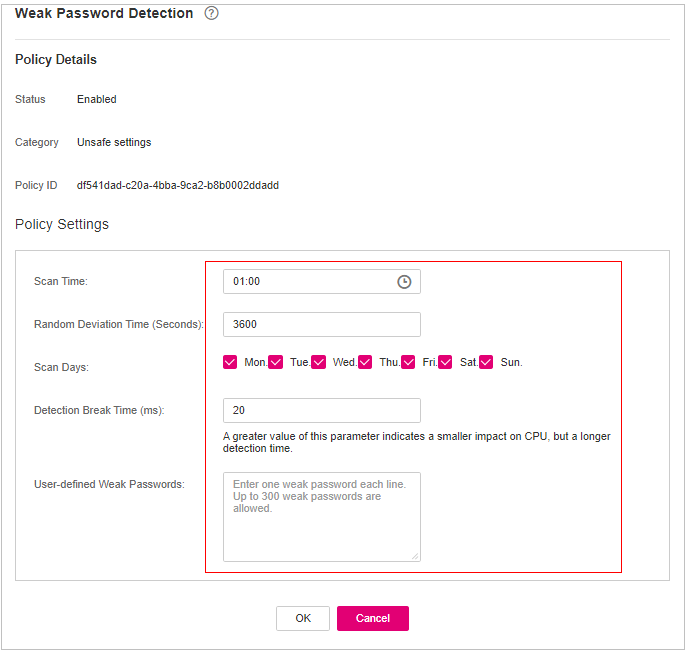
Figure 2 Modifying the weak password detection policy
Table 3 Parameter description¶ Parameter
Description
Scan Time
Time point when detections are performed. It can be accurate to the minute.
Random Deviation Time (s)
Random deviation time of the weak password based on Scan Time. The value range is 0 to 7200s.
Scan Days
Days in a week when weak passwords are scanned. You can select one or more days.
User-defined Weak Passwords
You can add a password that may have been leaked to this weak password text box to prevent server accounts from using the password.
Enter only one weak password per line. Up to 300 weak passwords can be added.
Confirm the information and click OK.
Configuration Check
Click Configuration Check.
On the Configure Check, modify the policy.
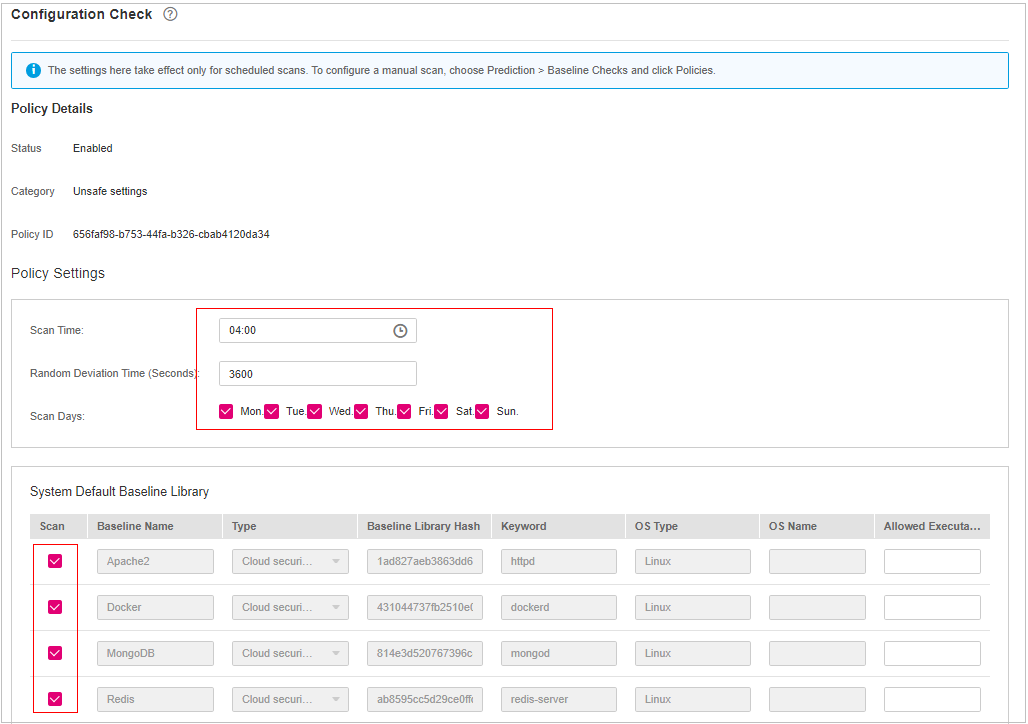
Figure 3 Modifying the configuration check policy
Table 4 Parameter description¶ Parameter
Description
Scan Time
Time point when detections are performed. It can be accurate to the minute.
Random Deviation Time (Seconds)
Random deviation time of the system detection. The value ranges from 0 to 7,200s.
Scan Days
Day in a week when a detection is performed. You can select any days from Monday to Sunday.
System Default Baseline Library
The detection baseline has been configured in the system. You only need to select the baseline you want to scan. All parameters are in their default values and cannot be modified.
Select the baseline to be detected or customize a baseline.
Confirm the information and click OK.
Web Shell Detection
If User-defined Scan Paths is not specified, the website paths in your assets are scanned by default. If User-defined Scan Paths is specified, website paths and the specified paths are scanned.
Click Web Shell Detection.
On the Web Shell Detection page, modify the settings as required. For more information, see Table 5.
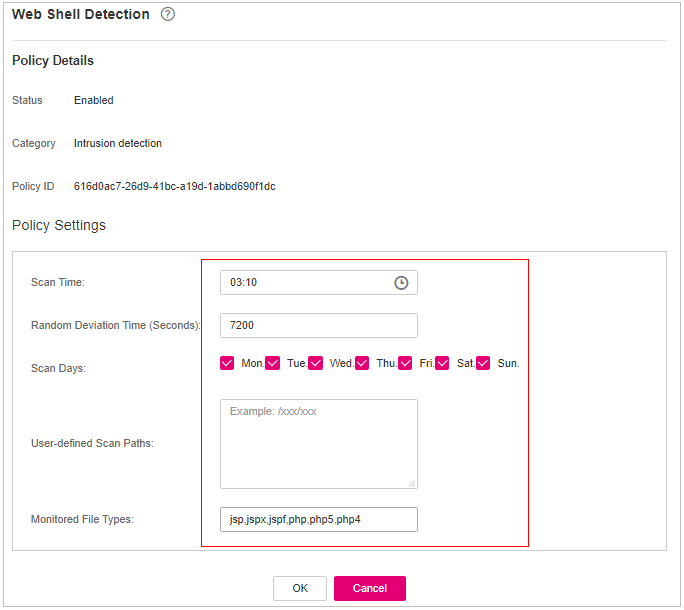
Figure 4 Modifying the web shell detection policy
Table 5 Parameter description¶ Parameter
Description
Scan Time
Time point when detections are performed. It can be accurate to the minute.
Random Deviation Time (Seconds)
Random deviation time. The value ranges from 0 to 7,200s.
Scan Days
Days in a week when web shells are scanned. You can select one or more days.
User-defined Scan Paths
Web paths to be scanned. A file path must:
Start with a slash (/) and end with no slashes (/).
Occupy a separate line and cannot contain spaces.
Confirm the information and click OK.
File Protection
Click File Protection.
On the File Protection page, modify the policy. For more information, see Table 6.
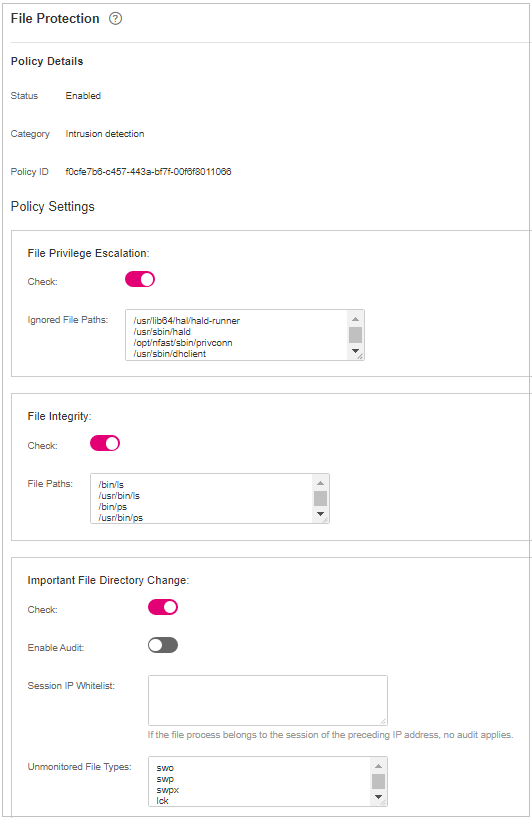
Figure 5 Modifying the file protection policy
Table 6 Parameter description¶ Parameter
Description
File Privilege Escalation
Detects privilege escalation.
 : enabled
 : disabled
Ignored File Path: Files to be ignored. Start the path with a slash (/) and do not end it with a slash (/). Each path occupies a line. No spaces are allowed between path names.
File Integrity
Detects the integrity of key files.
 : enabled
 : disabled
File Paths: Configure the file paths.
Important File Directory Change
Detects the directory change of key files.
 : enabled
 : disabled
Enable Audit: enables the audit detection function. If the function is enabled and inotify usage exceeds the limit, some file directory changes cannot be detected.
 : enabled
 : disabled
Session IP Whitelist: If the file process belongs to the sessions of the listed IP addresses, no audit applies.
Unmonitored File Types: File types that do not need to be monitored.
Unmonitored File Paths: File paths that do not need to be monitored.
Monitoring Login Keys: enables the function of monitoring login keys.
 : enabled
 : disabled
Directory Monitoring Mode
Directory monitoring mode.
Some file or directory monitoring paths are preset in the system. You can modify the file change type to be detected and add the file or directory paths to be monitored.
File or Directory Path: path of the file or directory to be monitored. Up to 50 paths can be added. Ensure the specified paths are valid.
Alias: alias of a file or directory path. You can enter a name that is easy to distinguish.
Monitor Subdirectory: If this option is selected, all files in the corresponding subdirectories are monitored. If it is not selected, subdirectories are not monitored.
Monitor Creation, Monitor Deletion, Monitor Movement, and Monitor Modification: Select them as needed.
Confirm the information and click OK.
HIPS Detection
Click HIPS Detection.
Modify the policy content. For more information, see Table 7.
Table 7 HIPS detection policy parameters¶ Parameter
Description
Auto Blocking
If this function is enabled, abnormal changes on registries, files, and processes will be automatically blocked to prevent reverse shells and high-risk commands.
: enabled
 : disabled
Trusted Processes
Paths of trusted processes. You can click Add to add a path and click Delete to delete it.
Confirm the information and click OK.
Login Security Check
Click Login Security Check.
On the displayed Login Security Check page, modify the policy content. Table 8 describes the parameters.
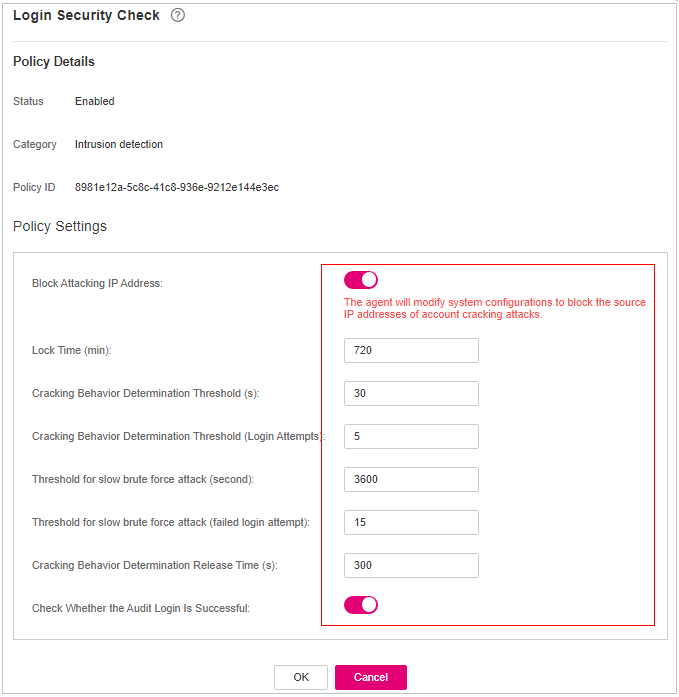
Figure 6 Modifying the security check policy
Table 8 Parameter description¶ Parameter
Description
Lock Time (min)
This parameter is used to determine how many minutes the IP addresses that send attacks are locked. The value range is 1 to 43200. Login is not allowed in the lockout duration.
Check Whether the Audit Login Is Successful
After this function is enabled, HSS reports login success logs.
 : enabled
 : disabled
Block Non-whitelisted Attack IP Address
After this function is enabled, HSS blocks the login of brute force IP addresses (non-whitelisted IP addresses).
Report Alarm on Brute-force Attack from Whitelisted IP Address
After this function is enabled, HSS generates alarms for brute force attacks from whitelisted IP addresses.
 : enabled
 : disabled
Whitelist
After an IP address is added to the whitelist, HSS does not block brute force attacks from the IP address in the whitelist. A maximum of 50 IP addresses or network segments can be added to the whitelist. Both IPv4 and IPv6 addresses are supported.
Confirm the information and click OK.
Malicious File Detection
Click Malicious File Detection.
On the displayed page, modify the policy. For more information, see Table 9.
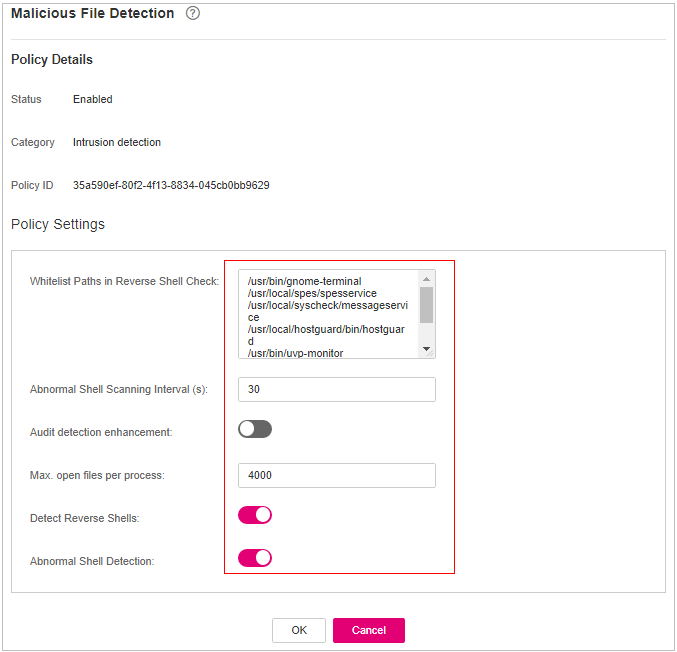
Figure 7 Modifying the malicious file detection policy
Table 9 Parameter description¶ Parameter
Description
Whitelist Paths in Reverse Shell Check
Process file path to be ignored in reverse shell detection
Start with a slash (/) and end with no slashes (/). Occupy a separate line and cannot contain spaces.
Ignored Reverse Shell Local Port
Local ports that do not need to be scanned for reverse shells.
Ignored Reverse Shell Remote Address
Remote addresses that do not need to be scanned for reverse shells.
Detect Reverse Shells
Detects reverse shells. You are advised to enable it.
 : enabled
 : disabled
Auto-block Reverse Shells
Specifies whether to enable automatic blocking of reverse shells. You are advised to enable this function.
Abnormal Shell Detection
Detects abnormal shells. You are advised to enable it.
 : enabled
 : disabled
Confirm the information and click OK.
Abnormal Process Behavior
Click Abnormal process behaviors.
In the displayed area, modify the settings as required. For more information, see Table 10.
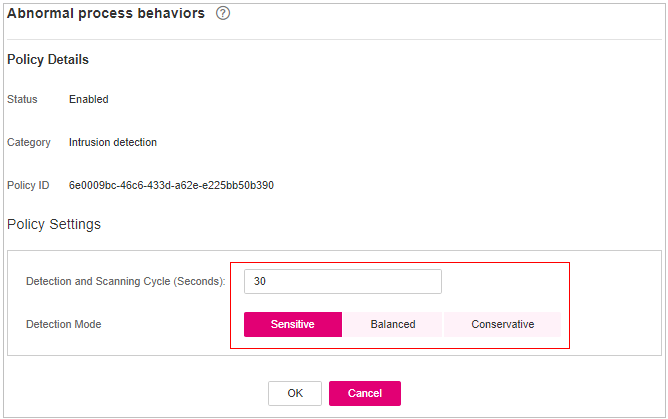
Figure 8 Modifying the abnormal process behavior policy
Table 10 Parameter description¶ Parameter
Description
Example Value
Detection Mode
Select the method for abnormal process behavior detection.
Sensitive: In-depth and full detection and scanning are performed on all processes, which may cause false positives. Suitable for cyber protection drills and key event assurance drills.
Balanced: All processes are detected and scanned. The detection result accuracy and the abnormal process detection rate are balanced. Suitable for routine protection.
Conservative: All processes are detected and scanned. This mode provides high detection result accuracy and low false positives. Suitable for scenarios with a large number of false positives.
Balanced
Threshold for Score Reporting
Score reporting threshold. The value range is 1 to 100.
3
Confirm the information and click OK.
Root Privilege Escalation Detection
Click Root privilege escalation.
In the displayed area, modify the settings as required. For more information, see Table 11.
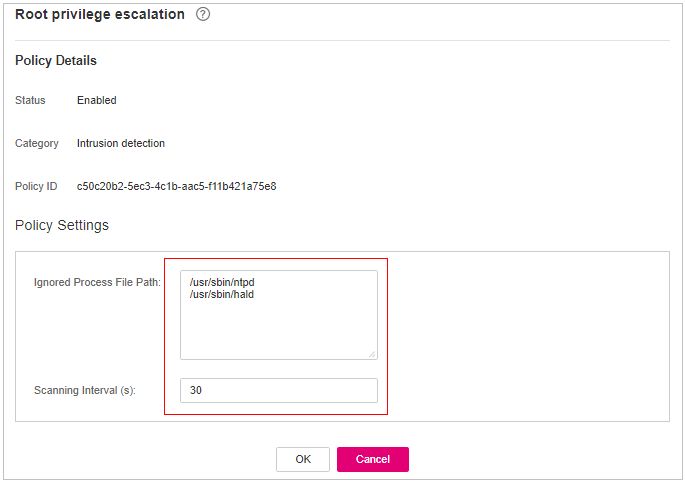
Figure 9 Modifying the root privilege escalation policy
Table 11 Parameter description¶ Parameter
Description
Ignored Process File Path
Ignored process file path
Start with a slash (/) and end with no slashes (/). Occupy a separate line and cannot contain spaces.
Confirm the information and click OK.
Real-time Process
Click Real-time Process.
On the displayed page, modify the settings as required. For more information, see Table 12.
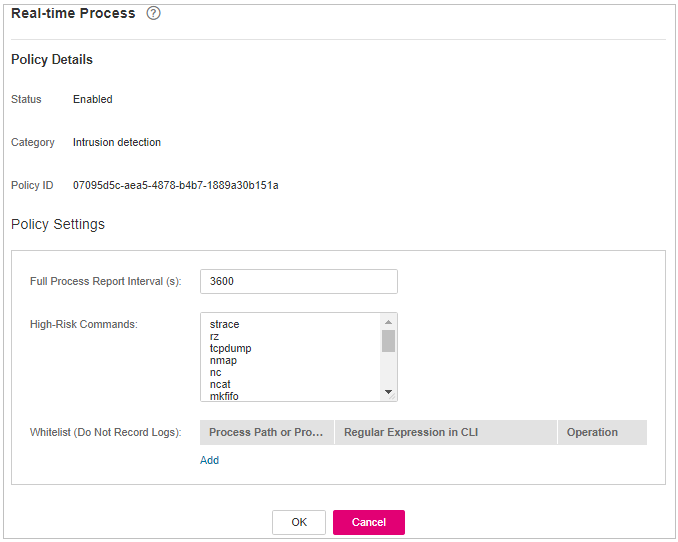
Figure 10 Modifying the real-time process policy
Table 12 Parameters for real-time process policy settings¶ Parameter
Description
High-Risk Commands
High-risk commands that contain keywords during detection.
Whitelist (Do Not Record Logs)
Paths or programs that are allowed or ignored during detection. You can enter the regular expression of the command to be added to the whitelist. The command regular expression is optional.
Confirm the information and click OK.
Rootkit Detection
Click Rootkit Detection.
On the rootkit detection page, modify the policy content.
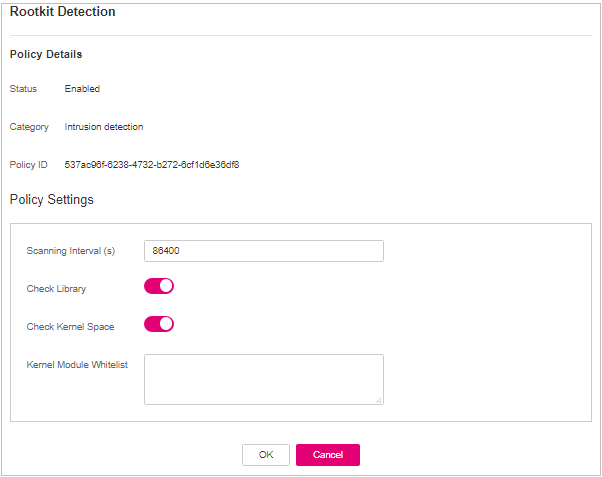
Figure 11 Modifying the rootkit detection policy
Table 13 Parameter description¶ Parameter
Description
Example Value
Kernel Module Whitelist
Add the kernel modules that can be ignored during the detection.
Up to 10 kernel modules can be added. Each module occupies a line.
xt_conntrack
virtio_scsi
tun
Confirm the information and click OK.
AV Detection
Click AV Detection.
On the AV Detection slide pane that is displayed, modify the settings as required. For details, see Table 14.
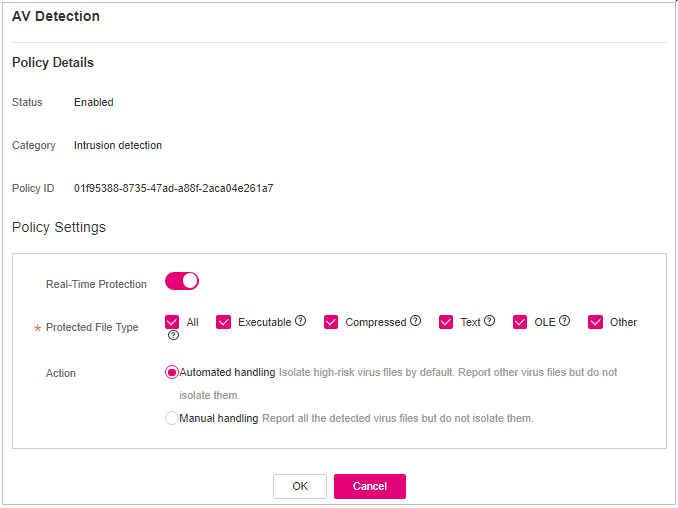
Figure 12 Modifying an AV detection policy
Table 14 AV detection policy parameters¶ Parameter
Description
Example Value
Real-Time Protection
After this function is enabled, AV detection is performed in real time when the current policy is executed. You are advised to enable this function.
 : enabled
 : disabled
 : enabled
Protected File Type
Type of the files to be checked in real time.
All: Select all file types.
Executable: Executable file types such as EXE, DLL, and SYS.
Compressed: Compressed file types such as ZIP, RAR, and JAR.
Text: Text file types such as PHP, JSP, HTML, and Bash.
OLE: Composite file types such as Microsoft Office files (PPT and DOC) and saved email files (MSG).
Other: File types except the preceding types.
All
Action
Handling method for the object detection alarms.
Automated handling:Isolate high-risk virus files bu default. Report other virus files but do not isolate them.
Manual handling: Report all the detected virus files but do not isolate them. You need to handle them manually.
Automatic handling
Confirm the information and click OK.
Container Information Collection
Click Container Information Collection.
On the Container Information Collection slide pane that is displayed, modify the Policy Settings. For details about the parameters, see Table 15.
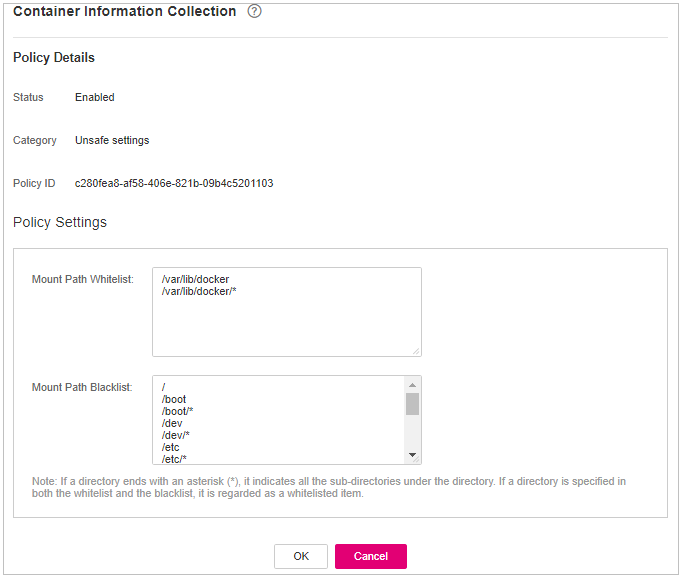
Figure 13 Modifying the container information collection policy
Note
The whitelist has a higher priority than blacklist. If a directory is specified in both the whitelist and blacklist, it is regarded as a whitelisted item.
Table 15 Container information collection policy parameters¶ Parameter
Description
Example Value
Mount Path Whitelist
Enter the directory that can be mounted.
/test/docker or /root/*
Note: If a directory ends with an asterisk (
*), it indicates all the sub-directories under the directory (excluding the main directory).For example, if /var/test/* is specified in the whitelist, all sub-directories in /var/test/ are whitelisted, excluding the test directory.
Mount Path Blacklist
Enter the directories that cannot be mounted. For example, user and bin, the directories of key host information files, are not advised being mounted. Otherwise, important information may be exposed.
Confirm the information and click OK.
Cluster Intrusion Detection
Click Cluster Intrusion Detection.
On the Cluster Intrusion Detection slide pane that is displayed, modify the Policy Settings. For details about the parameters, see Table 16.
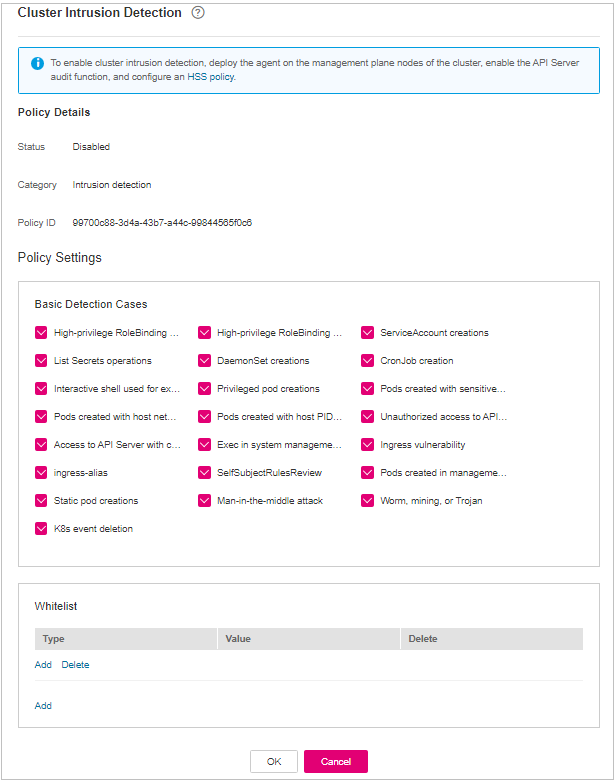
Figure 14 Modifying the cluster intrusion detection policy
Table 16 Cluster intrusion detection policy parameters¶ Parameter
Description
Example Value
Basic Detection Cases
Select basic check items as required.
Select all
Whitelist
You can customize the types and values that need to be ignored during the detection. You can add and delete types and values as required.
The following types are supported:
IP address filter
Pod name filter
Image name filter
User filter
Pod tag filter
Namespace filter
Note
Each type can be used only once.
Type: IP address filtering
Value: 192.168.x.x
Note
After this policy is configured, you need to enable the log audit function and deploy the HSS agent on the management node (node where the APIServer is located) of the cluster to make the policy take effect.
Confirm the information and click OK.
Container Escape Detection
Click Container Escape. The container escape policy details page is displayed.
On the container escape page that is displayed, edit the policy content. For details about the parameters, see Table 17.
If no image, process, or POD needs to be added to the whitelist, leave the whitelist blank.
Table 17 Container escape detection policy parameters¶ Parameter
Description
Image Whitelist
Enter the names of the images that do not need to perform container escape behavior detection. An image name can contain only letters, numbers, underscores (_), and hyphens (-), and each name needs to be on a separate line. Up to 100 image names are allowed.
Process Whitelist
Enter the full paths of processes that do not need to perform container escape behavior detection. A process path can contain only letters, numbers, underscores (_), and hyphens (-), and each path needs to be on a separate line. Up to 100 process paths are allowed.
Pod Whitelist
Enter the names of pods that do not need to perform container escape behavior detection. A pod name can contain only letters, numbers, underscores (_), and hyphens (-), and each name needs to be on a separate line. Up to 100 pod names are allowed.
Confirm the information and click OK.
Container File Monitoring
Important
If a monitored file path is under the mount path rather than the writable layer of the container on the server, changes on the file cannot trigger container file modification alarms. To protect such files, configure a file protection policy.
Click Container File Monitoring.
On the Container File Monitoring slide pane that is displayed, modify the Policy Settings. For details about the parameters, see Table 18.
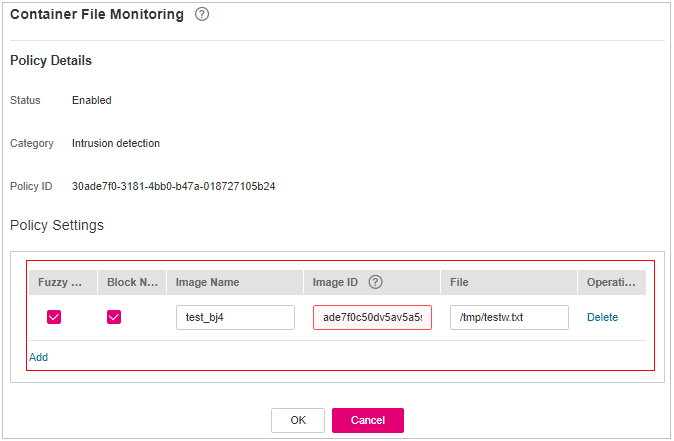
Figure 15 Modifying the container file monitoring policy
Table 18 Container file monitoring policy parameters¶ Parameter
Description
Example Value
Fuzzy match
Indicates whether to enable fuzzy match for the target file. You are advised to select this option.
Selected
Image Name
Name of the target image to be checked
test_bj4
Image ID
ID of the target image to be checked
-File
Name of the file in the target image to be checked
/tmp/testw.txt
Confirm the information and click OK.
Container Process Whitelist
Click Container Process Whitelist.
On the Container Process Whitelist slide pane that is displayed, modify the Policy Settings. For details about the parameters, see Table 19.
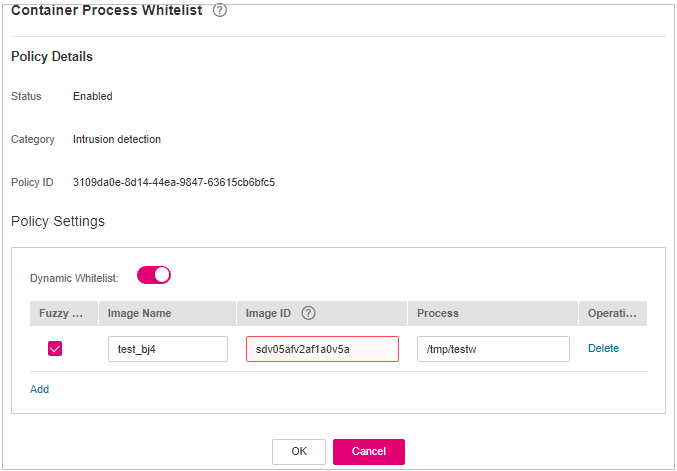
Figure 16 Container process whitelist policy
Table 19 Container process whitelist policy parameters¶ Parameter
Description
Example Value
Fuzzy Match
Indicates whether to enable fuzzy match for the target file. You are advised to select this option.
Selected
Image Name
Name of the target image to be detected
test_bj4
Image ID
ID of the target image to be checked
-Process
Full path of the file in the target image to be checked
/tmp/testw
Confirm the information and click OK.
Suspicious Image Behaviors
Click Suspicious Image Behaviors.
On the Suspicious Image Behaviors slide pane that is displayed, modify the Policy Settings. For details about the parameters, see Table 20.
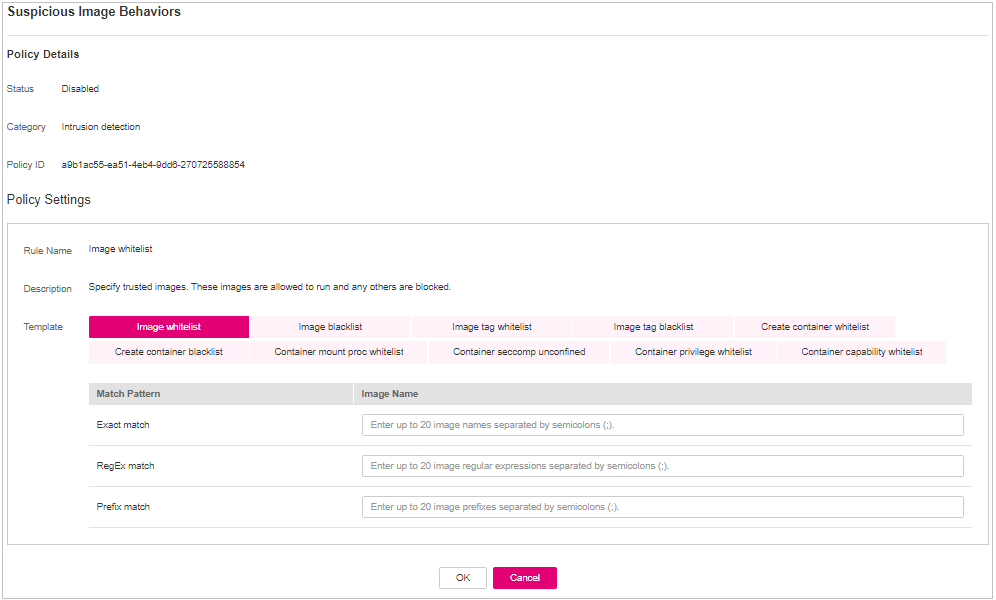
Figure 17 Modifying the suspicious image behavior policy
Table 20 Suspicious image behaviors policy parameters¶ Parameter
Description
Example Value
Rule Name
Name of a rule
-Description
Brief description of a rule
-Template
Configure templates based on different rules. The supported rules are as follows:
Image whitelist
Image blacklist
Image tag whitelist
Image tag blacklist
Create container whitelist
Create container blacklist
Container mount proc whitelist
Container seccomp unconfined
Container privilege whitelist
Container capability whitelist
The parameters are described as follows:
Exact match: Enter the names of the images you want to check. Use semicolons (;) to separate multiple names. A maximum of 20 names can be entered.
RegEx match: Use regular expressions to match images. Use semicolons (;) to separate multiple expressions. A maximum of 20 expressions can be entered.
Prefix match: Enter the prefixes of the images you want to check. Multiple prefixes are separated by semicolons (;). A maximum of 20 prefixes can be entered.
Tag Name: Enter the tag and value of the images you want to check. A maximum of 20 tags can be added.
Permission Type: Specify permissions to be checked or ignored. For details about permissions, see Table 21.
-Table 21 Abnormal image permissions¶ Permissions Name
Description
AUDIT_WRITE
Write records to kernel auditing log.
CHOWN
Make arbitrary changes to file UIDs and GIDs.
DAC_OVERRIDE
Bypass file read, write, and execute permission checks.
FOWNER
Bypass permission checks on operations that normally require the file system UID of the process to match the UID of the file.
FSETID
Do not clear set-user-ID and set-group-ID permission bits when a file is modified.
KILL
Bypass permission checks for sending signals
MKNOD
Create special files using mknod.
NET_BIND_SERVICE
Bind a socket to internet domain privileged ports (port numbers less than 1024).
NET_RAW
Use RAW and PACKET sockets.
SETFCAP
Set file capabilities.
SETGID
Make arbitrary manipulations of process GIDs and supplementary GID list.
SETPCAP
Modify process capabilities.
SETUID
Make arbitrary manipulations of process UIDs.
SYS_CHROOT
Use chroot to change the root directory.
AUDIT_CONTROL
Enable and disable kernel auditing; change auditing filter rules; retrieve auditing status and filtering rules.
AUDIT_READ
Allow reading audit logs via multicast netlink socket.
BLOCK_SUSPEND
Allow suspension prevention.
BPF
Allow creating BPF maps, loading BPF Type Format (BTF) data, retrieve JITed code of BPF programs, and more.
CHECKPOINT_RESTORE
Allow operations related to checkpoints and restoration.
DAC_READ_SEARCH
Bypass file read permission checks and directory read and execute permission checks.
IPC_LOCK
Lock memory (such as mlock, mlockall, mmap, and shmctl).
IPC_OWNER
Bypass permission checks for operations on System V IPC objects.
LEASE
Establish leases on arbitrary files
LINUX_IMMUTABLE
Set the FS_APPEND_FL and FS_IMMUTABLE_FL i-node flags.
MAC_ADMIN
Allow MAC configuration or state changes.
MAC_OVERRIDE
Override Mandatory Access Control (MAC).
NET_ADMIN
Perform various network-related operations.
NET_BROADCAST
Make socket broadcasts, and listen to multicasts.
PERFMON
Allow privileged system performance and observability operations using perf_events, i915_perf and other kernel subsystems.
SYS_ADMIN
Perform a range of system administration operations.
SYS_BOOT
Use reboot and kexec_load. Reboot and load a new kernel for later execution.
SYS_MODULE
Load and unload kernel modules.
SYS_NICE
Raise process nice value (nice, set priority) and change the nice value for arbitrary processes.
SYS_PACCT
Enable or disable process accounting.
SYS_PTRACE
Trace arbitrary processes using ptrace.
SYS_RAWIO
Perform I/O port operations (ipl and ioperm).
SYS_RESOURCE
Override resource limits.
SYS_TIME
Set the system clock (settimeofday, stime, and adjtimex) and real-time (hardware) clock.
SYS_TTY_CONFIG
Use vhangup. Employ various privileged ioctl operations on virtual terminals.
SYSLOG
Perform privileged syslog operations.
WAKE_ALARM
Trigger something that will wake up the system.
Confirm the information and click OK.
Port Scan Detection
Click Port Scan Detection.
On the Port Scan Detection slide pane that is displayed, modify the Policy Settings. For details about the parameters, see Table 22.
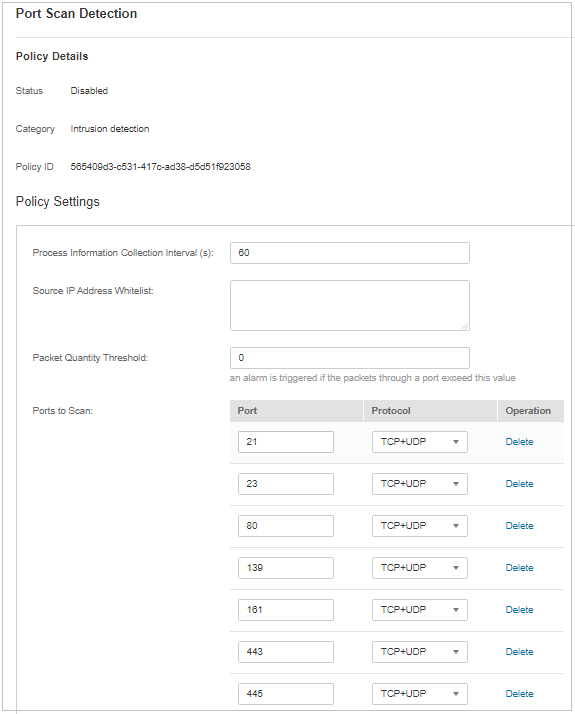
Figure 18 Modifying the port scanning policy
Table 22 Port scan detection policy parameters¶ Parameter
Description
Example Value
Source IP Address Whitelist
Enter the IP address whitelist. Separate multiple IP addresses with semicolons (;).
test_bj4
Ports to Scan
Details about the port number and protocol type to be detected
-Confirm the information and click OK.
Self-protection
The self-protection policy protects HSS software, processes, and files from being damaged by malicious programs. You cannot customize the policy content.