Enabling Ransomware Prevention
Prerequisites
You have enabled HSS premium, WTP, or container edition.
Constraints
Only premium, WTP, and container editions support ransomware protection.
Procedure
Log in to the management console.
Click
 in the upper left corner of the page, select a region, and choose Security > HSS. The HSS page is displayed.
In the navigation pane, choose Prevention > Ransomware Prevention. Click the Protected Servers tab. Click Add Server.
Note
If your servers are managed by enterprise projects, you can select an enterprise project to view or operate the asset and scan information.
In the dialog box that is displayed, select the target system to be protected and configure a protection policy.
OS: Select the server system to be protected.
Ransomware Prevention: Enable or disable ransomware prevention.
Enable:

Disable:

Policy: Select an existing policy or create a protection policy.
Use policy: Select an existing protection policy. For details, see Parameters for selecting an existing policy.
Table 1 Parameters for selecting an existing policy¶ Parameter
Description
Policy
Select an existing policy.
Action
Select a ransomware event processing mode supported by the selected protection policy.
Report alarm and isolate
Report alarm
Bait File
After bait protection is enabled, the system deploys bait files in protected directories and key directories (unless otherwise specified by users). A bait file occupies only a few resources and does not affect your server performance.
If ransomware prevention is enabled, this function is enabled by default.
Note
Currently, Linux servers support dynamic generation and deployment of bait files. Windows servers support only static deployment of bait files.
Create new: Create a protection policy on the current page. For details about the parameters, see Parameters for creating a protection policy.
Table 2 Protection policy parameters¶ Parameter
Description
Example Value
Policy
Policy name
test
Action
Indicates how an event is handled.
Report alarm and isolate
Report alarm
Report alarm and isolate
Bait File
After bait protection is enabled, the system deploys bait files in protected directories and key directories (unless otherwise specified by users). A bait file occupies only a few resources and does not affect your server performance.
If ransomware prevention is enabled, this function is enabled by default.
Note
Currently, Linux servers support dynamic generation and deployment of bait files. Windows servers support only static deployment of bait files.
Enabled
Bait File Directories
Protected directories (excluding subdirectories).
Separate multiple directories with semicolons (;). You can configure up to 20 directories.
This parameter is mandatory for Linux servers and optional for Windows servers.
Linux: /etc/lesuo
Windows: C:\Test
Excluded Directory (Optional)
Directories where bait files are not deployed.
Separate multiple directories with semicolons (;). You can configure up to 20 excluded directories.
Linux: /test
Windows: C:\ProData
Protected File Type
Types of files to be protected.
More than 70 file formats can be protected, including databases, containers, code, certificate keys, and backups.
This parameter is mandatory for Linux servers only.
Select all
After the configuration is complete, click Next to configure the vault.
Note
Server backup must be enabled.
Select the target vault. For details about the vault list, see Table 3.
Note
When selecting a vault, you are advised to determine the required capacity based on the backup rules, retention period, and server asset size. Select a vault with enough available capacity. Otherwise, the backup may fail.
Table 3 Vault list parameters¶ Parameter
Description
Vault Name
Name of the target vault
Vault ID
ID of the target vault
Vault Status
Status of the target vault.
Available
Frozen
Used/Total Vault Capacity (GB)
Current usage and total capacity of the target vault
Used Capacity (GB)
Total capacity of the server bound to the target vault.
For example:
Three servers with 60 GB hard disks are bound to vault A with 200 GB capacity.
The used capacity is the total storage capacity of the servers bound to vault A (3 x 60 GB = 180 GB).
The used capacity does not occupy the capacity of vault A.
The used capacity indicates the maximum capacity required for backing up servers bound to vault A. The used capacity cannot be greater than the capacity of vault A. Otherwise, the backup may fail.
Number of bound servers
Number of servers associated with the target vault
Backup Policy Status
Status of the rule for automatically backing up server data in the target vault
Enabled: The vault automatically backs up servers based on the selected backup policy.
Disabled: The backup policy is not enabled and the vault cannot be used to back up data.
Click Next and select servers. You can search for a server by its name or by filtering.
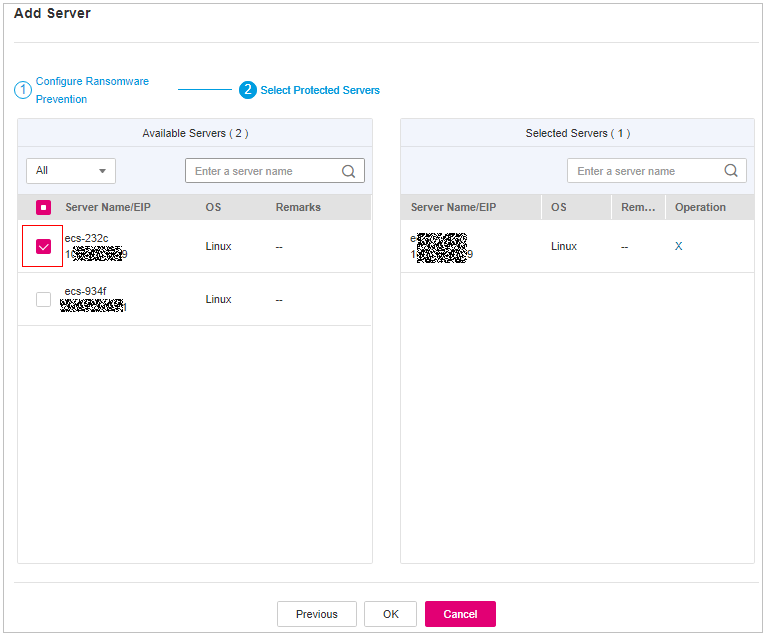
Figure 1 Selecting servers
Click OK.
In the navigation pane, choose Prevention > Ransomware Prevention. Click the Protected Servers tab and check protected servers.