Managing Isolated Files
HSS can isolate detected threat files. Files that have been isolated are displayed on a slide-out panel on the Server Alarms page. You can click Isolated Files on the upper right corner to check them, and can recover isolated files anytime.
For details about events that can be isolated and killed, see Server Alarms.
Constraints
Servers that are not protected by HSS do not support alarm-related operations.
Isolation and Killing Operations
Log in to the management console.
Click
 in the upper left corner of the page, select a region, and choose Security > HSS. The HSS page is displayed.
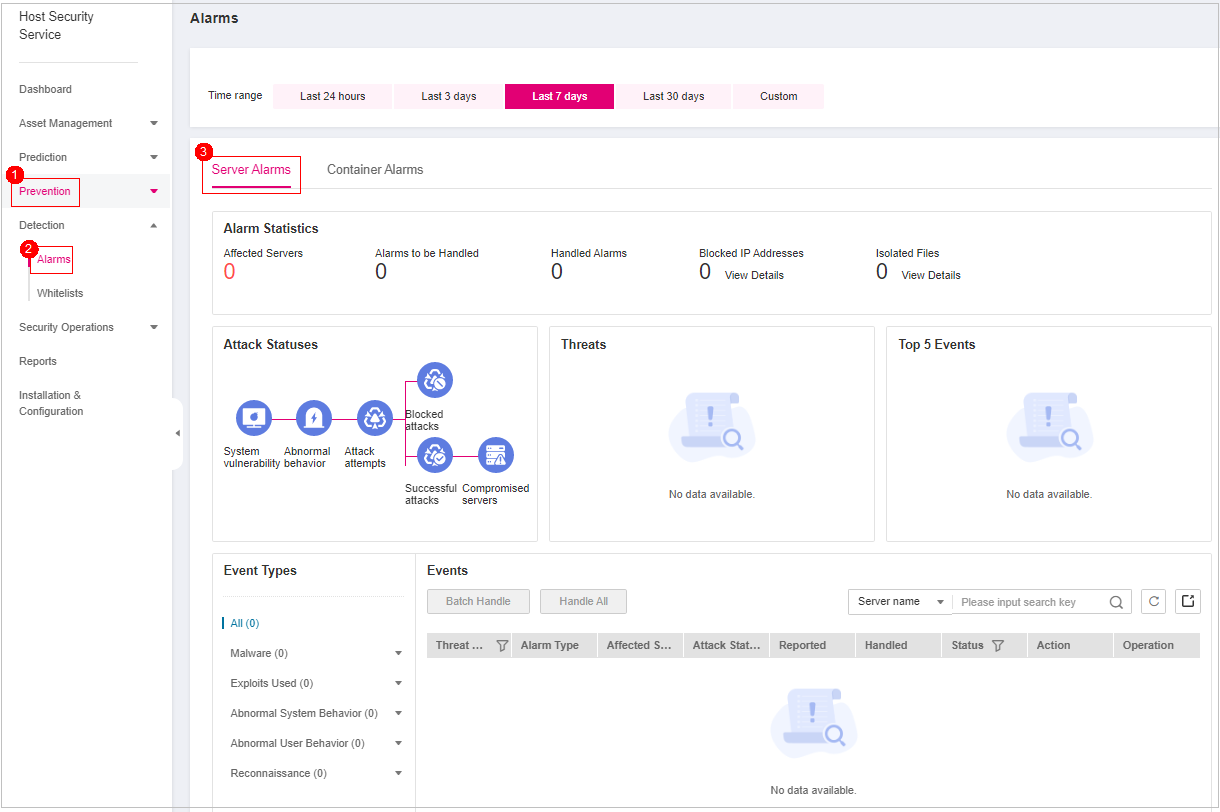
In the navigation pane on the left, choose Detection > Alarms and click Server Alarms.
Note
If your servers are managed by enterprise projects, you can select an enterprise project to view or operate the asset and scan information.

Figure 1 Server alarms
Table 1 Alarm statistics¶ Parameter
Description
Enterprise Project
Select an enterprise project and view alarm details by enterprise project.
Time range
You can select a fixed time period or customize a time period to filter alarms. Only alarms generated within 30 days can be queried.
The options are as follows:
Last 24 hours
Last 3 days
Last 7 days
Last 30 days
Custom
Server Alarms
Affected Servers
Number of servers for which alarms are generated.
Alarms to be Handled
Number of alarms to be handled.
By default, all alarms to be handled are displayed.
Handled Alarms
Number of handled alarms.
Blocked IP Addresses
Number of blocked IP addresses. You can click the number to check blocked IP address list.
The blocked IP address list displays the server name, attack source IP address, login type, blocking status, number of blocks, blocking start time, and the latest blocking time.
If a valid IP address is blocked by mistake (for example, after O&M personnel enter incorrect passwords for multiple times), you can manually unblock it. If a server is frequently attacked, you are advised to fix its vulnerabilities in a timely manner and eliminate risks.
Important
NOTICE:
After a blocked IP address is unblocked, HSS will no longer block the operations performed by the IP address.
A maximum of 10,000 IP addresses can be blocked for each type of software.
If your Linux server does not support ipset, a maximum of 50 IP addresses can be clocked for MySQL and vsftp.
If your Linux server does not support ipset or hosts.deny, a maximum of 50 IP addresses can be blocked for SSH.
Isolated Files
HSS can isolate detected threat files. Files that have been isolated are displayed on a slide-out panel on the Server Alarms page. You can click Isolated Files on the upper right corner to check them.
You can recover isolated files. For details, see Managing Isolated Files.
Container Alarms
Affected Servers
Number of servers for which alarms are generated.
Alarms to be Handled
Number of alarms to be handled.
By default, all alarms to be handled are displayed.
Handled Alarms
Number of handled alarms
Threats
Displays the statistics on alarms by severity.
Critical
High
Medium
Low
Top 5 Events
Displays the top 5 alarm types and their quantities.
Locate an event that can be isolated and killed, click Handle in the Operation column, and select Isolate and Kill in the displayed box.
Note
For details about events that can be isolated and killed, see Server Alarms.
Click OK and isolate and kill the target alarm event.
Files that have been isolated are displayed on a slide-out panel on the Server Alarms page and cannot harm your servers. You can click Isolated Files on the upper right corner to check them.
Checking Isolated Files
In the alarm statistics area on the Server Alarms page, click View Details under Isolated Files to check the isolated files.
Check the servers, names, paths, and modification time of the isolated files.
One-click Restoration
Click restore in the Operation column of the file isolation box list. You can specify that isolated files are removed from the isolation box.
Click OK.
Note
Recovered files will no longer be isolated. Exercise caution when performing this operation.