Common Security Configuration
After protection is enabled, you can configure the common login locations, common login IP addresses, and the SSH login IP address whitelist. You can also enable automatic isolation and killing of malicious programs.
Log in to the management console.
Click
 in the upper left corner of the page, select a region, and choose Security > HSS. The HSS page is displayed.
Configuring Common Login Locations
After you configure common login locations, HSS will generate alarms on the logins from other login locations. A server can be added to multiple login locations.
Choose Installation & Configuration and click the Security Configuration tab. Click Common Login Locations and click Add Common Login Location.
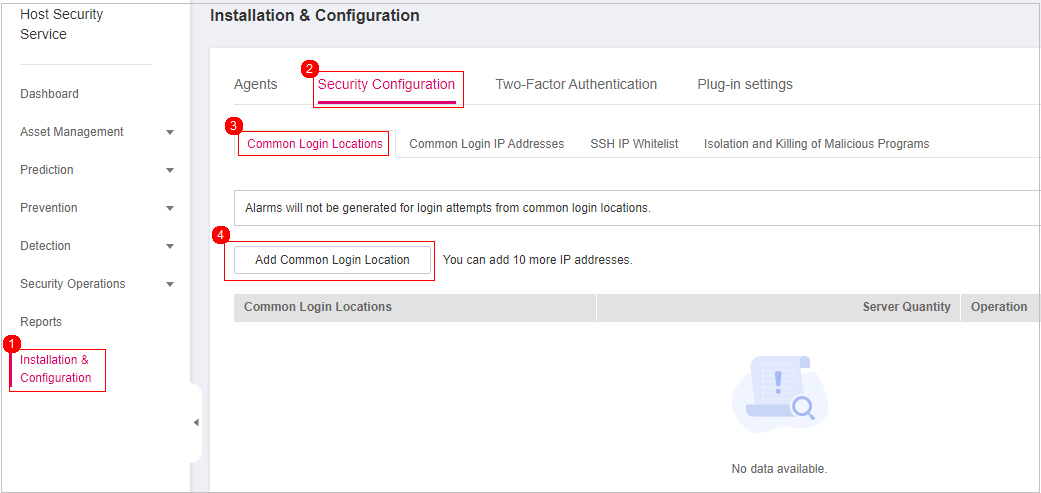
Figure 1 Adding a common login location
In the dialog box that is displayed, select a geographical location and select servers. Confirm the information and click OK.
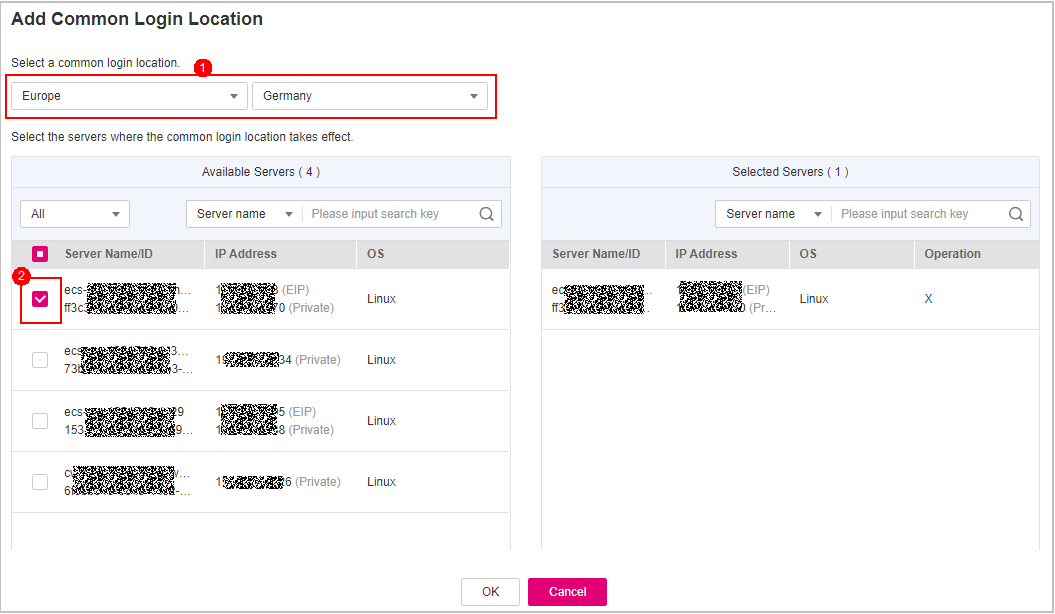
Figure 2 Configuring common login locations
Return to the Security Configuration tab of the Installation & Configuration page. Check whether the added locations are displayed on the Common Login Locations subtab.
Configuring Common Login IP Addresses
After you configure common IP addresses, HSS will generate alarms on the logins from other IP addresses.
Choose Installation & Configuration and click the Security Configuration tab. Click Common Login IP Addresses and click Add Common Login IP Address.
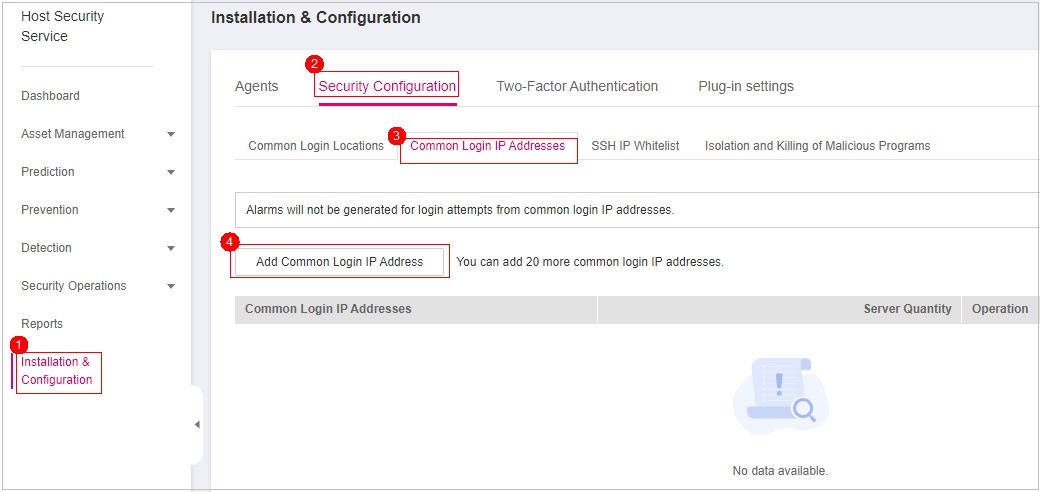
Figure 3 Adding a common login IP address
In the dialog box that is displayed, enter an IP address and select servers. Confirm the information and click OK.
Note
A common login IP address must be a public IP address or IP address segment. Otherwise, you cannot remotely log in to the server in SSH mode.
Only one IP address can be added at a time. To add multiple IP addresses, repeat the operations until all IP addresses are added. Up to 20 IP addresses can be added.
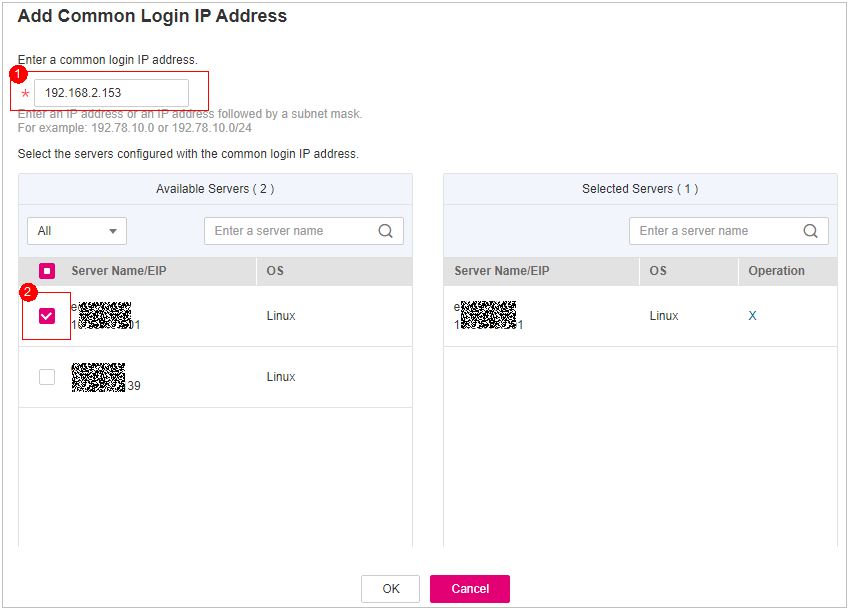
Figure 4 Entering a common login IP address
Return to the Security Configuration tab of the Installation & Configuration page. Check whether the added locations are displayed on the Common Login IP Addresses subtab.
Configuring an SSH Login IP Address Whitelist
The SSH login whitelist controls SSH access to servers to prevent account cracking.
Note
An account can have up to 10 SSH login IP addresses in the whitelist.
After you configure an SSH login IP address whitelist, SSH logins will be allowed only from whitelisted IP addresses.
Before enabling this function, ensure that all IP addresses that need to initiate SSH logins are added to the whitelist. Otherwise, you cannot remotely log in to your server using SSH.
If your service needs to access a server, but not necessarily via SSH, you do not need to add its IP address to the whitelist.
Exercise caution when adding an IP address to the whitelist. This will make HSS no longer restrict access from this IP address to your servers.
Choose Installation & Configuration and click the Security Configuration tab. Click SSH IP Whitelist and click Add IP Address.
In the dialog box that is displayed, enter an IP address and select servers. Confirm the information and click OK.
Note
A common login IP address must be a public IP address or IP address segment. Otherwise, you cannot remotely log in to the server in SSH mode.
Only one IP address can be added at a time. To add multiple IP addresses, repeat the operations until all IP addresses are added.
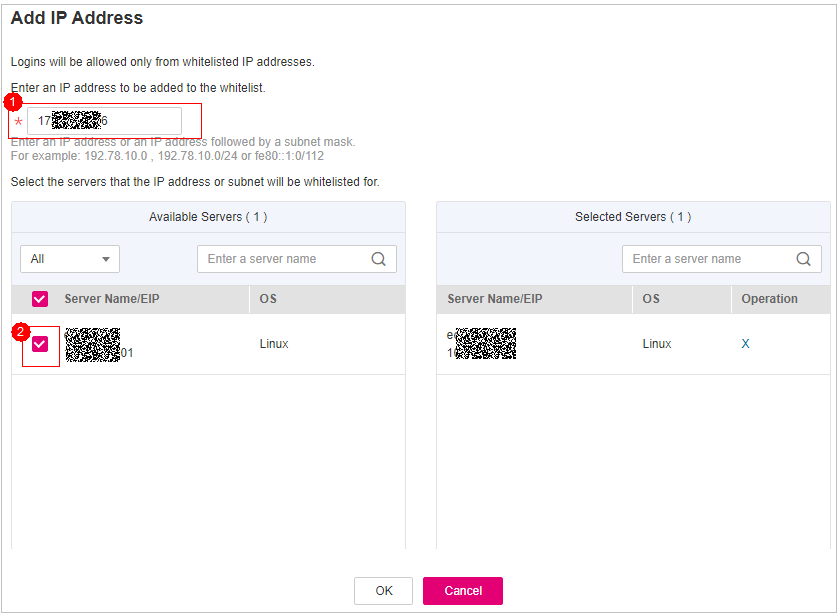
Figure 5 Entering an IP address
Return to the Security Configuration tab of the Installation & Configuration page. Check whether the added locations are displayed on the Common Login IP Addresses subtab.
Isolating and Killing Malicious Programs
HSS automatically isolates and kills identified malicious programs, such as web shells, Trojans, and worms, removing security risks.
Choose Installation & Configuration and click the Security Configuration tab. Click the Isolation and Killing of Malicious Programs tab and enable Isolate and Kill Malicious Programs.
Note
After the cloud scan function is enabled, all HSS servers will be scanned. Some HSS quota editions can support only limited scanning capabilities. Therefore, you are advised to enable the enterprise edition or higher to enjoy all capabilities of the isolation and killing function.
In the confirmation dialog box, click OK to enable the isolation and killing of malicious programs.
Automatic isolation and killing may cause false positives. You can choose Intrusions > Events to view isolated malicious programs. You can cancel the isolation or ignore misreported malicious programs.
Important
When a program is isolated and killed, the process of the program is terminated immediately. To avoid impact on services, check the detection result, and cancel the isolation of or unignore misreported malicious programs (if any).
If Isolate and Kill Malicious Programs is set to Disable on the Isolation and Killing of Malicious Programs tab, HSS will generate an alarm when it detects a malicious program.
To isolate and kill the malicious programs that triggered alarms, choose Intrusions > Events and click Malicious program.
Enabling 2FA
Two-factor authentication (2FA) requires users to provide verification codes before they log in. The codes will be sent to their mobile phones or email boxes.
You have to choose an SMN topic for servers where 2FA is enabled. The topic specifies the recipients of login verification codes, and HSS will authenticate login users accordingly.
Prerequisites
You have created a message topic whose protocol is SMS or email.
Server protection has been enabled.
To enable 2FA, you need to disable the SELinux firewall.
Constraints and Limitations
If 2FA is enabled, it can be used only in following scenarios:
Linux: The SSH password is used to log in to an ECS, and the OpenSSH version is earlier than 8.
Windows: The RDP file is used to log in to a Windows ECS.
Procedure
On the Two-Factor Authentication tab, select servers and click Enable 2FA. Alternatively, click Enable in the Operation column.
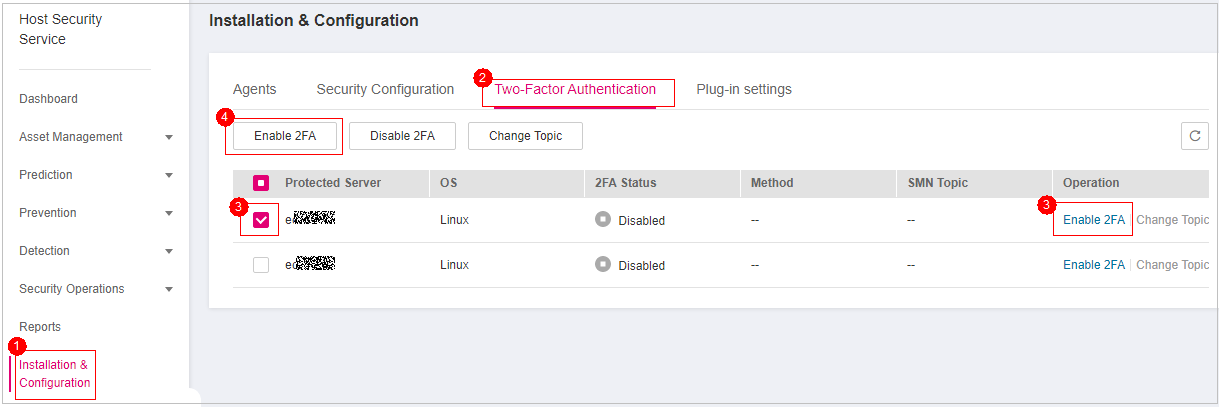
Figure 6 Enabling 2FA
In the displayed Enable 2FA dialog box, select an authentication mode.
SMS/Email
You need to select an SMN topic for SMS and email verification.
The drop-down list displays only notification topics that have been confirmed.
If there is no topic, click View to create one.
During authentication, all the mobile numbers and email addresses specified in the topic will receive a verification SMS or email. You can delete mobile numbers and email addresses that do not need to receive verification messages.
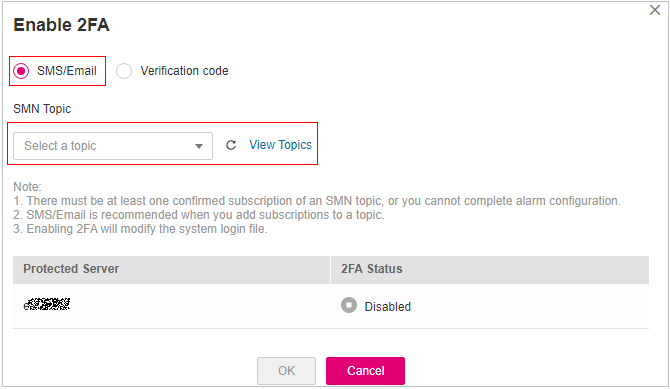
Figure 7 SMS/Email
Verification code
Use the verification code you receive in real time for verification.
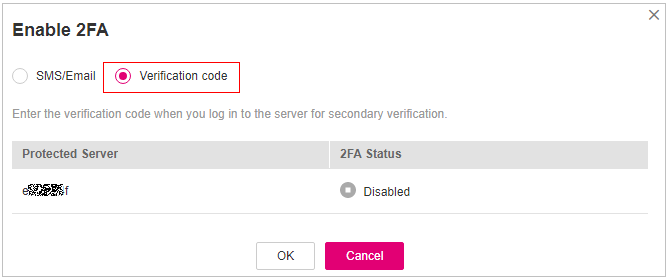
Figure 8 Setting Method to Verification code
Click OK. After 2FA is enabled, it takes about 5 minutes for the configuration to take effect.
Important
When you log in to a remote Windows server from another Windows server where 2FA is enabled, you need to manually add credentials on the latter. Otherwise, the login will fail.
To add credentials, choose Start > Control Panel, and click User Accounts. Click Manage your credentials and then click Add a Windows credential. Add the username and password of the remote server that you want to access.