Creating a Function from Scratch and Executing the Function
This section describes how to quickly create and test a HelloWorld function on the FunctionGraph console.
Prerequisites
Grant the FunctionGraph operation permissions to the user.
To perform the operations described in this section, ensure that you have the FunctionGraph FullAccess permissions, that is, all permissions for FunctionGraph. For more information, see section "Permissions Management".
Step 1: Create a Function
Log in to the FunctionGraph console. In the navigation pane, choose Functions > Function List.
Click Create Function in the upper right corner and choose Create from scratch.
Configure basic function information by referring to Figure 1. Then, click Create Function.
Table 1 Parameters required for creating a function¶ Parameter
Description
Example Value
Function Type
Select Event Function.
An event function is triggered by a specific event, which is usually a request event in JSON format.
Event Function
Region
Select the region where the function is located.
Regions are geographic areas isolated from each other. Resources are region-specific and cannot be used across regions through internal network connections. Select a region near you to ensure the lowest latency possible.
eu-de
Function Name
Enter a function name. The naming rules are as follows:
Consists of 1 to 60 characters, and can contain letters, digits, hyphens (-), and underscores (_).
Start with a letter and end with a letter or digit.
HelloWorld
Enterprise Project
Select the enterprise project to which the function belongs. Enterprise projects let you manage cloud resources and users by project.
The default value is default. You can select the created enterprise project.
default
Agency
Select an agency for the function. An agency is used to authorize FunctionGraph to access other cloud services. If FunctionGraph does not access any cloud service, you do not need to select an agency.
By default, Use no agency is used. You can select an existing agency.
Use no agency
Permission Policies
This parameter is displayed only when an agency is selected.
For details about how to adjust the permission policies on the IAM console, see section "Configuring Agency Permissions".
-Runtime
Select a runtime to compile the function.
CloudIDE supports only online editing of Node.js, Python, PHP, and custom runtimes.
After a function is created, the runtime language cannot be changed.
Node.js 16.17
Advanced Settings: Collect Logs is disabled by default. If it is enabled, function execution logs will be reported to Log Tank Service (LTS). You will be billed for log management on a pay-per-use basis.
Table 2 Parameters for configuring Collect Logs¶ Parameter
Description
Log Configuration
You can select Auto or Custom.
Auto: Use the default log group and log stream. Log groups prefixed with "functiongraph.log.group" are filtered out.
Custom: Select a custom log group and log stream. Log streams that are in the same enterprise project as your function.
Log Tag
You can use these tags to filter function logs in LTS. You can add 10 more tags.
Tag key/value: Enter a maximum of 64 characters. Only digits, letters, underscores (_), and hyphens (-) are allowed.
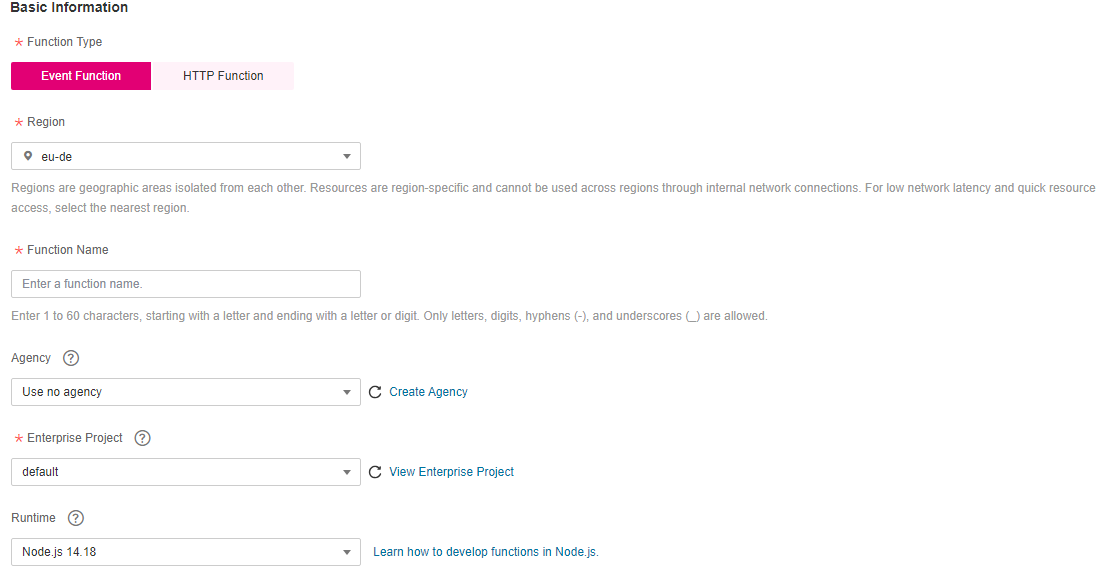
Figure 1 Configuring basic information
Configure the code source, copy the following code to the code window, and click Deploy.
The sample code enables you to obtain test events and print test event information.
exports.handler = function (event, context, callback) {
    const error = null;
    const output = `Hello message: ${JSON.stringify(event)}`;
    callback(error, output);
}
Step 2: Test the Function
On the function details page, click Test. In the displayed dialog box, create a test event.
Select blank-template, set Event Name to test, modify the test event as follows, and click Create.
{
    "hello": "function"
}
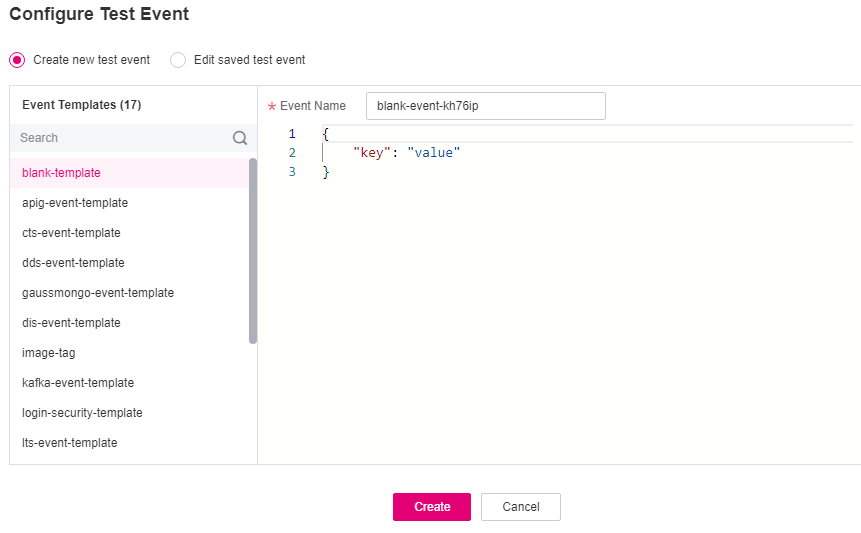
Figure 2 Configuring a test event
Step 3: View the Execution Result
Click Test and view the execution result on the right.
Function Output: displays the return result of the function.
Log Output: displays the execution logs of the function.
Summary: displays key information of the logs.
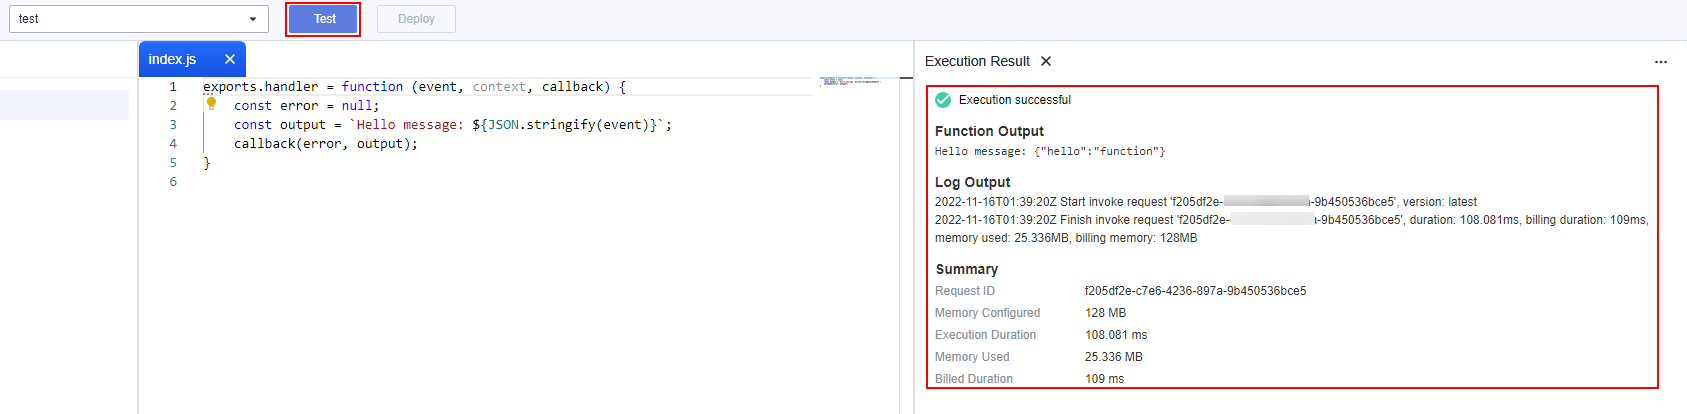
Figure 3 Viewing the execution result
Note
A maximum of 2 KB logs can be displayed. For more log information, see Querying Function Logs.