Extending Disk Partitions and File Systems (Windows Server 2016)
Scenarios
After a disk is expanded on the management console, the disk size is enlarged, but the additional space cannot be used directly.
In Windows, you must allocate the additional space to an existing partition or a new partition.
If the disk capacity is expanded on a stopped server, the additional space of a Windows system disk or Windows data disk will be automatically added to the partition at the end of the disk upon the server startup. In this case, the additional space can be used directly.
This section uses Windows Server 2016 Standard 64bit as the sample OS to describe the expansion methods:
For a system disk:
If volume (C:) already exists, you can add the additional space to volume (C:) and use it as a system volume. For details, see System Disk: Add the Additional Space to the Original Volume.
If volume (C:) already exists, you can create a new volume such as volume (F:) with the additional space and use the new volume as a data volume. For details, see System Disk: Create a New Volume with the Additional Space.
For a data disk:
If volume (D:) already exists, you can add the additional space to volume (D:) and use it as a data volume. For details, see Data Disk: Add the Additional Space to the Original Volume.
If volume (D:) already exists, you can create a new volume such as volume (E:) with the additional space and use the new volume as a data volume. For details, see Data Disk: Create a New Volume with the Additional Space.
The method for allocating the additional space varies with the server OS. This section is used for reference only. For detailed operations and differences, see the corresponding OS documents.
Important
Performing the expansion operations with caution. Incorrect operations may lead to data loss or exceptions. So you are advised to back up the disk data using CBR or snapshots before expansion. For details about using CBR, see Managing EVS Backups. For details about using snapshots, see Creating a Snapshot.
Prerequisites
You have expanded the disk capacity and attached the disk to a server on the management console. For details, see Expanding Capacity for an In-use EVS Disk or Expanding Capacity for an Available EVS Disk.
You have logged in to the server.
For how to log in to an ECS, see the Elastic Cloud Server User Guide.
For how to log in to a BMS, see the Bare Metal Server User Guide.
System Disk: Add the Additional Space to the Original Volume
In this example, the system disk has 40 GiB originally, and 30 GiB is added on the management console. The following procedure describes how to add this 30 GiB to volume (C:) on the server. After the operation is complete, volume (C:) will have 70 GiB of capacity and can be used as a system volume.
On the desktop of the server, right-click the start icon in lower left corner and choose Disk Management.
The Disk Management window is displayed.
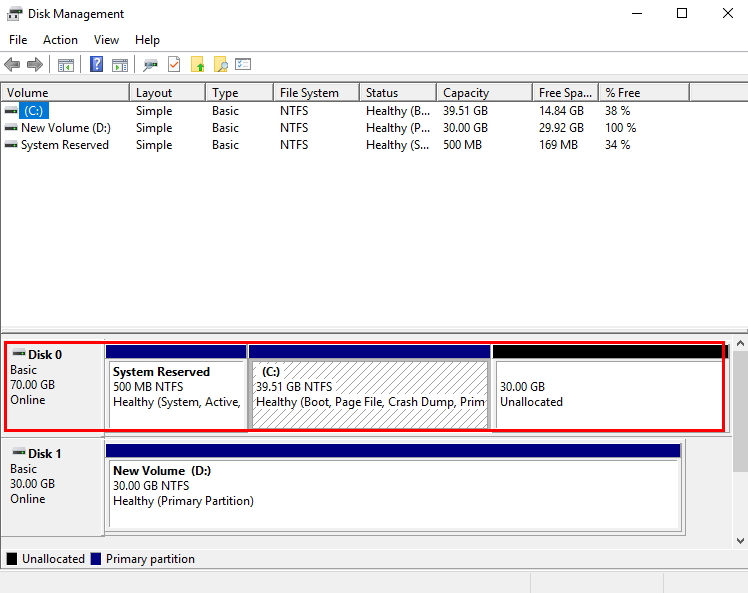
Figure 1 Disk Management (Windows Server 2016)
Note
If you cannot see the additional space, right-click Disk Management and choose Refresh from the shortcut menu.
On the Disk Management page, select the disk and volume that you want to extend. The current volume size and unallocated space are displayed.
Right-click the target volume and choose Extend Volume.
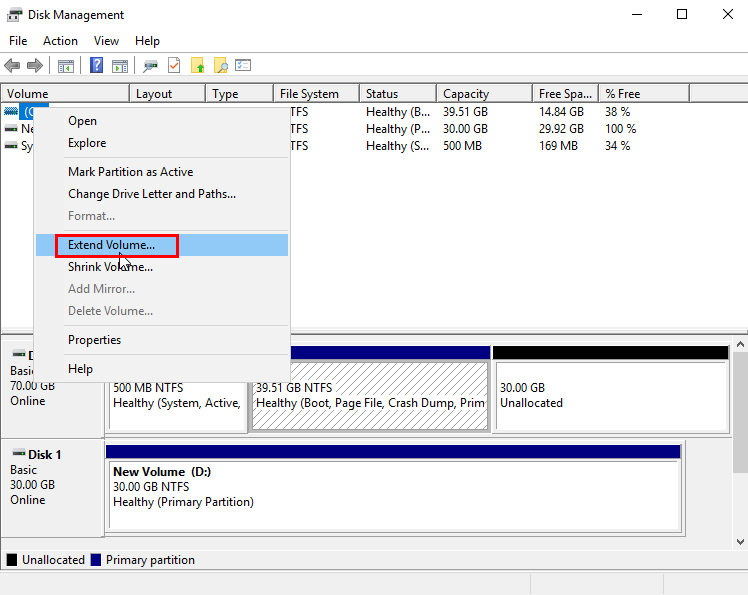
Figure 2 Choosing Extend Volume (Windows Server 2016)
On the displayed Extend Volume Wizard window, click Next.
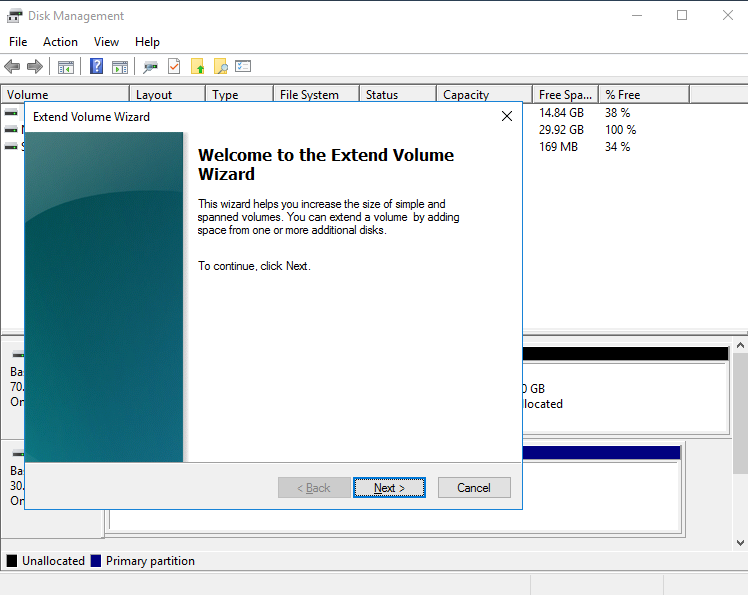
Figure 3 Extend Volume Wizard (Windows Server 2016)
In the text box to the right of Select the amount of space in MB, enter the amount of the additional space and click Next.
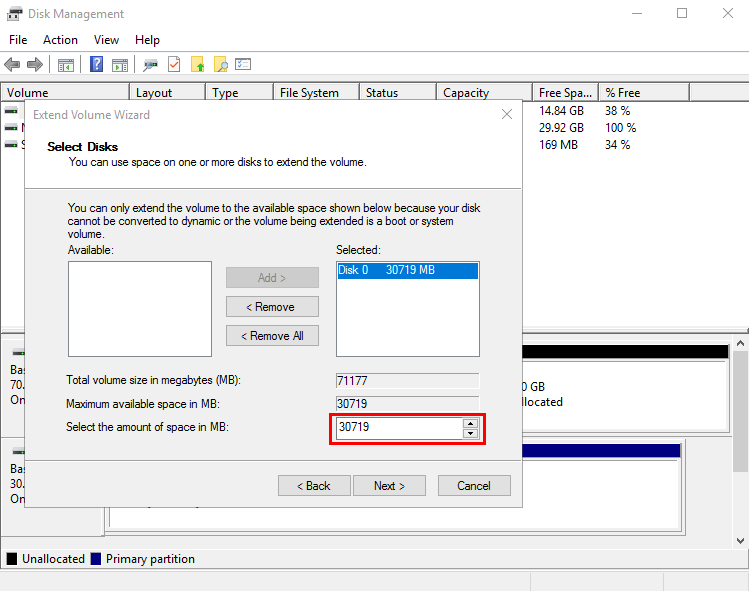
Figure 4 Selecting space (Windows Server 2016)
Click Finish.
After the expansion succeeded, the partition size is larger than the original size.
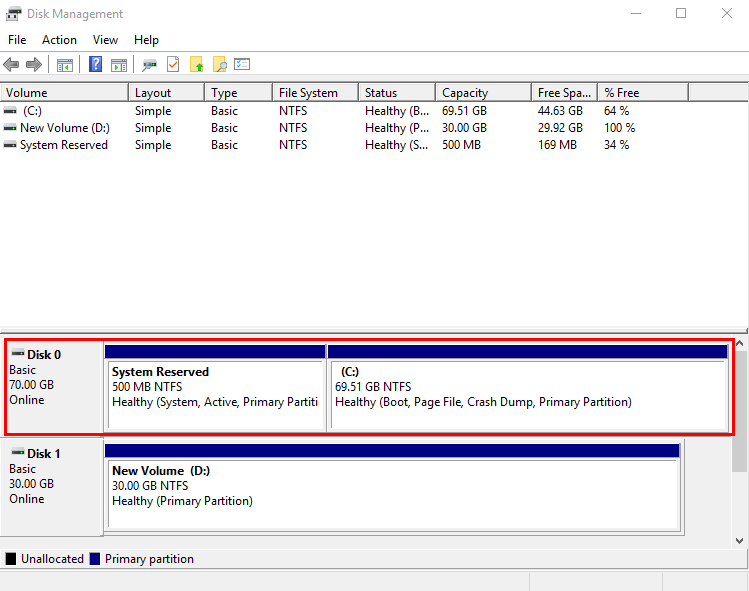
Figure 5 Capacity expansion succeeded (Windows Server 2016)
System Disk: Create a New Volume with the Additional Space
In this example, the system disk has 40 GiB originally, and 60 GiB is added on the management console. The following procedure describes how to use this 60 GiB to create a new volume, for example volume (F:), on the server. After the operation is complete, new volume (F:) has 60 GiB of capacity and can be used as a data volume.
On the desktop of the server, right-click the start icon in lower left corner and choose Disk Management.
The Disk Management window is displayed.
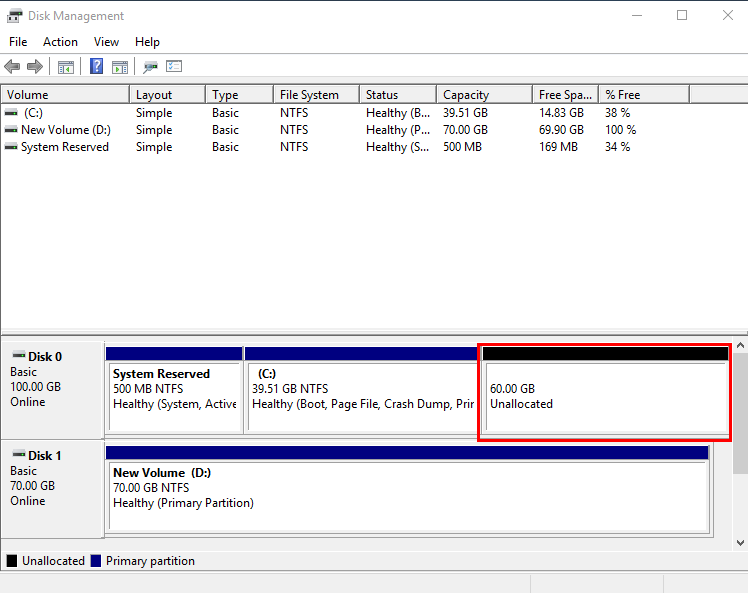
Figure 6 Unallocated disk space (Windows Server 2016 system disk)
Note
If you cannot see the additional space, right-click Disk Management and choose Refresh from the shortcut menu.
In the Unallocated area of Disk 0, right-click the blank area and choose New Simple Volume.
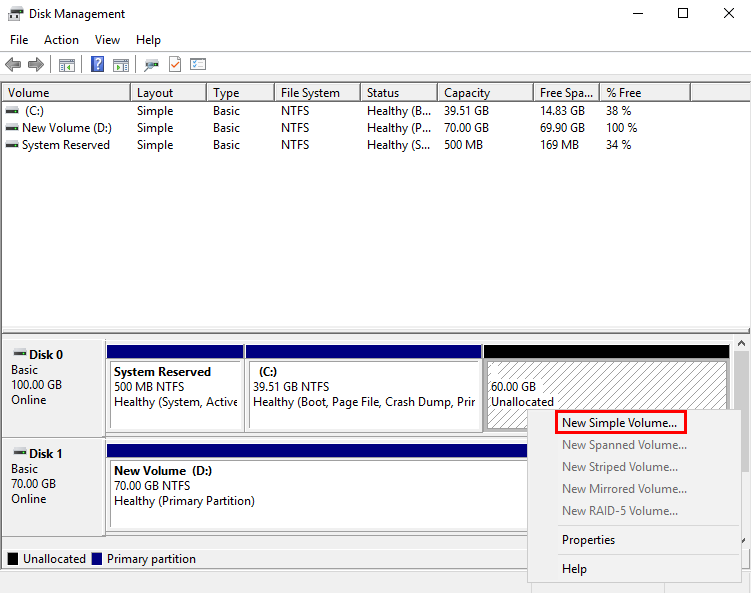
Figure 7 New Simple Volume (Windows Server 2016 system disk)
On the displayed New Simple Volume Wizard window, click Next.
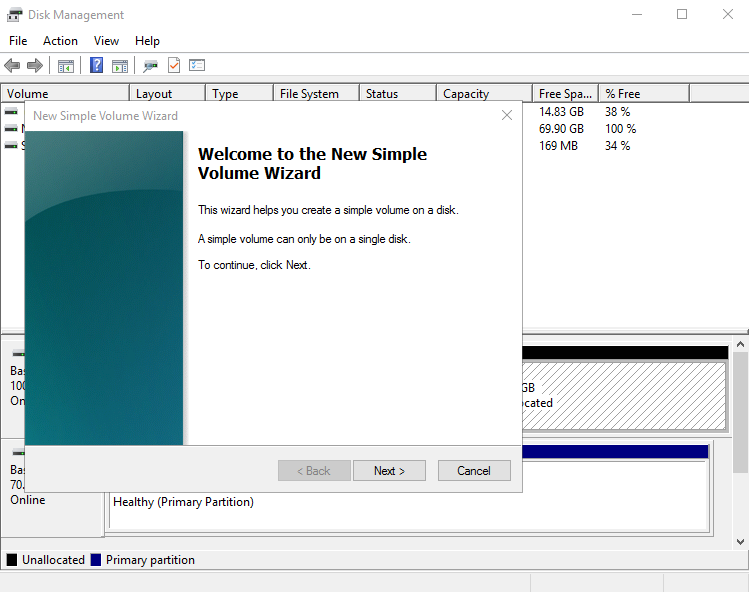
Figure 8 New Simple Volume Wizard (Windows Server 2016 system disk)
On the displayed Specify Volume Size page, set Simple volume size in MB and click Next. In this example, the default size is used.
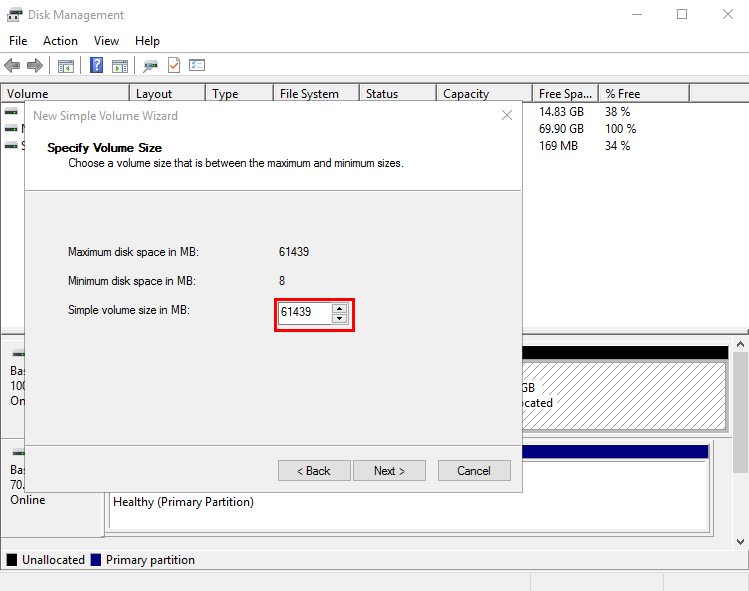
Figure 9 Specify Volume Size (Windows Server 2016 system disk)
On the displayed Assign Drive Letter and Path page, click Assign the following drive letter, select a drive letter, and click Next. In this example, drive letter F is selected.
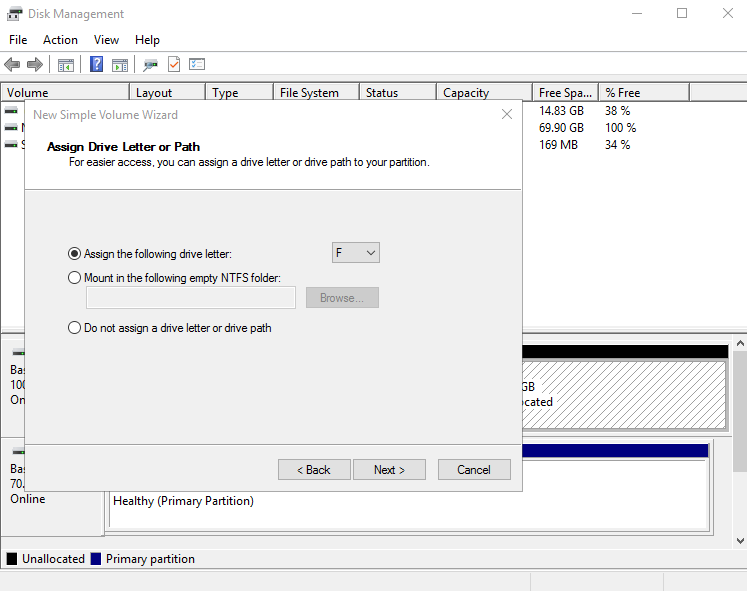
Figure 10 Assign Drive Letter or Path (Windows Server 2016 system disk)
On the displayed Format Partition page, click Format this volume with the following settings, set parameters based on the requirements, and select Perform a quick format. Then, click Next.
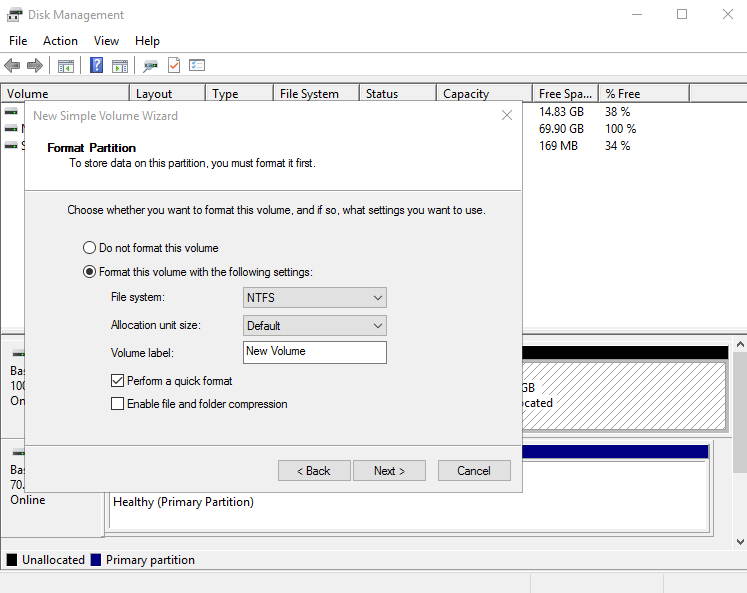
Figure 11 Format Partition (Windows Server 2016 system disk)
Click Finish.
After the expansion succeeded, new volume (F:) is displayed.
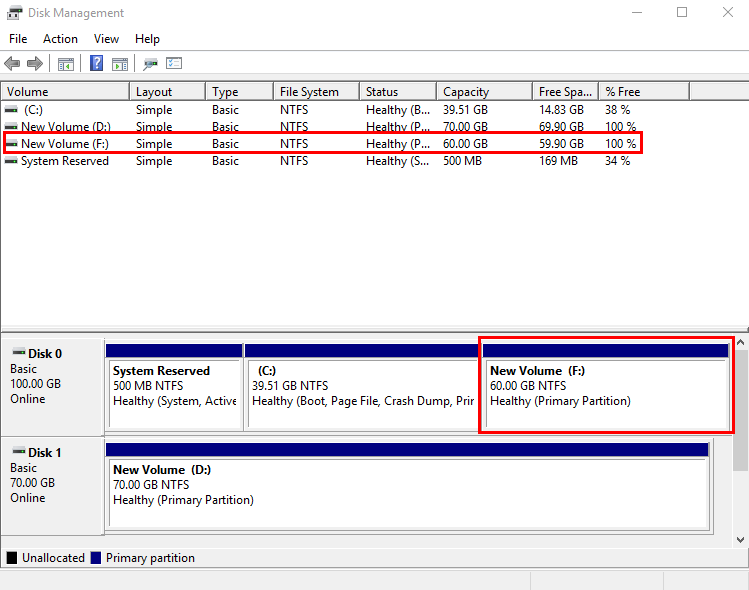
Figure 12 Volume (F:) (Windows Server 2016)
Data Disk: Add the Additional Space to the Original Volume
In this example, the data disk has 30 GiB originally, and 50 GiB is added on the management console. The following procedure describes how to add this 50 GiB to volume (D:) on the server. After the operation is complete, volume (D:) has 80 GiB of capacity and can be used as a data volume.
On the desktop of the server, right-click the start icon in lower left corner and choose Disk Management.
The Disk Management window is displayed.
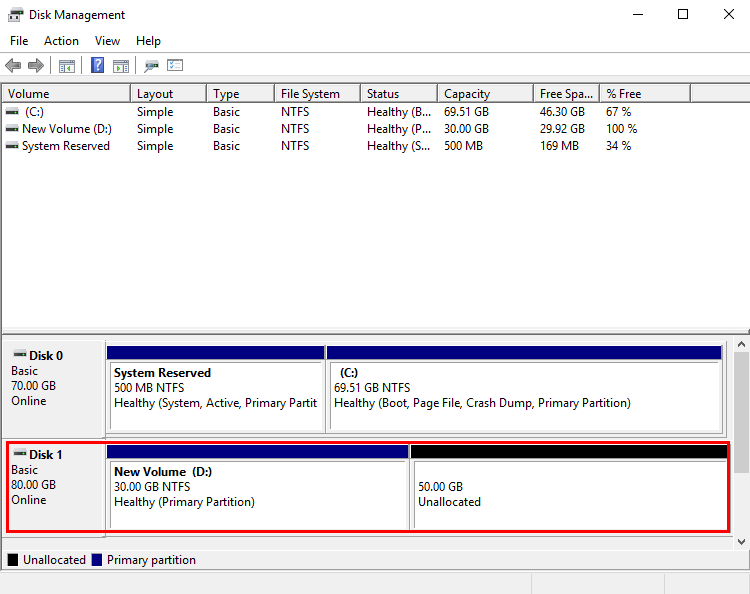
Figure 13 Disk Management (Windows Server 2016 data disk)
Note
If you cannot see the additional space, right-click Disk Management and choose Refresh from the shortcut menu.
On the Disk Management page, select the disk and volume that you want to extend. The current volume size and unallocated space are displayed.
Right-click the target volume and choose Extend Volume.
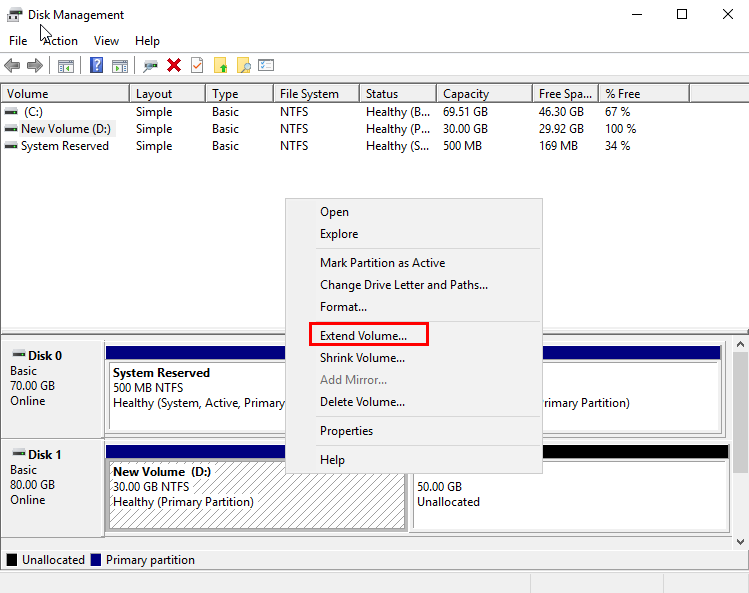
Figure 14 Choosing Extend Volume (Windows Server 2016 operating system)
On the displayed Extend Volume Wizard window, click Next.
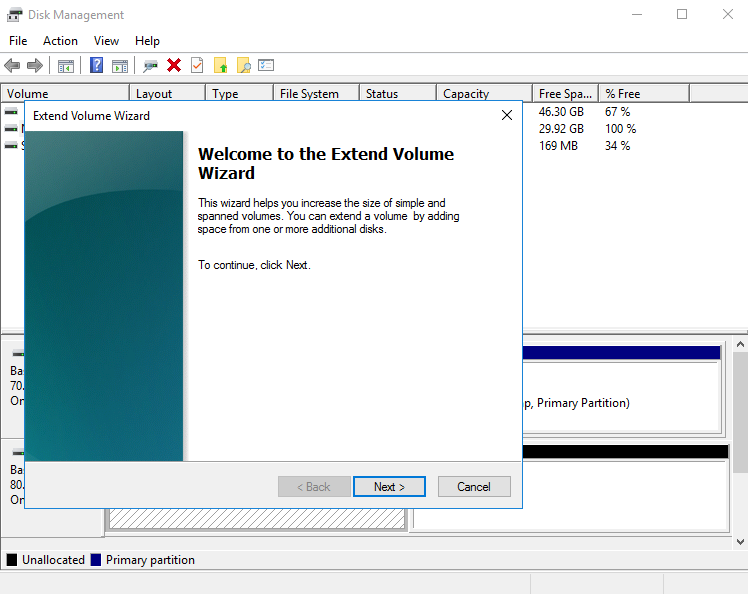
Figure 15 Extend Volume Wizard (Windows Server 2016 operating system)
In the text box to the right of Select the amount of space in MB, enter the amount of the additional space and click Next.
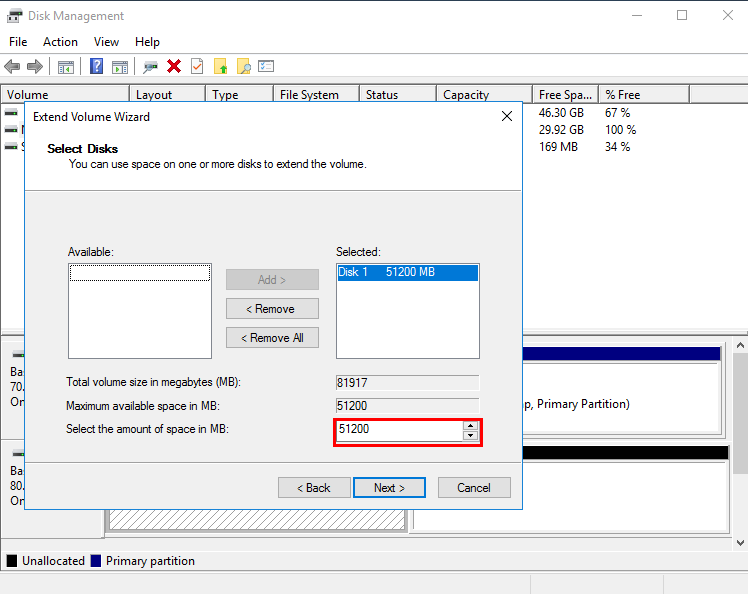
Figure 16 Selecting space (Windows Server 2016 operating system)
Click Finish.
After the expansion succeeded, the partition size is larger than the original size.
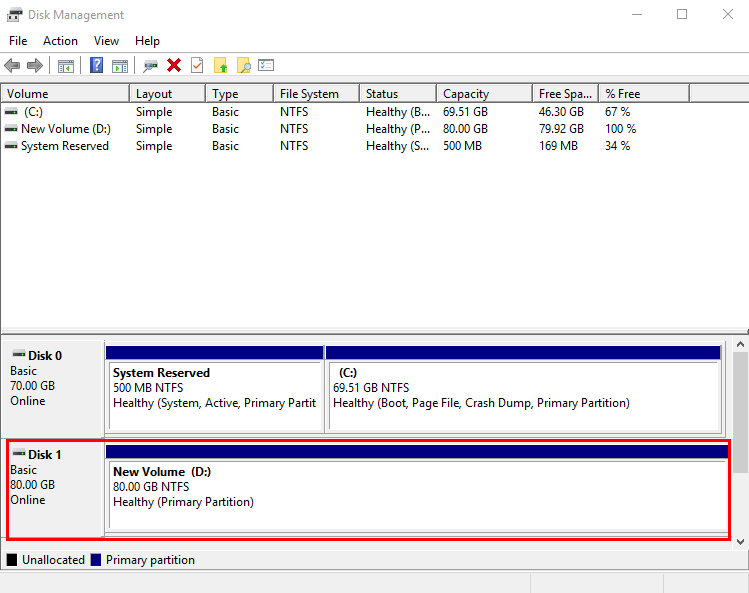
Figure 17 Capacity expansion succeeded (Windows Server 2016 operating system)
Data Disk: Create a New Volume with the Additional Space
In this example, the data disk has 80 GiB originally, and 50 GiB is added on the management console. The following procedure describes how to use this 50 GiB to create a new volume, for example volume (E:), on the server. After the operation is complete, new volume (E:) has 50 GiB of capacity and can be used as a data volume.
On the desktop of the server, right-click the start icon in lower left corner and choose Disk Management.
The Disk Management window is displayed.
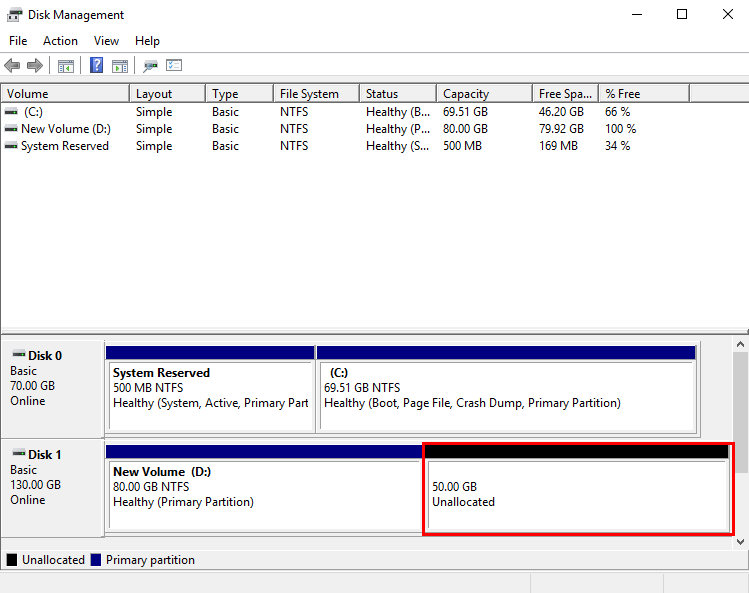
Figure 18 Unallocated disk space (Windows Server 2016 data disk)
Note
If you cannot see the additional space, right-click Disk Management and choose Refresh from the shortcut menu.
In the Unallocated area of Disk 1, right-click the blank area and choose New Simple Volume.
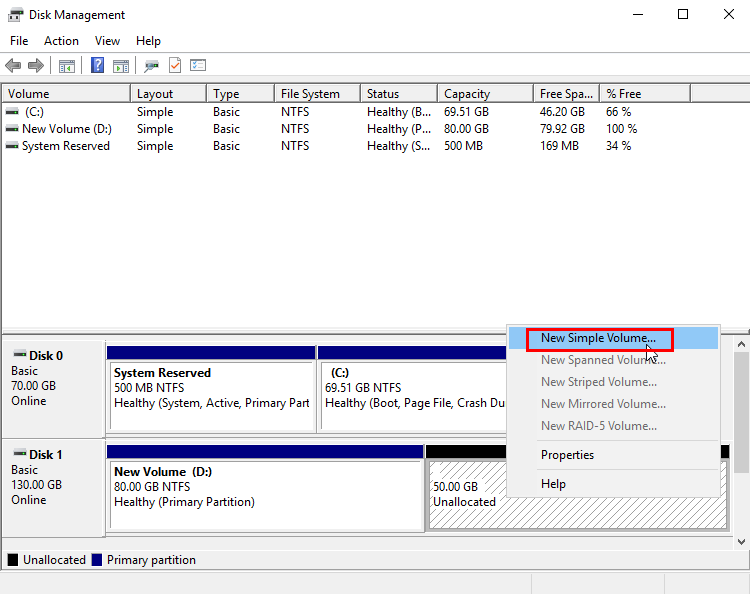
Figure 19 New Simple Volume (Windows Server 2016 data disk)
On the displayed New Simple Volume Wizard window, click Next.
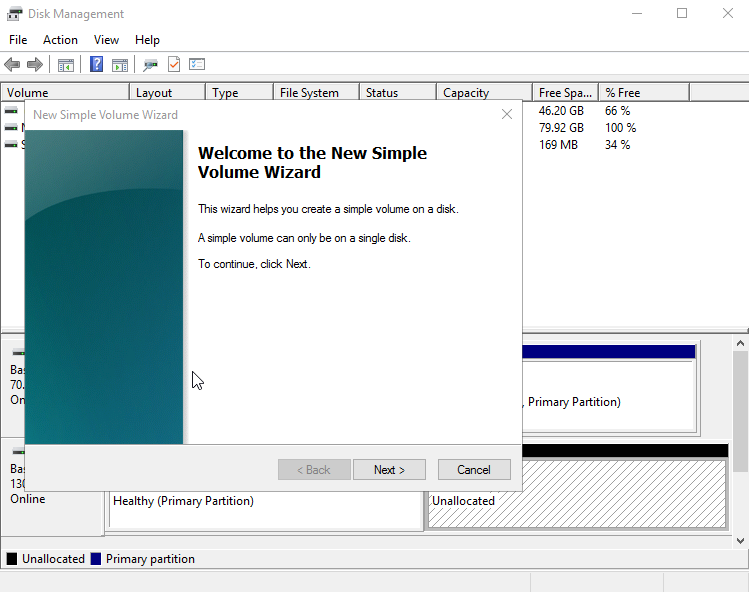
Figure 20 New Simple Volume Wizard (Windows Server 2016 data disk)
On the displayed Specify Volume Size page, set Simple volume size in MB and click Next. In this example, the default size is used.
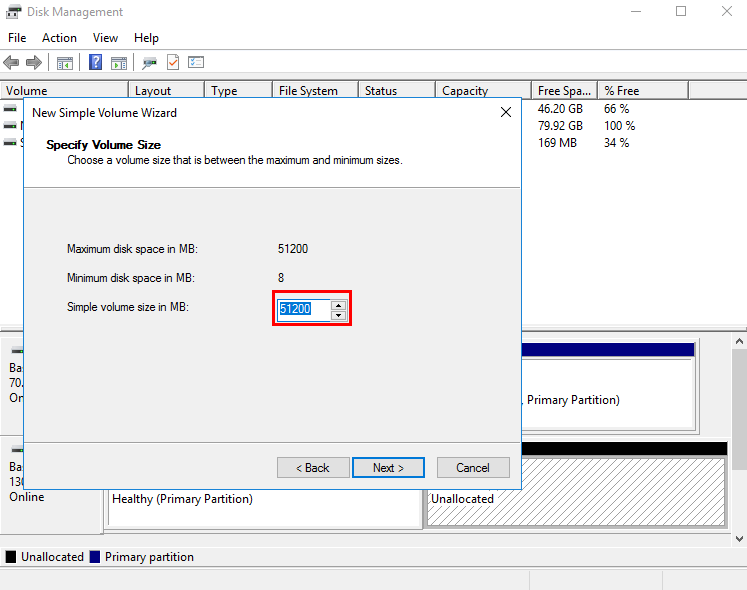
Figure 21 Specify Volume Size (Windows Server 2016 data disk)
On the displayed Assign Drive Letter and Path page, click Assign the following drive letter, select a drive letter, and click Next. In this example, drive letter E is selected.
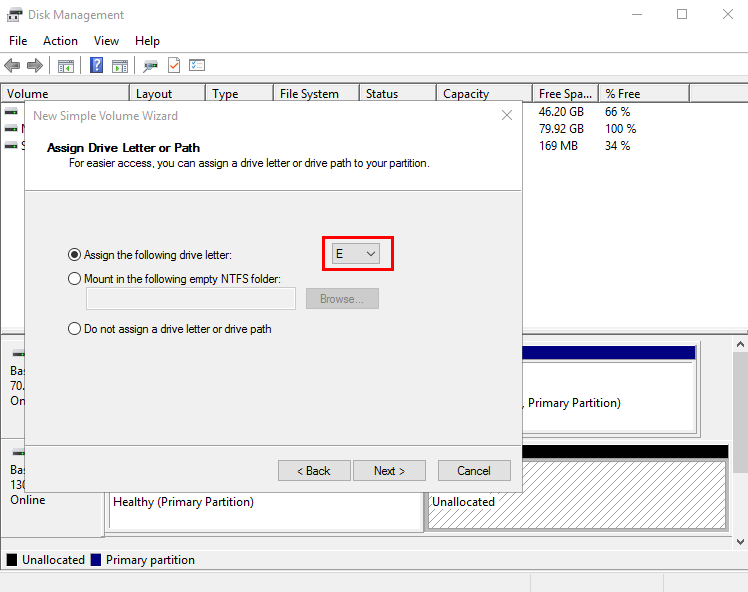
Figure 22 Assign Drive Letter or Path (Windows Server 2016 data disk)
On the displayed Format Partition page, click Format this volume with the following settings, set parameters based on the requirements, and select Perform a quick format. Then, click Next.
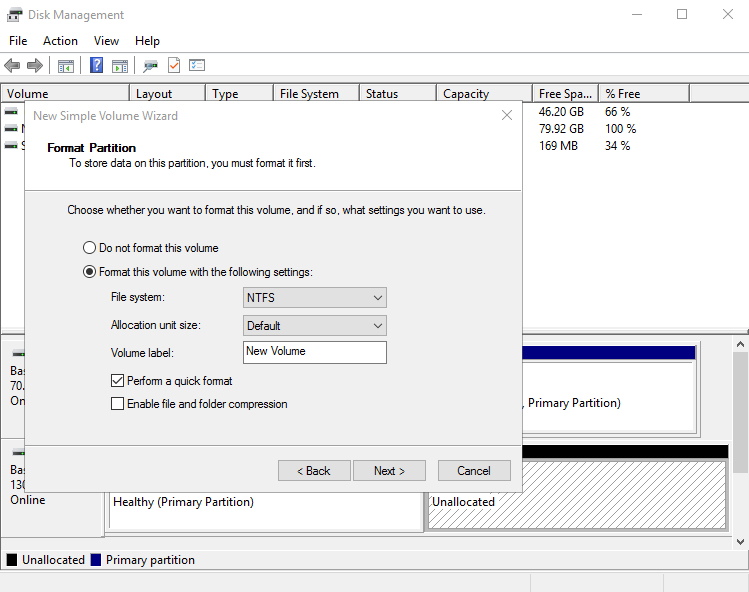
Figure 23 Format Partition (Windows Server 2016 data disk)
Click Finish.
After the expansion succeeded, new volume (E:) is displayed.
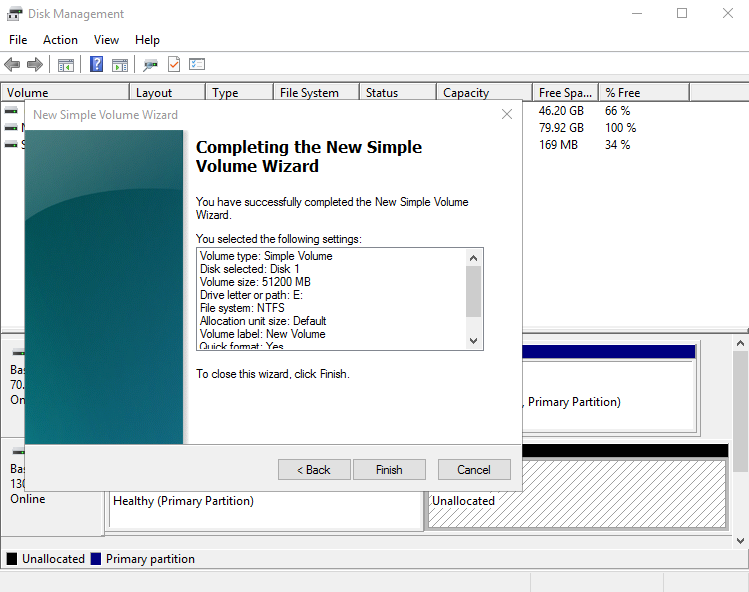
Figure 24 Completed
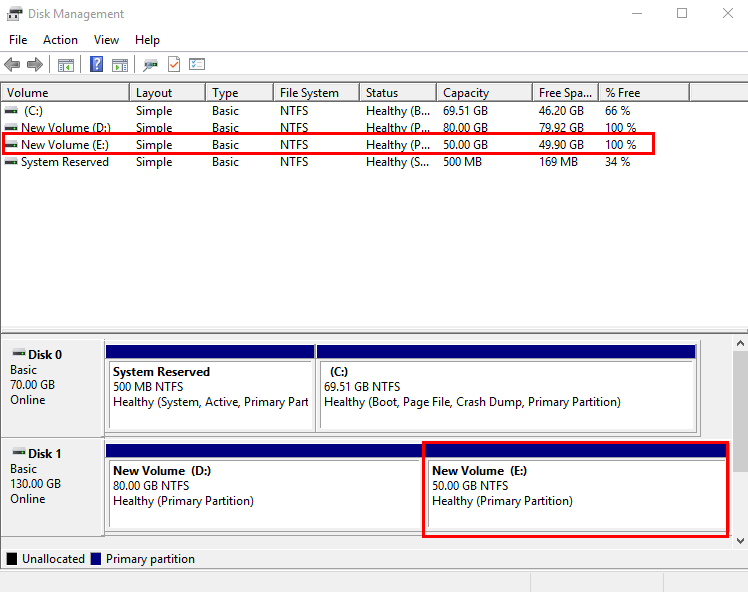
Figure 25 New Volume (E:)