How Can I Transfer the IP Address of a Client?
When you use ELB to route requests to backend servers, IP addresses of the clients will be translated by the ELB. This FAQ guides you to obtain the IP addresses of the clients.
Load balancing at Layer 7 (HTTP or HTTPS listeners): Configure the application server and obtain the IP address of a client from the HTTP header.
For details, see Layer 7 Load Balancing.
For load balancing at Layer 4 (TCP/UDP), you can enable Transfer Client IP Address to obtain the source IP address.
Constraints and Limitations
If Network Address Translation (NAT) is used, you cannot obtain the IP addresses of the clients.
If the client is a container, you can obtain only the IP address of the node where the container is located, but cannot obtain the IP address of the container.
If Transfer Client IP Address is enabled for TCP or UDP listeners, a cloud server cannot be used as a backend server and a client at the same time.
By default, the Transfer Client IP Address function is enabled for TCP and UDP listeners of dedicated load balancers and cannot be disabled.
Layer 7 Load Balancing
Configure the application server and obtain the IP address of a client from the HTTP header.
The real IP address is placed in the X-Forwarded-For header field by the load balancer in the following format:
X-Forwarded-For: IP address of the client,Proxy server 1-IP address,Proxy server 2-IP address,...
If you use this method, the first IP address obtained is the IP address of the client.
Apache Server
Install Apache 2.4.
For example, if CentOS 7.5 is used as the OS, run the following command to install the software:
yum install httpd
Add the following content to the end of Apache configuration file /etc/httpd/conf/httpd.conf:
LoadModule remoteip_module modules/mod_remoteip.so
RemoteIPHeader X-Forwarded-For
RemoteIPInternalProxy 100.125.0.0/16

Figure 1 Content to be added
Note
Add the IP address range of the proxy server after RemoteIPInternalProxy.
Shared load balancers: 100.125.0.0/16 and the IP address range used by the AAD service. Load balancers use IP addresses in 100.125.0.0/16 to communicate with backend servers, and there are no security risks. Use commas (,) to separate multiple entries.
Dedicated load balancers: CIDR block of the subnet where the load balancer resides
Change the log output format in the Apache configuration file to the following (%a indicates the source IP address):
LogFormat "%a %l %u %t \"%r\" %>s %b \"%{Referer}i\" \"%{User-Agent}i\"" combined
Restart Apache.
systemctl restart httpd
Obtain the actual IP address of the client from the httpd access logs.
Nginx Server
For example, if CentOS 7.5 is used as the OS, run the following command to install the software:
Run the following commands to install http_realip_module:
yum -y install gcc pcre pcre-devel zlib zlib-devel openssl openssl-devel
wget http://nginx.org/download/nginx-1.17.0.tar.gz
tar zxvf nginx-1.17.0.tar.gz
cd nginx-1.17.0
./configure --prefix=/path/server/nginx --with-http_stub_status_module --without-http-cache --with-http_ssl_module --with-http_realip_module
make
make install
Run the following command to open the nginx.conf file:
vi /path/server/nginx/conf/nginx.conf
Add new fields and information to the end of the following configuration information:
Add the following information under http or server:
set_real_ip_from 100.125.0.0/16;
real_ip_header X-Forwarded-For;
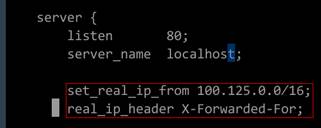
Figure 2 Adding information
Note
Add the IP address range of the proxy server after set_real_ip_from <IP_address>.
Shared load balancers: 100.125.0.0/16 and the IP address range used by the AAD service. Load balancers use IP addresses in 100.125.0.0/16 to communicate with backend servers, and there are no security risks. Use commas (,) to separate multiple entries.
Dedicated load balancers: CIDR block of the subnet where the load balancer resides
Start Nginx.
/path/server/nginx/sbin/nginx
Obtain the actual IP address of the client from the Nginx access logs.
cat /path/server/nginx/logs/access.log
Tomcat Servers
In the following operations, the Tomcat installation path is /usr/tomcat/tomcat8/.
Log in to a server on which Tomcat is installed.
Check whether Tomcat is running properly.
ps -ef|grep tomcat
netstat -anpt|grep java
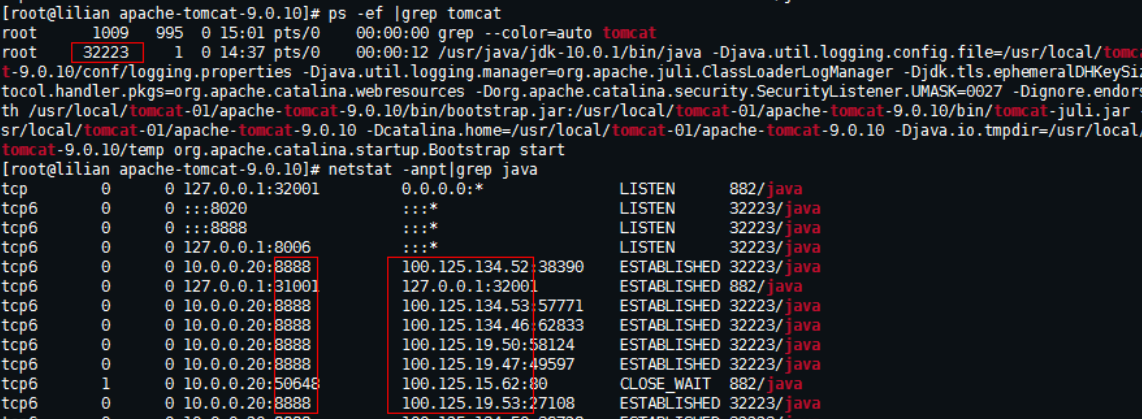
Figure 3 Tomcat running properly
Modify className="org.apache.catalina.valves.AccessLogValve" in the server.xml file as follows:
vim /usr/tomcat/tomcat8/conf/server.xml
<Valve className="org.apache.catalina.valves.AccessLogValve" directory="logs"
prefix="localhost_access_log." suffix=".txt"
pattern="%{X-FORWARDED-FOR}i %l %u %t %r %s %b %D %q %{User-Agent}i %T" resolveHosts="false" />

Figure 4 Example configuration
Restart the Tomcat service.
cd /usr/tomcat/tomcat8/bin && sh shutdown.sh && sh startup.sh
/usr/tomcat/tomcat8/ is where Tomcat is installed. Change it based on site requirements.

Figure 5 Restarting the Tomcat service
View the latest logs.
As highlighted in the following figure, IP addresses that are not in the IP address range starting with 100.125 are the source IP addresses.
cd /usr/tomcat/tomcat8/logs/
cat localhost_access_log..2021-11-29.txt
In this command, localhost_access_log..2021-11-29.txt indicates the log path of the current day. Change it based on site requirements.

Figure 6 Querying the source IP address
Windows Server with IIS Deployed
The following uses Windows Server 2012 with IIS7 as an example to describe how to obtain the source IP address.
Download and install IIS.
Download the F5XForwardedFor.dll plug-in and copy the plug-ins in the x86 and x64 directories to a directory for which IIS has the access permission, for example, C:\F5XForwardedFor2008.
Open the Server Manager and choose Modules > Configure Native Modules.
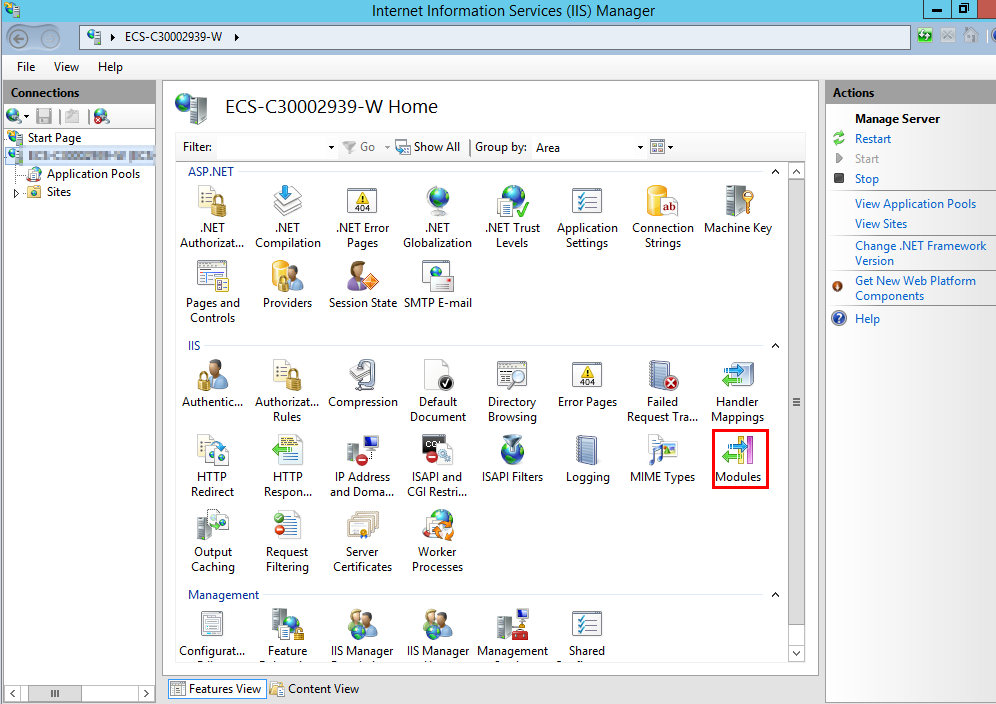
Figure 7 Selecting modules
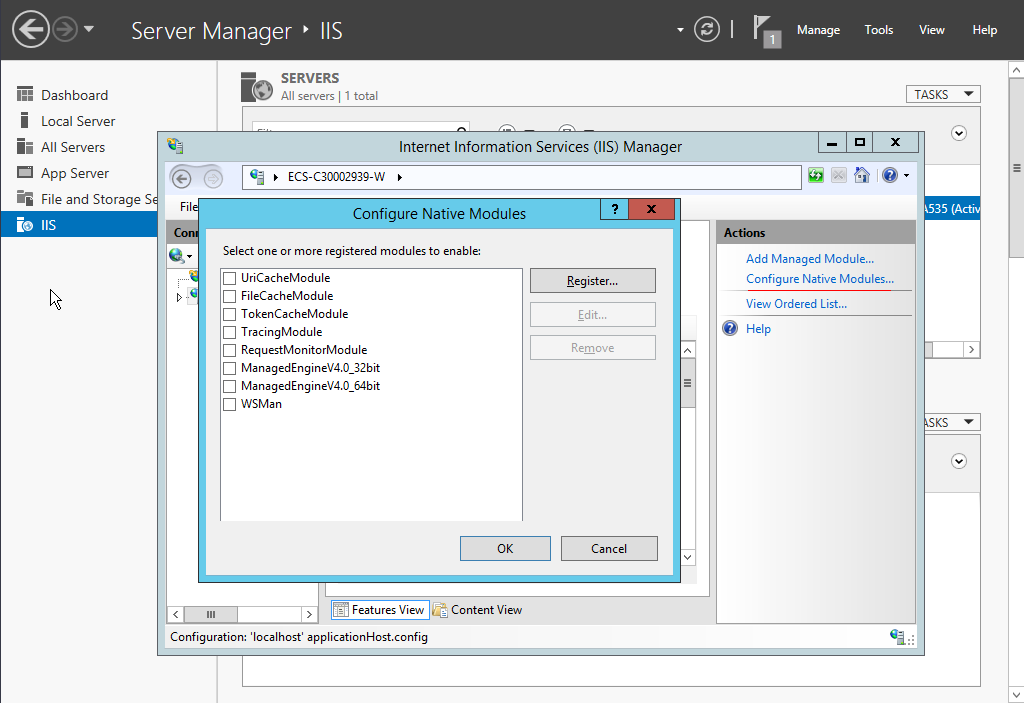
Figure 8 Configure Native Modules
Click Register to register the x86 and x64 plug-ins.
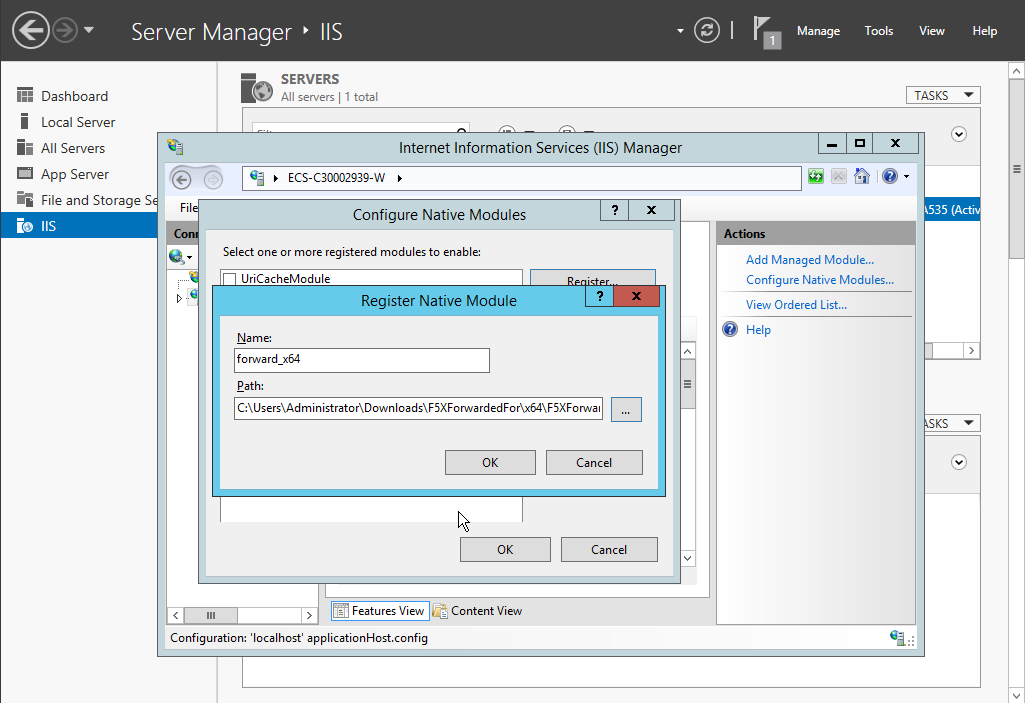
Figure 9 Registering plug-ins
In the Modules dialog box, verify that the registered plug-ins are displayed in the list.
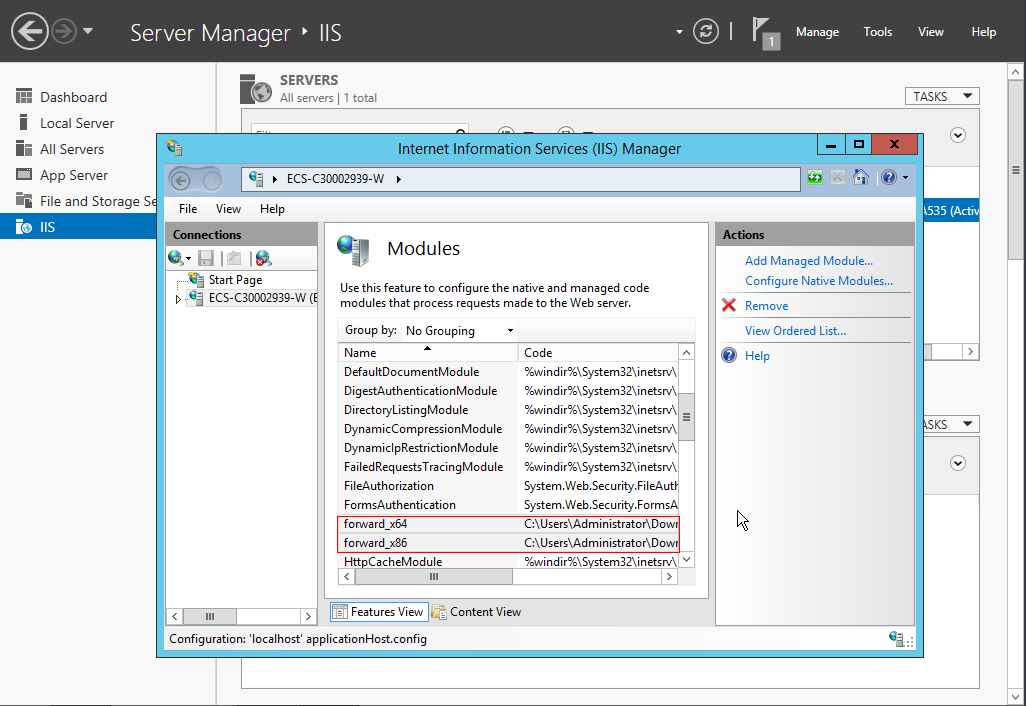
Figure 10 Confirming the registration
Select ISAPI Filters on the Server Manager homepage and authorize two plug-ins to run ISAPI and CGI extensions.
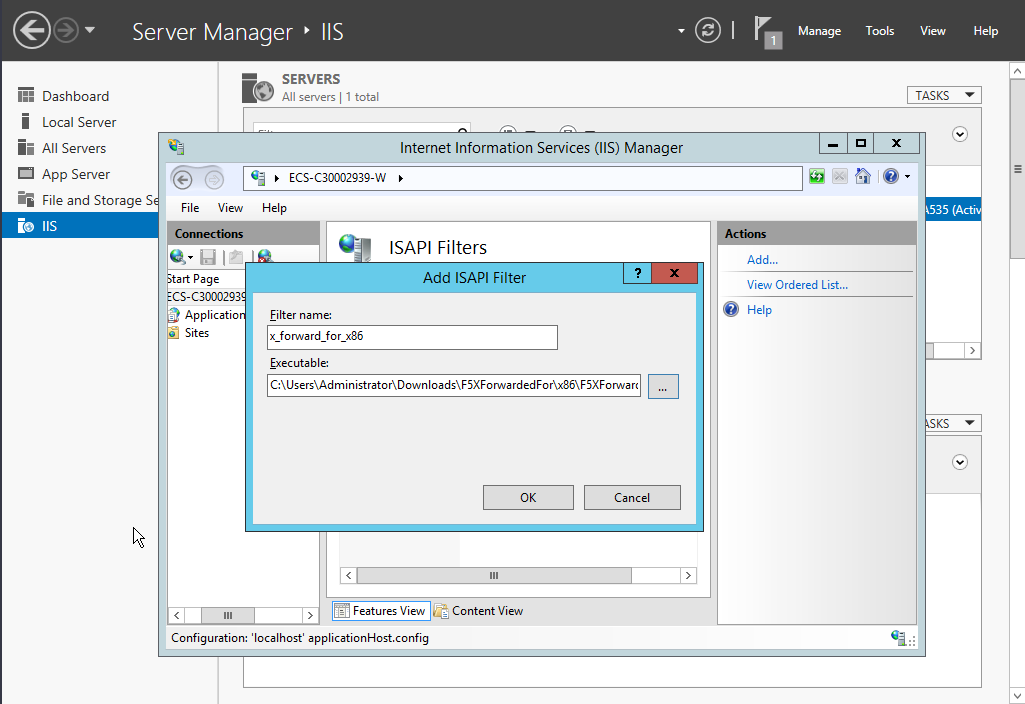
Figure 11 Adding authorization
Select ISAPI and CGI Restriction to set the execution permission for the two plug-ins.
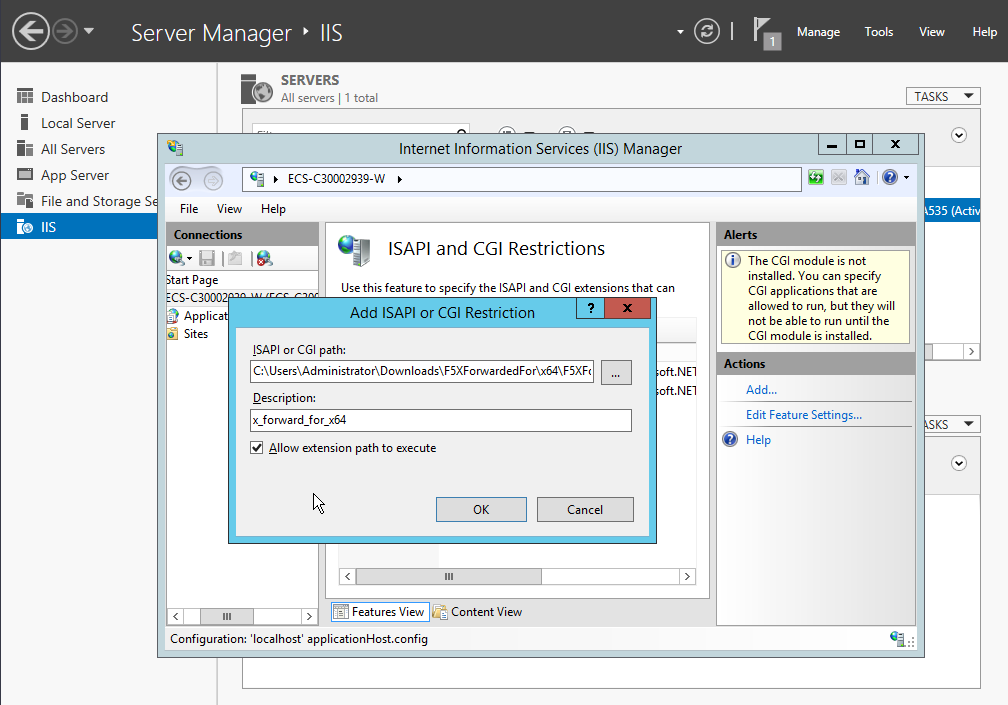
Figure 12 Allowing the plug-ins to execute
Click Restart on the homepage to restart IIS. The configuration will take effect after the restart.
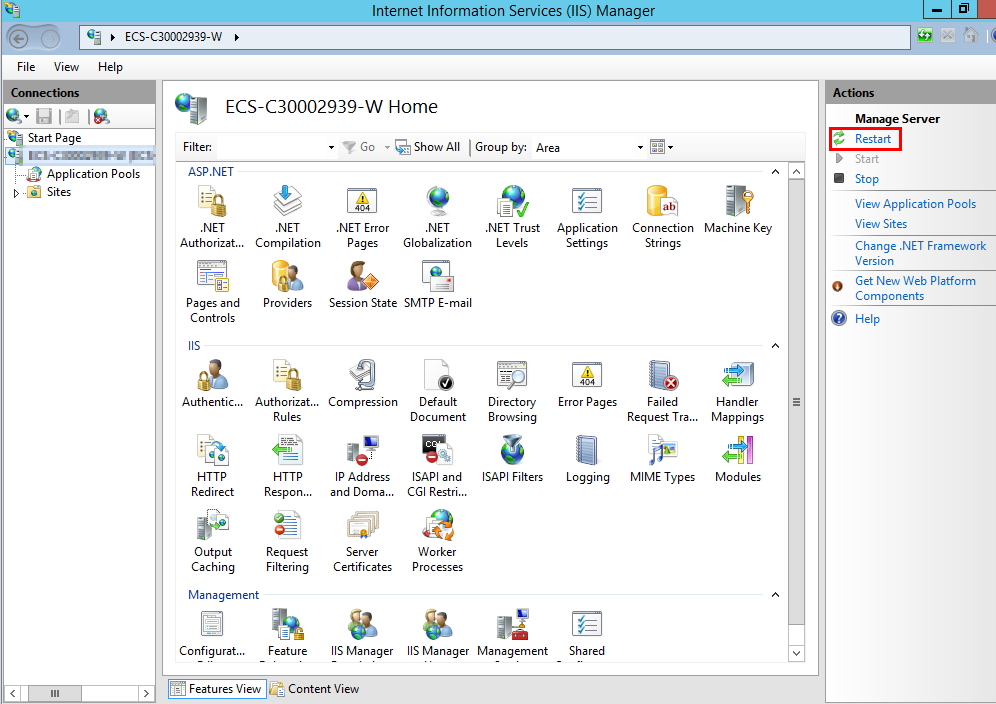
Figure 13 Restarting IIS
Layer 4 Load Balancing
For load balancing at Layer 4 (TCP/UDP), you can enable Transfer Client IP Address to obtain the source IP address.
Method 1 (for TCP or UDP listeners): Enable Transfer Client IP Address.
Caution
After this function is enabled, traffic, such as unidirectional download or push traffic, may be interrupted when backend servers are being migrated during the migration of the associated classic load balancer. After backend servers are migrated, retransmit the packets to restore the traffic.
After this function is enabled, the associated backend servers cannot be used as clients to access the listener.
If a backend server has been associated with the listener and health checks are enabled, enabling this function will check the health of the backend server, and traffic to this server will be interrupted for two health check intervals.
Perform the following steps to enable the function:
Log in to the management console.
In the upper left corner of the page, click
 and select the desired region and project.
Hover on
 in the upper left corner to display Service List and choose Network > Elastic Load Balancing.
In the load balancer list, click the name of the load balancer.
Click Listeners.
To add a listener, click Add Listener.
To modify a listener, locate the listener, click
 on the right of its name, and click Modify Listener. In the Modify Listener dialog box, modify the parameters as needed.
Enable Transfer Client IP Address.
Configure security groups, network ACLs, and OS and software security policies so that IP addresses of the clients can access these backend servers.
Note
If you enable this function, a server cannot be used as both the client and the backend server. If the client and the backend server use the same server and the Transfer Client IP Address option is enabled, the backend server will think the packet from the client is sent by itself and will not return a response packet to the load balancer. As a result, the return traffic will be interrupted.