Ultra-high I/O ECSs
Overview
Ultra-high I/O ECSs use high-performance local NVMe SSDs to provide high storage input/output operations per second (IOPS) and low read/write latency. You can create such ECSs with high-performance local NVMe SSDs attached on the management console.
Scenarios
Ultra-high I/O ECSs are suitable for high-performance relational databases.
Ultra-high I/O ECSs are suitable for NoSQL databases (such as Cassandra and MongoDB) and ElasticSearch.
Specifications
Flavor | vCPUs | Memory (GiB) | Max./Assured Bandwidth (Gbit/s) | Max. PPS (10,000) | Max. NIC Queues | Max. NICs | Local Disks (GiB) | Virtualization |
|---|---|---|---|---|---|---|---|---|
i3.2xlarge.4 | 8 | 32 | 15/4.5 | 150 | 4 | 4 | 1 x 3,200 GiB NVMe | KVM |
i3.4xlarge.4 | 16 | 64 | 20/9 | 280 | 8 | 8 | 2 x 3,200 GiB NVMe | KVM |
i3.8xlarge.4 | 32 | 128 | 30/18 | 550 | 16 | 8 | 4 x 3,200 GiB NVMe | KVM |
i3.12xlarge.4 | 48 | 192 | 35/27 | 750 | 16 | 8 | 6 x 3,200 GiB NVMe | KVM |
i3.16xlarge.4 | 64 | 256 | 40/32 | 1,000 | 32 | 8 | 8 x 3,200 GiB NVMe | KVM |
i3.2xlarge.8 | 8 | 64 | 15/4.5 | 150 | 4 | 4 | 1 x 3,200 GiB NVMe | KVM |
i3.4xlarge.8 | 16 | 128 | 20/9 | 280 | 8 | 8 | 2 x 3,200 GiB NVMe | KVM |
i3.8xlarge.8 | 32 | 256 | 30/18 | 550 | 16 | 8 | 4 x 3,200 GiB NVMe | KVM |
i3.12xlarge.8 | 48 | 384 | 35/27 | 750 | 16 | 8 | 6 x 3,200 GiB NVMe | KVM |
i3.16xlarge.8 | 64 | 512 | 40/32 | 1,000 | 32 | 8 | 8 x 3,200 GiB NVMe | KVM |
Local Disk Performance
Table 2 and Table 3 list the IOPS performance of local disks and specifications of a single local disk attached to an I3 ECS.
Flavor | Maximum IOPS for Random 4 KB Read |
|---|---|
i3.2xlarge.4 | 750,000 |
i3.4xlarge.4 | 1,500,000 |
i3.8xlarge.4 | 3,000,000 |
i3.12xlarge.4 | 4,500,000 |
i3.16xlarge.4 | 6,000,000 |
i3.2xlarge.8 | 750,000 |
i3.4xlarge.8 | 1,500,000 |
i3.8xlarge.8 | 3,000,000 |
i3.12xlarge.8 | 4,500,000 |
i3.16xlarge.8 | 6,000,000 |
Metric | Performance |
|---|---|
Disk capacity | 1.6 TB |
IOPS for random 4 KB read | 750,000 |
IOPS for random 4 KB write | 200,000 |
Read throughput | 2.9 GiB/s |
Write throughput | 1.9 GiB/s |
Access latency | Within microseconds |
Notes
Table 4 lists the OSs supported by ultra-high I/O ECSs.
Table 4 Supported OS versions¶ OS
Version
Alma
Alma 8 64bit
CentOS
CentOS Stream 8.6 64bit
CentOS 7.9 64bit
CentOS 7.7 64bit
Debian
Debian GNU/Linux 11 64bit
Debian GNU/Linux 10 64bit
EulerOS
EulerOS 2.5 64bit
Fedora
Fedora 35 64bit
Fedora 34 64bit
Fedora 33 64bit
OpenSUSE
OpenSUSE 15.3 64bit
Oracle Linux
Oracle Linux Server release 8.4 64bit
Oracle Linux Server release 7.6 64bit
Red Hat
Red Hat Enterprise Linux 7.9 64bit
Red Hat Enterprise Linux 6.10 64bit
Rocky
Rocky 8 64bit
SUSE
Novell SUSE Linux Enterprise Server 15 SP3 64bit
Novell SUSE Linux Enterprise Server 15 SP2 64bit
Novell SUSE Linux Enterprise Server 15 SP1 64bit
Novell SUSE Linux Enterprise Server 15 64bit
Novell SUSE Linux Enterprise Server 12 SP5 64bit
Novell SUSE Linux Enterprise Server 12 SP4 64bit
Novell SUSE Linux Enterprise Server 12 SP3 64bit
Ubuntu
Ubuntu 20.04 server 64bit
Ubuntu 18.04 server 64bit
Windows
Windows Server 2019 Standard 64bit
Windows Server 2016 Standard 64bit
Windows Server 2012 R2 Standard 64bit
openEuler
openEuler 20.03 64bit
If the host where an ultra-high I/O ECS is deployed is faulty, the ECS cannot be restored through live migration.
If the host is faulty or subhealthy, you need to stop the ECS for hardware repair.
In case of system maintenance or hardware faults, the ECS will be redeployed (to ensure HA) and cold migrated to another host. The local disk data of the ECS will not be retained.
Ultra-high I/O ECSs do not support specifications change.
Ultra-high I/O ECSs do not support local disk snapshots or backups.
Ultra-high I/O ECSs can use local disks, and can also have EVS disks attached to provide a larger storage size. Note the following when using the two types of storage media:
Only an EVS disk, not a local disk, can be used as the system disk of an ultra-high I/O ECS.
Both EVS disks and local disks can be used as data disks of an ultra-high I/O ECS.
An ultra-high I/O ECS can have a maximum of 60 attached disks (including VBD, SCSI, and local disks). An ECS can have a maximum of 60 attached disks, including the system disk. For details about constraints, see Can I Attach Multiple Disks to an ECS?
Modify the fstab file to set automatic disk mounting at ECS start. For details, see Configuring Automatic Mounting at System Start.
The local disk data of an ultra-high I/O ECS if an exception occurs, such as physical server breakdown or local disk damage. If your application does not use the data reliability architecture, it is a good practice to use EVS disks to build your ECS.
When an ultra-high I/O ECS is deleted, the data on local NVMe SSDs will also be automatically deleted, which can take some time. As a result, an ultra-high I/O ECS takes a longer time than other ECSs to be deleted. Back up the data before deleting such an ECS.
The data reliability of local disks depends on the reliability of physical servers and hard disks, which are SPOF-prone. It is a good practice to use data redundancy mechanisms at the application layer to ensure data availability. Use EVS disks to store service data that needs to be stored for a long time.
The device name of a local disk attached to an ultra-high I/O ECS is /dev/nvme0n1 or /dev/nvme0n2.
The basic resources, including vCPUs, memory, and image of an ultra-high I/O ECS will continue to be billed after the ECS is stopped. To stop the ECS from being billed, delete it and its associated resources.
Handling Damaged Local Disks Attached to an ECS of I Series
If a local disk attached to an ECS is damaged, perform the following operations to handle this issue:
For a Linux ECS:
Detach the faulty local disk.
Run the following command to query the mount point of the faulty disk:
df -Th
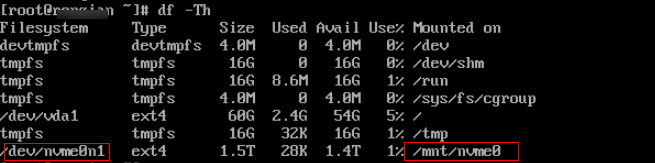
Figure 1 Querying the mount point
Run the following command to detach the faulty local disk:
umount Mount point
In the example shown in Figure 1, the mount point of /dev/nvme0n1 is /mnt/nvme0. Run the following command:
umount /mnt/nvme0
Check whether the mount point of the faulty disk is configured in /etc/fstab of the ECS. If yes, comment out the mount point to prevent the ECS from entering the maintenance mode upon ECS startup after the faulty disk is replaced.
Run the following command to obtain the partition UUID:
blkid Disk partition
In this example, run the following command to obtain the UUID of the /dev/nvme0n1 partition:
blkid /dev/nvme0n1
Information similar to the following is displayed:
/dev/nvme0n1: UUID="b9a07b7b-9322-4e05-ab9b-14b8050cd8cc" TYPE="ext4"
Run the following command to check whether /etc/fstab contains the automatic mounting information about the disk partition:
cat /etc/fstab
Information similar to the following is displayed:
UUID=b9a07b7b-9322-4e05-ab9b-14b8050cd8cc /mnt ext4 defaults 0 0
If the mounting information exists, perform the following steps to delete it.
Run the following command to edit /etc/fstab:
vi /etc/fstab
Use the UUID obtained in 2.a to check whether the mounting information of the local disk is contained in /etc/fstab. If yes, comment out the information. This prevents the ECS from entering the maintenance mode upon ECS startup after the local disk is replaced.
Press i to enter editing mode.
Delete or comment out the automatic mounting information of the disk partition.
For example, add a pound sign (#) at the beginning of the following command line to comment out the automatic mounting information:
# UUID=b9a07b7b-9322-4e05-ab9b-14b8050cd8cc /mnt ext4 defaults 0 0Press Esc to exit editing mode. Enter :wq and press Enter to save the settings and exit.
Run the following command to obtain the SN of the local disk:
For example, if the nvme0n1 disk is faulty, obtain the serial number of the nvme0n1 disk.
ll /dev/disk/by-id/

Figure 2 Querying the serial number of the faulty local disk
Stop the ECS and provide the serial number of the faulty disk to technical support personnel to replace the local disk.
After the local disk is replaced, restart the ECS to synchronize the new local disk information to the virtualization layer.
For a Windows ECS:
Open Computer Management, choose Computer Management (Local) > Storage > Disk Management, and view the disk ID, for example, Disk 1.
Open Windows PowerShell as an administrator and run the following command to query the disk on which the logical disk is created:
Get-CimInstance -ClassName Win32_LogicalDiskToPartition |select Antecedent, Dependent | fl

Figure 3 Querying the disk on which the logical disk is created
Run the following command to obtain the serial number of the faulty disk according to the mapping between the disk ID and serial number:
Get-Disk | select Number, SerialNumber
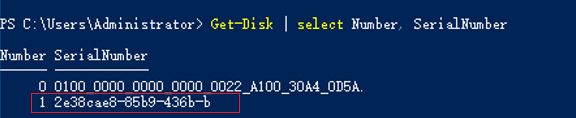
Figure 4 Querying the mapping between the disk ID and serial number
Note
If the serial number cannot be obtained by running the preceding command, see Using a Serial Number to Obtain the Disk Name (Windows).
Stop the ECS and provide the serial number of the faulty disk to technical support personnel to replace the local disk.
After the local disk is replaced, restart the ECS to synchronize the new local disk information to the virtualization layer.