How Can I Configure the NTP and DNS Servers for an ECS?
For Linux OSs
Take the NTP and DNS servers running SUSE as an example.
Configure the NTP server for the ECS.
Log in to the Linux ECS.
Run the following command to switch to user root:
sudo su -
Run the following command to edit the ntp.conf configuration file:
vim /etc/ntp.conf
Add the following statement to configure the NTP server:
server Domain name or IP address of the NTP server
Example:
If the IP address of the NTP server is 192.168.56.1, add the following statement:
server 192.168.56.1
Run the following command to start the NTP service upon system restart:
service ntp restart
Run the following command to check the status of the NTP server:
service ntp status
Note
If you want to disable NTP, perform the following steps:
Run the service ntp stop command to stop NTP.
Run the systemctl disable ntp command to disable the function of automatically starting NTP upon ECS startup.
Configure the DNS server for the ECS.
Log in to the Linux ECS.
Run the following command to switch to user root:
sudo su -
Run the following command to edit the resolv.conf configuration file:
vi /etc/resolv.conf
Add the following statement to configure the DNS server:
nameserver = IP addresses of the DNS servers
Example:
If the IP addresses of the DNS servers are 8.8.8.8 and 4.4.4.4, add the following statements:
nameserver = 8.8.8.8
nameserver = 4.4.4.4
Note
The IP addresses of the DNS servers must be the same as those in the VPC subnet. Otherwise, the DNS modification cannot persistently take effect.
Run the following command to restart the network:
rcnetwork restart
service network restart
/etc/init.d/network restart
Windows
Take an ECS running Windows Server 2012 as an example.
Log in to the Windows ECS as user Administrator.
Enable the local area connection.
In the lower right corner of the taskbar, right-click the network connection icon.
Click Open Network and Sharing Center.
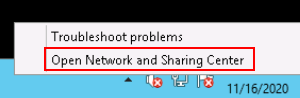
Figure 1 Open Network and Sharing Center
In the navigation pane on the left, click Change adapter settings.
Configure the DNS server for the ECS.
Double-click network connections.
Click Properties in the lower left corner.
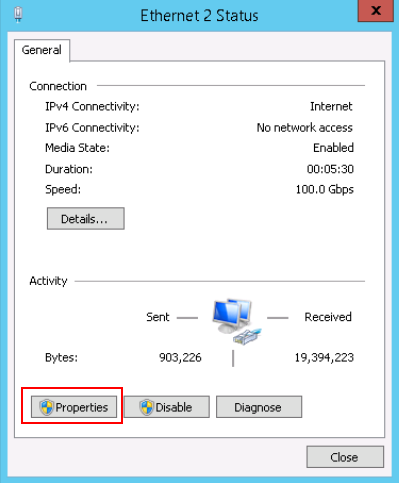
Figure 2 Local area connection
Select Internet Protocol Version 4 (TCP/IPv4) and click Properties.
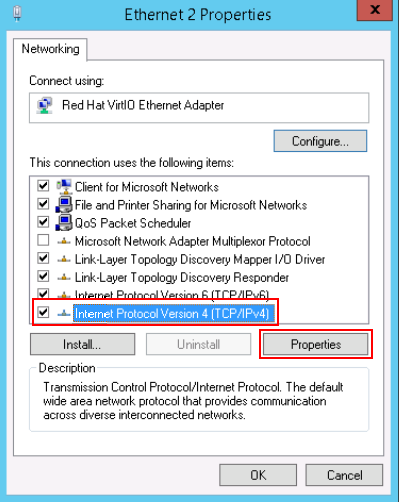
Figure 3 Selecting a protocol type
Select Use the following DNS server addresses and set the IP addresses of the DNS servers.
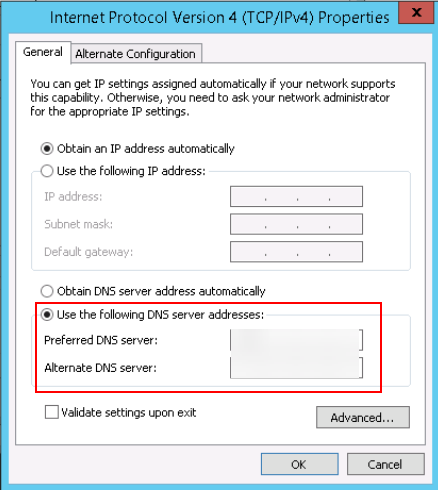
Figure 4 Setting the IP addresses of the DNS servers
Configure the NTP server for the ECS.
Start the Run dialog box. Enter regedit and click OK.
Modify the registry entries.
In HKEY_LOCAL_MACHINE > SYSTEM > CurrentControlSet > Services > W32Time > TimeProviders > NtpClient, set the value of Enabled to 1, indicating that the NTP client is used.
In HKEY_LOCAL_MACHINE > SYSTEM > CurrentControlSet > Services > W32Time > TimeProviders > NtpServer, set the value of Enabled to 0, indicating that the NTP server is stopped.
Choose HKEY_LOCAL_MACHINE > SYSTEM > CurrentControlSet > Services > W32Time > Parameters file and set the NtpServer data. Set the data of TYPE to NTP.
In HKEY_LOCAL_MACHINE \ SYSTEM \ CurrentControlSet \ Services \ W32Time \ TimeProviders \ NtpClient, set the value of SpecialPollInterval to 60 and that of Base to Decimal, indicating the clock synchronization cycle is 60s.
In HKEY_LOCAL_MACHINE \ SYSTEM \ CurrentControlSet \ Services \ W32Time \ config, set the values of MaxPosPhaseCorrection and MaxNegPhaseCorrection to ffffffff and that of Base to Hexadecimal.
Open the Run dialog box, enter services.msc, and click OK. The Services window is displayed.
View the service named Windows Time and set the Start Type to Automatic to synchronize time from the NTP server.
Open the Run dialog box and run the following commands in sequence to restart the Windows Time service:
net stop w32time
net start w32time
Manually change the time on the client to make it different from that on the NTP server. One minute later, check whether the time on the client is the same as that on the NTP server. If yes, the time is synchronized.