Creating a Public Zone
Scenarios
Create a public zone on the DNS console to resolve your domain name.
Prerequisites
You have registered a domain name.
Procedure
If your domain name is registered with a third-party registrar, create a public zone and add record sets to it on the DNS console.
Log in to the management console.
In the service list, choose Network > Domain Name Service.
The DNS console is displayed.
In the navigation pane, choose Public Zones.
The Public Zones page is displayed.
Click Create Public Zone.
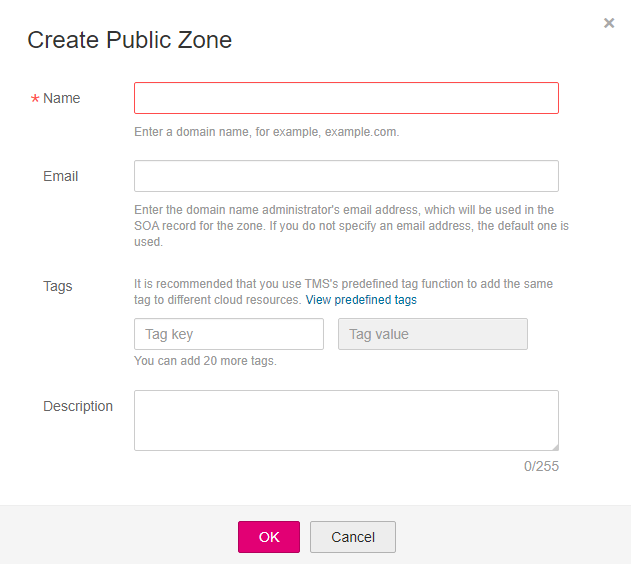
Set the parameters.

Figure 1 Creating a public zone
Table 1 describes the parameters.
Table 1 Parameters for creating a public zone¶ Parameter
Description
Example Value
Name
Name of the public zone, which is the domain name you registered
example.com
Email
(Optional) Email address of the administrator managing the public zone
It is recommended that you set the email address to HOSTMASTER@Domain name.
For more information about the email address, see Why Was the Email Address Format Changed in the SOA Record?
Tags
(Optional) Identifier of a resource
Each tag contains a key and a value. You can add a maximum of 20 tags to a zone.
For details about tag key and value requirements, see Table 2.
example_key1
example_value1
Description
(Optional) Supplementary information about the zone
You can enter a maximum of 255 characters.
This is a zone example.
Table 2 Tag key and value requirements¶ Parameter
Requirements
Example Value
Key
Cannot be left blank.
Must be unique for each resource.
Can contain a maximum of 36 characters.
Can contain only letters, digits, hyphens (-), and underscores (_).
example_key1
Value
Cannot be left blank.
Can contain a maximum of 43 characters.
Can contain only letters, digits, hyphens (-), and underscores (_).
example_value1
Click OK.
View the created public zone on the Public Zones page.
Click the zone name or click Add Record Set under Operation.
On the Record Sets page, click Add Record Set. For detailed operations, see Overview.
Note
Click the zone name to view zone details. You can view SOA and NS record sets automatically generated by the system.
The SOA record set defines the DNS server that is the authoritative information source for a particular domain name.
The NS record set defines authoritative DNS servers for a zone.
Follow-up Operations
After a public zone is created, you can perform the following operations:
Add record sets for it. For details, see Overview.
Modify or delete it, or view its details. For details, see Managing Public Zones.