Migrating Data Online
Scenario
If the source and target instances are interconnected and the SYNC and PSYNC commands are supported in the source instance, data can be migrated online in full or incrementally from the source to the target.
Note
During online migration, data is essentially synchronized in full to a new replica. Therefore, perform online migration during low-demand hours. Otherwise, source instance CPU usage may surge and latency may increase.
Notes and Constraints
Migrating a later Redis instance to an earlier one may fail.
For earlier instances whose passwords contain single quotation marks ('), modify the password for online migration or try other methods.
If the SYNC and PSYNC commands are disabled on the source Redis instance, enable them before performing online migration. Otherwise, the migration fails. If you use a DCS Redis instance for online migration, the SYNC command is automatically enabled.
During online migration, you are advised to set repl-timeout on the source instance to 300s and client-output-buffer-slave-hard-limit and client-output-buffer-slave-soft-limit to 20% of the maximum memory of the instance.
To migrate to an instance with SSL enabled, disable the SSL setting first. For details, see Transmitting DCS Redis Data with Encryption Using SSL.
Prerequisites
Before migrating data, read through Introduction to Migration with DCS to learn about the DCS data migration function and select an appropriate target instance.
To migrate data from a single-node, read/write splitting, or master/standby instance to a cluster instance, check if any data exists in DBs other than DB0 in the source instance. If yes, move the data to DB0 by using the open-source tool Rump. Otherwise, the migration will fail because a cluster instance has only one DB. For details about the migration operations, see Online Migration with Rump.
Step 1: Obtain Information About the Source Redis Instance
If the source is a cloud Redis instance, obtain its name.
If the source is self-hosted Redis, obtain its IP address or domain name and port number.
Step 2: Prepare the Target DCS Redis Instance
If a target DCS Redis instance is not available, create one first. For details, see Creating a DCS Redis Instance.
If a target instance is available, you do not need to create a new one. However, you must clear the instance data before the migration. For details, see Clearing DCS Instance Data.
If the target instance data is not cleared before the migration and the source and target instances contain the same key, the key in the target instance will be overwritten by the key in the source instance after the migration.
Step 3: Check the Network
Note
If the source or target of online migration is Redis in the cloud, the selected Redis instance must be in the same VPC as the migration task. Otherwise, the migration task may fail to connect to the cloud Redis instance.
In special scenarios, if you have enabled cross-VPC access between the migration task and the cloud Redis instance, the cloud Redis instance and the migration task can be in different VPCs.
Table 1 lists the requirements on the network between the online migration task, source Redis, and target Redis.
Source Redis Type | Target Redis Type | Network Requirement on Online Migration |
|---|---|---|
Redis in the cloud | Redis in the cloud | When creating an online migration task, ensure that the online migration task is in the same VPC as the source and target Redis. If they are not in the same VPC, enable cross-network access between the migration task and the source and target Redis. To enable cross-network access, create a VPC peering connection by referring to section "VPC Peering Connection" in Creating a VPC. |
Redis in the cloud | Self-hosted Redis | When creating an online migration task, ensure that the migration task and the source Redis are in the same VPC. Then, enable cross-network access between the migration task and the target Redis. To enable cross-network access, create a VPC peering connection by referring to section "VPC Peering Connection" in Creating a VPC. |
Self-hosted Redis | Redis in the cloud | When creating an online migration task, ensure that the migration task and the target Redis are in the same VPC. Then, enable cross-network access between the migration task and the source Redis. To enable cross-network access, create a VPC peering connection by referring to section "VPC Peering Connection" in Creating a VPC. |
Self-hosted Redis | Self-hosted Redis | After creating an online migration task, enable cross-network access between the migration task and the source and target Redis, respectively. To enable cross-network access, create a VPC peering connection by referring to section "VPC Peering Connection" in Creating a VPC. |
Step 4: Create a Migration Task
Log in to the DCS console.
Click
 in the upper left corner and select a region and a project.
In the navigation pane, choose Data Migration. The migration task list is displayed.
Click Create Online Migration Task.
Enter the task name and description.
Configure the VPC, subnet, and security group for the migration task.
The VPC, subnet, and security group facilitate the migration. Ensure that the migration resources can access the source and target Redis instances.
Important
The migration task uses a tenant IP address (Migration ECS displayed on the Basic Information page of the task.) If a whitelist is configured for the source or target instance, add the migration IP address to the whitelist or disable the whitelist.
To allow the VM used by the migration task to access the source and target instances, set an outbound rule for the task's security group to allow traffic through the IP addresses and ports of the source and target instances. By default, all outbound traffic is allowed.
Click Next.
Click Submit.
Configuring the Online Migration Task
On the Online Migration tab page, click Configure in the row containing the online migration task you just created.
Specify Migration Type.
Supported migration types are Full and Full + incremental, which are described in Table 2.
Table 2 Migration type description¶ Migration Type
Description
Full
Suitable for scenarios where services can be interrupted. Data is migrated at one time. Source instance data updated during the migration will not be migrated to the target instance.
Full + incremental
Suitable for scenarios requiring minimal service downtime. The incremental migration parses logs to ensure data consistency between the source and target instances.
Once incremental migration starts, it remains Migrating until you click Stop in the Operation column. After the migration is stopped, data in the source instance will not be lost, but data will not be written to the target instance. When the transmission network is stable, the delay of incremental migration is within seconds. The actual delay depends on the transmission quality of the network link.
Configure source Redis and target Redis.
The Redis type can be Redis in the cloud or Self-hosted Redis as required.
Redis in the cloud: a DCS Redis instance that is in the same VPC as the migration task
Self-hosted Redis: self-hosted Redis in another cloud, or in on-premises data centers. If you select this option, enter Redis addresses.
Note
If the source and target Redis instances are connected but are in different regions of DCS, you can only select Self-hosted Redis for Target Redis Type and enter the instance addresses, regardless of whether the target Redis instance is self-hosted or in the cloud.
If the instance is password-protected, you can click Test Connection to check whether the instance password is correct and whether the network is connected. If the instance is not password-protected, click Test Connection directly.
Click Next.
Confirm the migration task details and click Submit.
Go back to the data migration task list. After the migration is successful, the task status changes to Successful.
Note
If the migration type is full+incremental, the migration task status will remain Migrating until you click Stop.
After data migration, duplicate keys will be overwritten.
Verifying the Migration
After the migration is complete, use redis-cli to connect the source and target Redis instances to check data integrity.
Connect to the source Redis and the target Redis.
Run the info keyspace command to check the values of keys and expires.
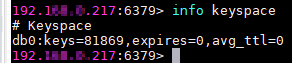
Calculate the differences between the values of keys and expires of the source Redis and the target Redis. If the differences are the same, the data is complete and the migration is successful.
During full migration, source Redis data updated during the migration will not be migrated to the target instance.