Using a Direct Connection to Access Multiple VPCs
Scenarios
You can access multiple VPCs using one direct connection. If you have created a direct connection between your local data center (172.16.0.1/24) and VPC A (192.168.0.1/24) and want to access VPC B (192.168.0.1/24), you can use a VPC peer connection to implement the connection. For details, see Figure 1.

Figure 1 A direct connection accessing to multiple VPCs
Note
Before creating a VPC peer connection, if your direct connection is requested through email or call, you need to notify the customer manager of the network segments that are to be connected to VPC B. If your direct connection is created in self-service mode, you need to add the network segments that are to be connected to VPC B to the CIDR Block parameter of the virtual gateway.
Procedure
Create the peering connection peering-001 between VPC A and VPC B. If VPC A and VPC B belong to the same tenant, see Creating a VPC Peering Connection in Creating a VPC Peering Connection with Another VPC in Your Account. If VPC A and VPC B belong to different tenants, see Creating a VPC Peering Connection in Creating a VPC Peering Connection with a VPC in Another Account.
Add routes for the VPC peering connection. If VPC A and VPC B belong to the same tenant, see Adding Routes for the VPC Peering Connection in Creating a VPC Peering Connection with Another VPC in Your Account. If VPC A and VPC B belong to different tenants, see Adding Routes for the VPC Peering Connection in Creating a VPC Peering Connection with a VPC in Another Account.
Add a route that points to the remote subnet of the customer local data center for the peering connection.
When VPC A and VPC B belong to the same tenant, and VPC A is the peer VPC in peering-001, you need to add a local route for the peer connection.
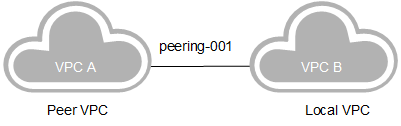
Figure 2 VPC A being the peer VPC in the peer connection
On the VPC Peering page, click peering-001 to view the peering connection details.
On the displayed page, click the Local Routes tab.
Click Add Local Route. Set Destination to the remote subnet of the direct connection, that is, 172.16.0.1/24. The next hop address is the default value.
Click OK.
When VPC A and VPC B belong to the same tenant, and VPC A is the local VPC in peering-001, you need to add a peer route for the peer connection.
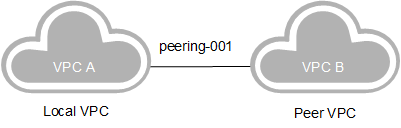
Figure 3 VPC A being the local VPC in the peering connection
On the VPC Peering page, click peering-001 to view the peering connection details.
On the displayed page, click the Peer Routes tab.
Click Add Peer Route. Set Destination to the remote subnet of the direct connection, that is, 172.16.0.1/24. The next hop address is the default value.
Click OK.
When VPC A and VPC B belong to different tenants, the tenant that has VPC B needs to perform the following operations:
On the VPC Peering page, click peering-001 to view the peering connection details.
On the displayed page, click Add Local Route under the Local Routes tab. Set Destination to the remote subnet of the direct connection, that is, 172.16.0.1/24. The next hop address is the default value.
Click OK.