Auditing an RDS DB Instance (Without Agents)
Overview
This section describes how to audit the security of a relational database instance. (Applications connected to this DB instance are deployed on ECS.) DBSS can audit certain types of relational databases without installing agents.
Note
DBSS without agents is easy to configure and use, but the following functions are not supported:
Successful and failed login sessions cannot be counted.
The port number of the client for accessing the database cannot be obtained.
GaussDB(DWS) has the permission control policy for the log audit function. Only accounts and users with the Security Administrator permission can enable or disable the DWS database audit function.
Solution Architecture
The DBSS instance receives the logs sent from databases, such as certain GaussDB(for MySQL) or RDS for MySQL versions, and saves the logs to its log library for security analysis, aggregation statistics, and compliance analysis.
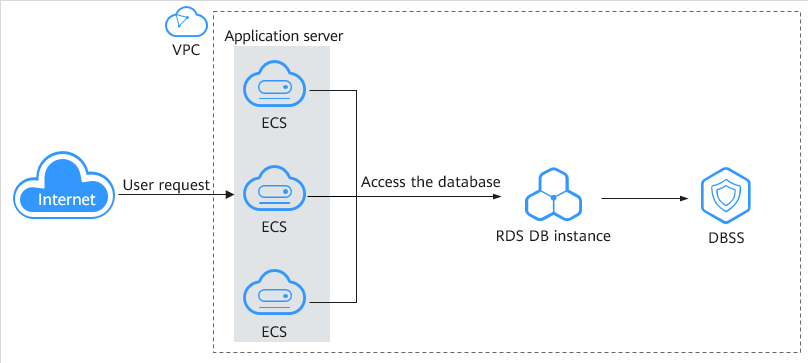
Figure 1 Auditing an RDS DB instance (without agents)
Take the GaussDB(for MySQL) database as an example. Assume you need to locate and track internal violations and improper operations in the database to meet compliance requirements. This section describes how to enable the database audit function and check audit results.
Database Type | RDS database |
Database Type | GaussDB(for MySQL) |
Version | MySQL 8.0 |
IP Address | 192.168.0.237 |
Database Port | 3306 |
Limitations and Constraints
The database audit instance and the database to be audited must be in the same region.
Step 1: Apply for Database Audit
Configure and apply for the database audit service. For details, see the "Database Audit Instance" section.
Step 2: Add a Database and Enable Audit
After applying for database audit, add a database to the database audit instance and enable audit for the database.
Log in to the management console.
Select a region and click
 . Choose Security > Database Security Service. The Dashboard page will be displayed.
In the navigation pane, choose Databases.
Select an instance from the Instance drop-down list. Click Add Database.
In the displayed dialog box, set database parameters described in Table 1.
Click OK. The database will be displayed in the database list and its Audit Status will be Disabled.
In the database list, view the information in the Agent column.
If the message No agent needs to be added is displayed, the database can be audited without installing agents. In this case, go to step 8.
In the Operation column of the database, click Enable.
Step 3: Viewing the Audit Result
You can check audit results on the dashboard page, or generate, preview, or download reports.
Check overview information.
In the navigation pane, choose Dashboard.
The Dashboard page displays the audit duration, total number of SQL statements and risks, statements and risks today, and today's sessions of an instance.
You can click the Statements or Sessions tab to view session distribution.
Generate, download, or preview reports.
In the navigation pane, choose Reports.
Select an instance from the Instance drop-down list. Click the Report Management tab.
In the Operation column of a report template, click Generate Report.
In the displayed dialog box, click
 to set the start time and end time of the report, and select the database for which you want to generate a report.
Click OK.
The Reports page will be displayed. You can view the report status on this page. After a report is generated, you can click Preview or choose More > Download. See Figure 2.
Important
To preview a report online, use Google Chrome or Mozilla FireFox.
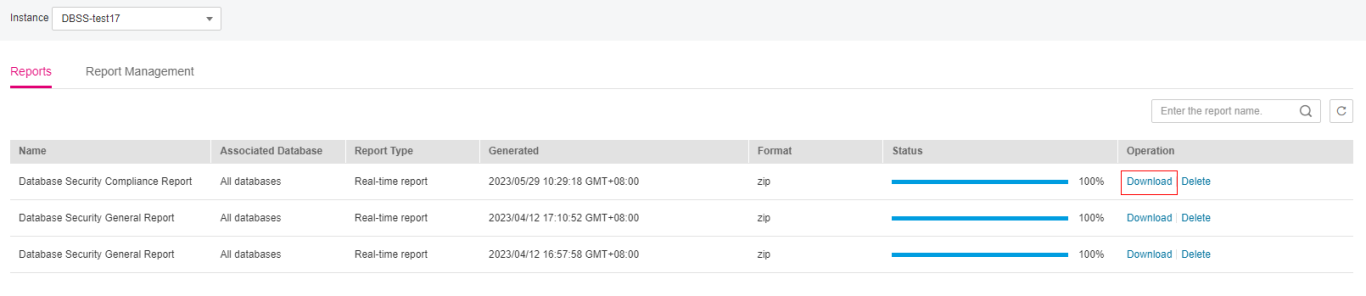
Figure 2 Previewing or downloading an audit report