Step 1: Create a DR Task
Scenario
To prevent service unavailability caused by regional faults, DRS provides disaster recovery to ensure service continuity. If the region where the primary instance is located encounters a natural disaster and cannot be connected, you can switch the remote instance to the primary instance. To reconnect to the primary instance, you only need to change the connection address on the application side. DRS allows you to perform cross-region real-time synchronization between a primary instance and a DR instance during disaster recovery
A complete online disaster recovery consists of creating a DR task, tracking task progress, analyzing DR logs, and comparing data consistency. By comparing multiple items and data, you can synchronize data between different service systems.
Process
The following flowchart shows the basic processes for disaster recovery.
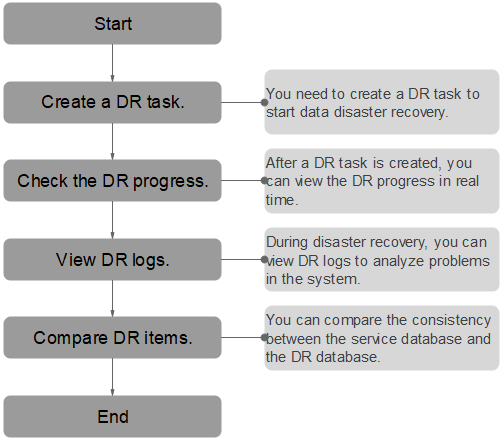
Figure 1 Disaster recovery process
Step 1: Create a DR task. Select the service and DR databases as required and create a DR task.
Step 2: Query the DR progress. During the disaster recovery, you can view the DR progress.
Step 3: View DR logs. Disaster recovery logs contain alarms, errors, and prompt information. You can analyze system problems based on such information.
Step 4: Compare DR items. The DR system supports object-level, data-level comparison to ensure data consistency.
This section uses disaster recovery from a MySQL instance to an RDS MySQL instance as an example describes how to configure a DR task on the DRS console over a public network.
You can create a DR task that will walk you through each step of the process. After a DR task is created, you can manage it on the DRS console.
Prerequisites
You have logged in to the DRS console.
For details about the supported DB types and versions, see Real-Time Disaster Recovery.
Procedure
On the Disaster Recovery Management page, click Create Disaster Recovery Task.
On the Create Disaster Recovery Instance page, specify the task name, description, and the DR instance details, and click Next.
Task information description
Table 1 Task and recipient description¶ Parameter
Description
Region
The region where your service is running. You can change the region.
Project
The project corresponds to the current region and can be changed.
Task Name
The task name must start with a letter and consist of 4 to 50 characters. It can contain only letters, digits, hyphens (-), and underscores (_).
Description
The description consists of a maximum of 256 characters and cannot contain special characters
!=<>'&"\DR instance information
Table 2 DR instance settings¶ Parameter
Description
Disaster Recovery Relationship
Select Current cloud as standby.
By default, Current cloud as standby is selected. You can also select Current cloud as active.
Current cloud as standby: The DR database is on the current cloud.
Current cloud as active: The service database is on the current cloud.
Service DB Engine
Select MySQL.
DR DB Engine
Select MySQL.
Network Type
The public network is used as an example.
Available options: VPN or Direct Connect and Public network. By default, the value is Public network.
DR DB Instance
The RDS instance you created.
Disaster Recovery Instance Subnet
Select the subnet where the disaster recovery instance is located. You can also click View Subnet to go to the network console to view the subnet where the instance resides.
By default, the DRS instance and the destination DB instance are in the same subnet. You need to select the subnet where the DRS instance resides and ensure that there are available IP addresses. To ensure that the disaster recovery instance is successfully created, only subnets with DHCP enabled are displayed.
Destination Database Access
Select Read-only.
During disaster recovery, the DR database becomes read-only. To change the DR database to Read/Write, you can change the DR database (or destination database) to a service database by clicking Promote Current Cloud on the Disaster Recovery Monitoring tab. After the DR task is complete or deleted, you can query and read data to the DR database.
When the external database functions as the DR database, the user with the superuser permission can set the database to read-only.
If a DRS instance node is rebuilt due to a fault, to ensure data consistency during the DRS task restoration, the current cloud standby database is set to read-only before the task is restored. After the task is restored, the synchronization relationship recovers.
Tags
Table 3 Tags¶ Parameter
Description
Tags
Tags a task. This configuration is optional. Adding tags helps you better identify and manage your tasks. Each task can have up to 20 tags.
After a task is created, you can view its tag details on the Tags tab. For details, see Tag Management.
Note
If a task fails to be created, DRS retains the task for three days by default. After three days, the task automatically ends.
On the Configure Source and Destination Databases page, wait until the DR instance is created. Then, specify source and destination database information and click Test Connection for both the source and destination databases to check whether they have been connected to the DR instance. After the connection tests are successful, select the check box before the agreement and click Next.
Select Current cloud as standby for Disaster Recovery Relationship in 2.
Table 4 Service database settings¶ Parameter
Description
Source Database Type
By default, Self-built on ECS is selected.
IP Address or Domain Name
The IP address or domain name of the service database.
Port
The port of the service database. Range: 1 - 65535
Database Username
The username for accessing the service database.
Database Password
The password for the service database username. You can change the password if necessary. To change the password, perform the following operation after the task is created:
If the task is in the Starting, Initializing, Disaster recovery in progress, or Disaster recovery failed status, in the DR Information area on the Basic Information tab, click Modify Connection Details. In the displayed dialog box, change the password.
Note
The IP address, domain name, username, and password of the service database are encrypted and stored in DRS and will be cleared after the task is deleted.
Table 5 DR database settings¶ Parameter
Description
DB Instance Name
The DB instance you selected when creating the DR task and cannot be changed.
Database Username
The username for accessing the DR database.
Database Password
The password for the database username. The password can be changed after a task is created.
If the task is in the Starting, Initializing, Disaster recovery in progress, or Disaster recovery failed status, in the DR Information area on the Basic Information tab, click Modify Connection Details. In the displayed dialog box, change the password.
The database username and password are encrypted and stored in DRS, and will be cleared after the task is deleted.
Select Current cloud as active for Disaster Recovery Relationship in 2.
Table 6 Service database settings¶ Parameter
Description
DB Instance Name
The RDS instance selected when you created the DR task. This parameter cannot be changed.
Database Username
The username for accessing the service database.
Database Password
The password for the database username. You can change the password if necessary. To change the password, perform the following operation after the task is created:
If the task is in the Starting, Initializing, Disaster recovery in progress, or Disaster recovery failed status, in the DR Information area on the Basic Information tab, click Modify Connection Details. In the displayed dialog box, change the password.
The database username and password are encrypted and stored in the system and will be cleared after the task is deleted.
Table 7 DR database settings¶ Parameter
Description
IP Address or Domain Name
The IP address or domain name of the DR database.
Port
The port of the DR database. Range: 1 - 65535
Database Username
The username for accessing the DR database.
Database Password
The password for the DR database username. You can change the password if necessary. To change the password, perform the following operation after the task is created:
If the task is in the Starting, Initializing, Disaster recovery in progress, or Disaster recovery failed status, in the DR Information area on the Basic Information tab, click Modify Connection Details. In the displayed dialog box, change the password.
Region
The region where the RDS DB instance is located. This parameter is available only when the source database is an RDS DB instance.
DB Instance Name
DR instance name. This parameter is available only when the source database is an RDS DB instance.
Note
When the DB instance is used as the DR database, it is set to read-only. After the task is complete, the DB instance can be readable and writable.
Database Username
Username for logging in to the DR database.
Database Password
Password for the database username.
Note
The IP address, domain name, username, and password of the DR database are encrypted and stored in DRS and will be cleared after the task is deleted.
On the Configure DR page, specify flow control and click Next.
Table 8 DR settings¶ Parameter
Description
Flow Control
You can choose whether to control the flow.
Yes
You can customize the maximum DR speed.
In addition, you can set the time range based on your service requirements. The traffic rate setting usually includes setting of a rate limiting time period and a traffic rate value. Flow can be controlled all day or during specific time ranges. The default value is All day. A maximum of three time ranges can be set, and they cannot overlap.
The flow rate must be set based on the service scenario and cannot exceed 9,999 MB/s.
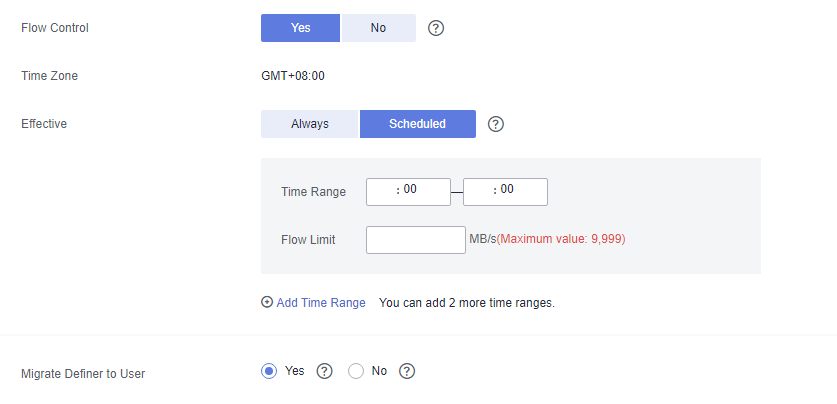
Figure 2 Flow control
No
The DR speed is not limited and the outbound bandwidth of the source database is maximally used, which causes read consumption on the source database accordingly. For example, if the outbound bandwidth of the source database is 100 MB/s and 80% bandwidth is used, the I/O consumption on the source database is 80 MB/s.
Note
Flow control mode takes effect during the initial DR phase only.
You can also change the flow control mode when the task is in the Configuration state. On the Basic Information tab, In the DR Information area, click Modify next to Flow Control. In the dialog box that is displayed, change the flow control mode. The flow control mode cannot be changed for a task that is in Starting state.
Migrate Definer to User
Yes
The Definers of all source database objects will be migrated to the user. Other users do not have permissions for database objects unless these users are authorized. For details on authorization, see How Do I Maintain the Original Service User Permission System After Definer Is Forcibly Converted During MySQL Migration?
No
The Definers of all source database objects will not be changed. You need to migrate all accounts and permissions of the source database in the next step.
On the Check Task page, check the DR task.
If any check fails, review the failure cause and rectify the fault. After the fault is rectified, click Check Again.
If the check is complete and the check success rate is 100%, go to the Compare Parameter page.
Note
You can proceed to the next step only when all checks are successful. If there are any items that require confirmation, view and confirm the details first before proceeding to the next step.
On the Confirm Task page, specify Start Time and DR instance details. Then, click Submit.
Table 9 Task and recipient description¶ Parameter
Description
Start Time
Set Start Time to Start upon task creation or Start at a specified time based on site requirements.
Note
Starting a DR task may slightly affect the performance of the service and DR databases. You are advised to start a DR task during off-peak hours.
After the DR task is submitted, view and manage it on the Disaster Recovery Management page.
You can view the task status. For more information about task status, see Task Statuses.
You can click
 in the upper-right corner to view the latest task status.
By default, DRS retains a task in the Configuration state for three days. After three days, DRS automatically deletes background resources, but the task status remains unchanged. When you reconfigure the task, DRS applies for resources for the task again.