Migrating Data from OBS to DLI
Scenario
DLI is a fully hosted big data query service. This section describes how to use CDM to migrate data from OBS to DLI. The procedure includes four steps:
Prerequisites
You have enabled OBS and DLI and have the permissions to read data from OBS.
You have created resource queues, databases, and tables on DLI.
Creating a CDM Cluster
Create a CDM cluster.
In this scenario, if the CDM cluster is used only to migrate data from OBS to DLI and does not need to migrate data of other data sources, there is no special requirements on the VPC, subnet, and security group of the CDM cluster. You can specify them based on your needs. CDM accesses DLI and OBS through the intranet. The flavor of the CDM cluster is selected based on the amount of data to be migrated. Generally, cdm.medium meets the requirements for most migration scenarios.
Creating a DLI Link
Click Job Management in the Operation column of the CDM cluster. On the displayed page, click the Links tab and then Create Link. The Select Connector page is displayed.
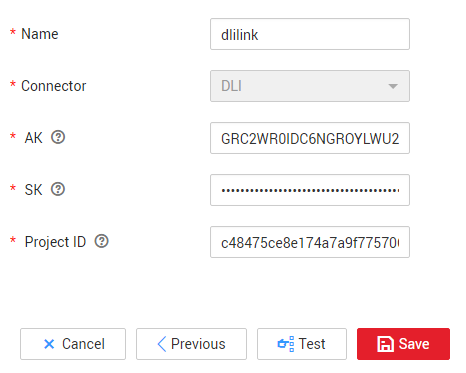
Select Data Lake Insight, click Next, and configure the DLI link parameters. See Figure 1.
Name: Enter a custom link name, for example, dlilink.
AK and SK: Enter the AK and SK used for accessing the DLI database.
Project ID: Enter the project ID of the region to which DLI belongs.

Figure 1 Creating a DLI link
Click Save. The Link Management page is displayed.
Creating an OBS Link
Click Job Management in the Operation column of the CDM cluster. On the displayed page, click the Links tab and then Create Link. The Select Connector page is displayed.

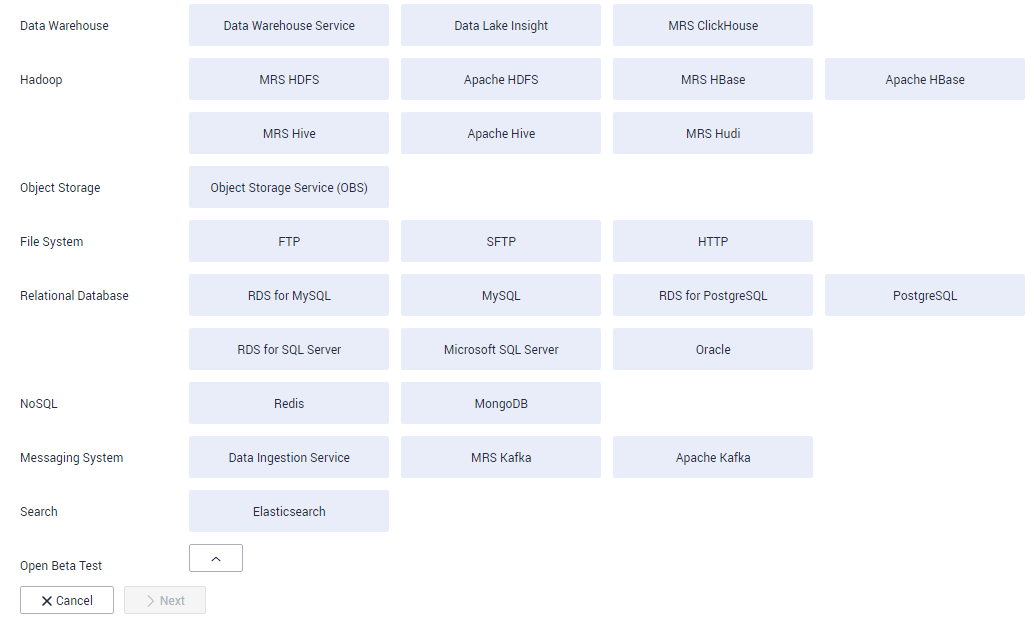
Figure 2 Selecting a connector type
Select Object Storage Service (OBS) and click Next to configure parameters for the OBS link.
Name: Enter a custom link name, for example, obslink.
OBS Server and Port: Enter the actual OBS address information.
AK and SK: Enter the AK and SK used for logging in to OBS.
To obtain an access key, perform the following steps:
Log in to the management console, move the cursor to the username in the upper right corner, and select My Credentials from the drop-down list.
On the My Credentials page, choose Access Keys, and click Create Access Key. See Figure 3.

Figure 3 Clicking Create Access Key
Click OK and save the access key file as prompted. The access key file will be saved to your browser's configured download location. Open the credentials.csv file to view Access Key Id and Secret Access Key.
Note
Only two access keys can be added for each user.
To ensure access key security, the access key is automatically downloaded only when it is generated for the first time and cannot be obtained from the management console later. Keep them properly.
Click Save. The Link Management page is displayed.
Creating a Migration Job
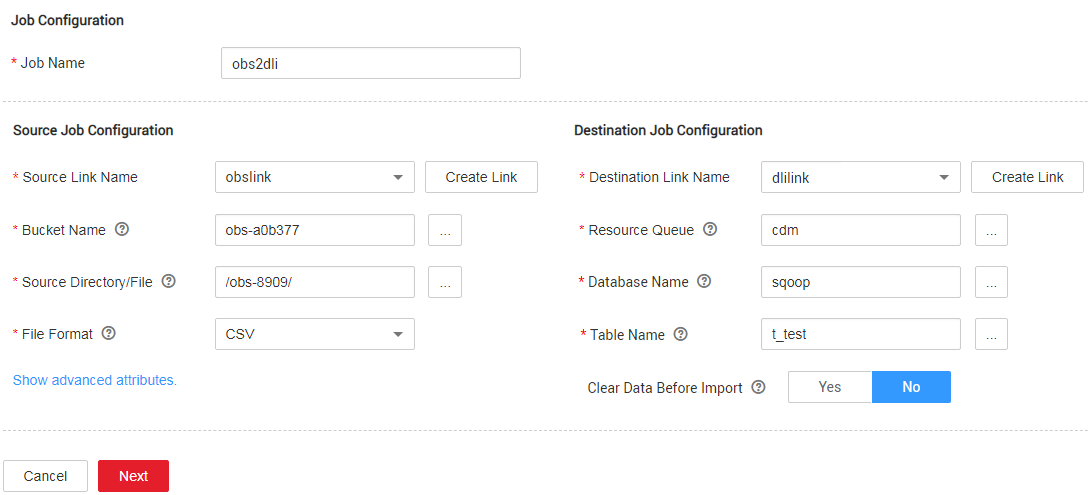
Choose Table/File Migration > Create Job to create a job for migrating data from OBS to DLI. See Figure 4.

Figure 4 Creating a job for migrating data from OBS to DLI
Job Name: Enter a custom job name.
Source Link Name: Select the obslink link created in Creating an OBS Link.
Bucket Name: Select the bucket from which the data is to be migrated.
Source Directory/File: Set this parameter to the path of the data to be migrated.
File Format: Select CSV or JSON for transferring files to a data table.
Retain the default values of the optional parameters in Show Advanced Attributes.
Destination Link Name: Select the dlilink link created in Creating a DLI Link.
Resource Queue: Enter the resource queue to which the destination table belongs.
Database Name: Enter the name of the database to which data is to be written.
Table Name: Enter the name of the table to which data is to be written. CDM cannot automatically create tables on DLI. The table must be created on DLI in advance, and the field types and formats of the table must be consistent with those of the data to be migrated.
Clear Before Importing Data: Choose whether to clear data in the destination table before data import. In this example, retain the default value.
Click Next. The Map Field page is displayed. CDM automatically matches the source and destination fields.
If the field mapping is incorrect, you can drag the fields to adjust the mapping.
CDM supports field conversion during the migration.
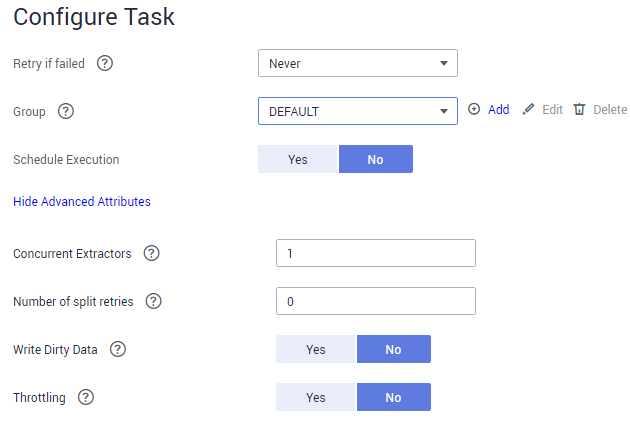
Click Next and set task parameters. Generally, retain the default values of all parameters.
In this step, you can configure the following optional functions:
Retry If Failed: Determine whether to automatically retry the job if it fails. Retain the default value Never.
Group: Select the group to which the job belongs. The default group is DEFAULT. On the Job Management page, jobs can be displayed, started, or exported by group.
Schedule Execution: Determine whether to automatically execute the job at a scheduled time. Retain the default value No in this example.
Concurrent Extractors: Enter the number of concurrent extractors. An appropriate value improves migration efficiency. Retain the default value 1.
Write Dirty Data: Specify this parameter if data that fails to be processed or filtered out during job execution needs to be written to OBS for future viewing. Before writing dirty data, create an OBS link on the CDM console. Retain the default value No so that dirty data is not recorded.

Figure 5 Configuring the task
Click Save and Run. The Job Management page is displayed, on which you can view the job execution progress and result.
After the job is successfully executed, in the Operation column of the job, click Historical Record to view the job's historical execution records and read/write statistics.
On the Historical Record page, click Log to view the job logs.