Migrating an Entire MySQL Database to RDS
Scenario
This section describes how to migrate the entire on-premises MySQL database to RDS using the CDM's entire DB migration function.
Currently, CDM can migrate the entire on-premises MySQL database to RDS for MySQL, RDS for PostgreSQL, or RDS for SQL Server. The following describes how to migrate the entire database to RDS. The procedure is as follows:
Prerequisites
You have sufficient EIP quota.
You have obtained an RDS database instance and the database engine of this instance is MySQL.
The on-premises MySQL database can be accessed through the public network. If the MySQL database is deployed on an on-premises data center or a third-party cloud, ensure that an IP address that can be accessed from the public network has been configured for the MySQL database, or the VPN or Direct Connect between the on-premises data center and the cloud service platform has been established.
You have obtained the IP addresses, names, usernames, and passwords of the on-premises MySQL database and RDS for MySQL.
You have uploaded a MySQL database driver by following the instructions provided in Managing Drivers.
Creating a CDM Cluster and Binding an EIP to the Cluster
Create a CDM cluster by following the instructions in Creating a Cluster.
The key configurations are as follows:
The flavor of the CDM cluster is selected based on the amount of data to be migrated. Generally, cdm.medium meets the requirements for most migration scenarios.
The CDM cluster and the RDS for MySQL instance must be in the same VPC. In addition, it is recommended that the CDM cluster be in the same subnet and security group as the RDS for MySQL instance.
If the same subnet and security group cannot be used for security purposes, ensure that a security group rule has been configured to allow the CDM cluster to access the RDS for MySQL instance.
After the CDM cluster is created, on the Cluster Management page, click Bind EIP in the Operation column to bind an EIP to the cluster. The CDM cluster uses the EIP to access the on-premises MySQL database.

Figure 1 Cluster list
Note
If SSL encryption is configured for the access channel of a local data source, CDM cannot connect to the data source using the EIP.
Creating a MySQL Link
On the Cluster Management page, locate a cluster and click Job Management in the Operation column. On the displayed page, click the Links tab and then Create Link.
Select MySQL and click Next. On the page that is displayed, configure MySQL link parameters.
Click Show Advanced Attributes and set optional parameters. For details, see Link to a Common Relational Database. Retain the default values of the optional parameters and configure the mandatory parameters according to Table 1.
Table 1 MySQL link parameters¶ Parameter
Description
Example Value
Name
Unique link name
mysqllink
Database Server
IP address or domain name of the MySQL database server
192.168.1.110
Port
MySQL database port
3306
Database Name
Name of the MySQL database
sqoop
Username
User who has the read, write, and delete permissions on the MySQL database
admin
Password
Password of the user
-Use Agent
Whether to extract data from the data source through an agent
Yes
Agent
Click Select to select the agent created in Connecting to an Agent.
-Click Save. The Link Management page is displayed.
Note
If an error occurs during the saving, the security settings of the MySQL database are incorrect. In this case, you need to enable the EIP of the CDM cluster to access the MySQL database.
Creating an RDS Link
Click Job Management in the Operation column of the CDM cluster. On the displayed page, click the Links tab and then Create Link. The Select Connector page is displayed.
Select RDS for MySQL and click Next to configure parameters for the RDS for MySQL link.
Name: Enter a custom link name, for example, rds_link.
Database Server and Port: Enter the address information about the RDS for MySQL database.
Database Name: Enter the name of the RDS for MySQL database.
Username and Password: Enter the username and password used for logging in to the database.
Note
During RDS link creation, if Use Local API in Show Advanced Attributes is set to Yes, you can use the LOAD DATA function provided by MySQL to speed up data import.
The LOAD DATA function is disabled by default on RDS for MySQL, so you need to modify the parameter group of the MySQL instance and set local_infile to ON to enable this function.
If the local_infile parameter group cannot be edited, it is the default parameter group. You need to create a parameter group and modify its value, and apply it to the MySQL instance of RDS.
Click Save. The Link Management page is displayed.
Creating an Entire DB Migration Job
After the two links are created, choose Entire DB Migration > Create Job to create a migration job. See Figure 2.
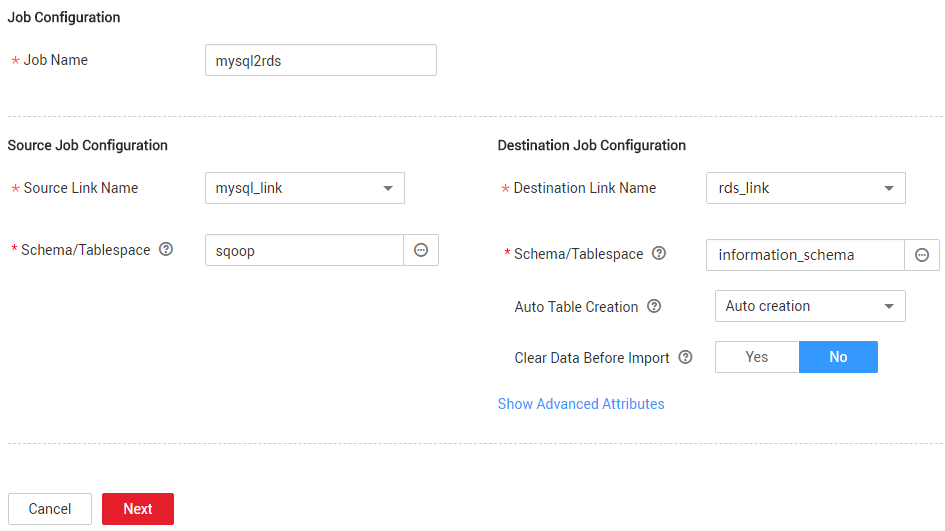
Figure 2 Creating an entire DB migration job
Job Name: Enter a name for the entire DB migration job.
Source Job Configuration
Source Link Name: Select the mysql_link link created in Creating a MySQL Link.
Schema/Tablespace: Select the on-premises MySQL database from which data is to be exported.
Destination Job Configuration
Destination Link Name: Select the rds_link link created in Creating an RDS Link.
Schema/Tablespace: Select the name of the RDS database to which data is to be imported.
Auto Table Creation: Select Auto creation, which indicates that CDM automatically creates tables in the RDS database when tables of the on-premises MySQL database do not exist in the RDS database.
Clear Data Before Import: Select Yes, which indicates that when a table with the same name as the table in the on-premises MySQL database exists in the RDS database, CDM clears data in the table on RDS.
Retain the default values of the optional parameters in Show Advanced Attributes.
Click Next. The page for selecting tables to be migrated is displayed. You can select all or part of tables to migrate.
Click Save and Run and CDM immediately starts the entire DB migration job.
When the job starts running, a sub-job will be generated for each table. You can click the job name to view the sub-job list.
In the Operation column of the job, click Historical Record to view the job's historical execution records and read/write statistics.
There are no logs for the entire DB migration job. However, the sub-jobs have logs. On the Historical Record page of the sub-jobs, click Log to view the job logs.